• Skip to primary navigation
  • Skip to main content
  • Skip to primary sidebar
Woodshop Diaries
  • Shop
  • About
    • Work With Me
    • Frequently Asked Questions
  • DIY Projects
    • DIY Furniture Plans
      • DIY Bed Plans
      • DIY Dresser Plans
      • DIY Nightstand Plans
      • DIY Desk Plans
      • DIY TV Stand Plans
      • Coffee and Side Table Plans
      • Tables
      • Shelves and Bookcase Plans
      • DIY Storage Trunk Plans
      • DIY Bench Plans
      • DIY Storage Cabinet Plans
      • DIY Bathroom Vanity Plans
      • Kids Projects and Furniture
    • DIY Scrap Wood Projects
    • DIY Workshop Projects
    • DIY Home Decor Projects
  • Getting Started
    • Cabinet Building
    • Woodworking Basics
    • Furniture Finishing Tips
    • Tool Guides & Reviews
  • Blog
    • Facebook
    • Instagram
    • Pinterest
    • YouTube
menu icon
go to homepage
search icon
Homepage link
  • DIY Furniture Projects
  • Easy DIY Projects
  • Shop
  • Browse Projects by Category
  • Woodworking Tips
  • About
    • Facebook
    • Instagram
    • Pinterest
    • YouTube
  • ×
    Home » Furniture

    Hoosier cabinet part 3…the final reveal

    October 15, 2014 by Shara, Woodshop Diaries

    We last left off with the cabinet looking like this:

    IMG_1684.JPG

    IMG_1698.JPG

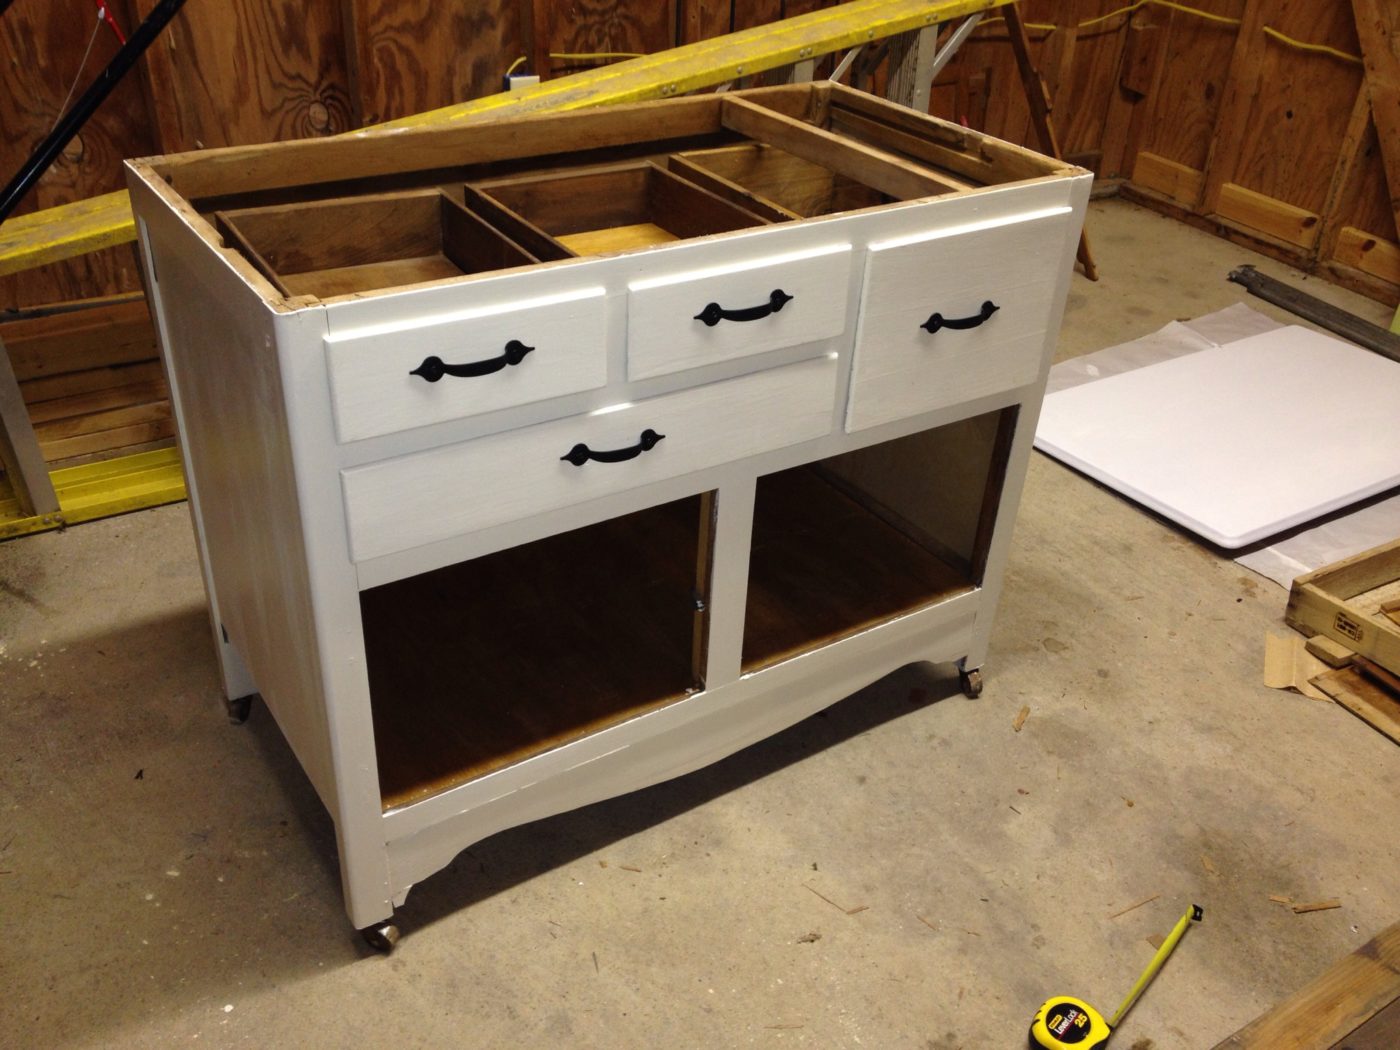
    It’s come a long way, but it still had a lot to be finished. I tend to not be able to focus on one thing at a time…well at least while I’m crafting. So instead of logically finishing the next step–the cabinet doors–I first decide to paint the countertop.

    I looked all over the internet for ideas on how to paint porcelain enamel. I didn’t have much luck, so I figured I couldn’t make it look much worse so I just experimented. Since I don’t plan to be rough with it, I decided I’d take my chances on it chipping.

    I scrubbed it as long and hard as I could with sand paper…until I got bored with sanding. (Didn’t take too long haha) Then I brushed on some latex primer (latex is NOT the best option, I know, but I already had some and I didn’t want to buy anything else). I put three or four (I can’t remember) coats of primer, and once it was dry, I lightly sanded and wiped it clean. Some of the primer scraped all the way off, so I had to touch up a few places. I never think to take enough pictures while I’m working, so I don’t have a pic of this step.

    Mom gave me a can of spray paint a while back because she bought one too many. It was black hammered metal and I thought I’d never have a good use for it, but I took it anyway. It was the perfect color! I sprayed several coats and I loved it!

    IMG_1703.JPG

    IMG_1704.JPG

    I liked it so much, I took the old rusty hinges from the original doors and sprayed them too…saved me from buying new ones haha. I’m so cheap.

    IMG_1702.JPG

    Once the hinges were dry, I put the doors back on, touched up some places with paint and convinced Danny to help me bring it inside so I could get a picture of it all together 🙂

    IMG_1714.JPG

    Tada! Here she is!

    IMG_1717.JPG

    I’m happy with it, but I can’t decide if I’m finished. I’ve been debating whether I should distress it a little or put some antique glaze on it. We are moving in about a month. I may wait until we get into the new house and see what it looks like before I make any changes.

    Keep eyes and ears open..,I’m betting this isn’t the last time you’ll see this cabinet 🙂 I can’t seem to ever be done with it!

    « Hoosier cabinet part 2
    Our new home…the pros and cons »

    Related Posts

    DIY Chunky Outdoor Chair
    13 Easy DIY Projects for Fall
    How to Buy Lumber for Your DIY Projects

    Primary Sidebar

    Hi! I'm Shara, the designer, maker, and videographer behind Woodshop Diaries. Let's get building, friends :)

    Learn more →

    Woodworking Tips & Guides

    • How to make simple Shaker style cabinet doors!!
      DIY Simple Shaker Cabinet Doors
    • 5 Tools To Get Started Woodworking
    • DIY Kitchen Cabinets–From Only Plywood
    • How to Square Board Edges and Make Your Own 2x2s

    Footer

    ↑ back to top

    Tips to Take Your Projects to the Next Level

    --5 Secrets to Professional Looking DIY Furniture

    --How to Properly Paint Wood Furniture

    --How to EASILY Cover Plywood Edges

    --How to Sand Wood

    --10 Must Have Tools for Furniture and Cabinet Building

    Printable Building Plans

    Check out our shop to browse printable PDF building plans!

    Website Policies

    This website is for entertainment purposes. Using any information provided is to be at your own risk.

    This site uses cookies to provide you with a better experience.

    All images and text on this site are property of Woodshop Diaries, LLC. Please be respectful and don't steal this content.

    See Policies and Privacy page on this site for more information.

    Want to get in touch? Contact Us Here

    Copyright © 2026