Interested in making a unique DIY Floor Mirror? This project is for you 😉 This post is sponsored by The Home Depot as part of the ProSpective Tool Review Program.

This post also contains affiliate links. See policies page.
.
I’m not much of a fashionista. My outfit typically consists of jeans, sneakers, and some sort of woodworking t-shirt haha. But, before this project, if I ever wanted to look at my outfit from head to toe, I had to ask my husband to take my picture on my phone and that served as my mirror. Please tell me I’m not the only one who does that??
.
It’s not exactly ideal, so I decided I needed to make a floor mirror so I could quit relying on my husband’s poor photography skills to tell me if my shoes match my shirt…

I wanted a really unique style mirror (what else is new?), so I made this one using brass dowels and some walnut boards to make the mirror look kind of like it’s floating in the frame. Also, I’m well aware that my mirror is still covered in dust despite the fact I cleaned it before taking these photos. *face palm*

So, if you’re ready to see how I put it together, let get to it. I’ve got the video for you here and the step by step right after 🙂
For this project, you will need:
(2) 1×3 boards
Diablo Wood and Metal Circular Saw Blade
½″ diameter brass dowel–I can’t find this online, but you can check your local metal supplier. OR you can use a steel rod (which is MUCH CHEAPER) and spray paint it to look like brass
½″ drill bit
Dowel Jig
Wood Dowel
Wood Glue
Adhesive Epoxy
Cut List:
(2) 1×3 boards @ 66″ long
(2) 1×3 boards @ 18″ long
Step 1: Trim Boards for DIY Floor Mirror Frame
The first thing I did for this project was determine the approximate size I wanted the mirror to be and trim the boards accordingly. I trimmed two pieces of walnut to 66” long and two pieces to 18” long. This made my mirror 66″ tall and 19 ½″ wide overall.

For this project, I used a circular saw with Diablo’s wood and metal blade to trim both the wood pieces and the brass dowels. It was nice to not have to switch blades back and forth as I switched back and forth between cutting wood and cutting metal.

Once my walnut was trimmed to size, I laid it out on my workbench to see how long I wanted to make the brass dowels for the mirror. But then, basically, because I’m incredibly indecisive, I just decided that I didn’t like the boards this wide, so I ripped them in half.

The boards were originally about 6” wide, so I ripped them down on my table saw to about 2 ¾” wide. If you are purchasing standard dimensional lumber for this project, you can use 1x3s and be pretty close to the same size boards I ended up with here.

Funny thing, once I trimmed these down, I still thought they were too wide, so I ended up turning them on their side haha. But you’ll see that later. Indecisiveness puts me on the struggle bus.
Step 2: Cut Brass Dowels to Hold Floor Mirror in Place
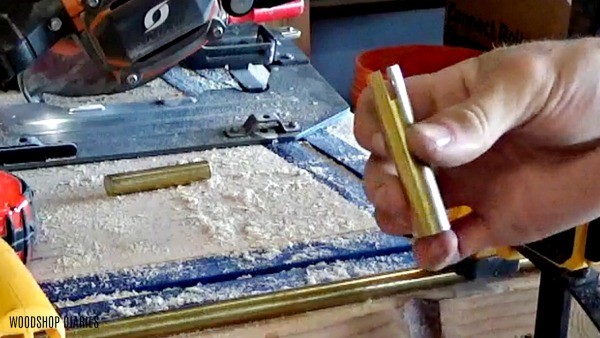
Once I had my boards ready to go, I started working on my dowels. I needed to cut slots in the center of the dowels for the mirror to fit down into to hold it in place. For this, I made a simple jig from some scrap wood. Since I was using a ½” diameter dowel rod, I used a ½” drill bit to drill a hole in the center of a piece of 2x scrap I had lying around.

Then I used my circular saw to cut this piece along the middle of this hole.

Now, I could place the brass dowel in the hole and clamp it in place in the jig.

I flipped this over, clamped the jig to my workbench and drew a line down the center of the dowel. I set my blade depth to cut ½” and cut along the center line through the wood jig and the brass dowel. That’s another cool thing about the wood and metal blade I am using here. I can cut straight through wood right into metal without any problems.

Since I was purchasing an ⅛” mirror, I needed to make sure my slot was slightly larger than ⅛”. The blade itself is slightly less than ⅛”, so I cut a little more out by running the saw slightly to the left and slightly more to the right of this first cut until I had about 3/16-¼” wide. Once the first cut is made, it’s easy to follow these cuts for the rest of the dowels to keep the slots the same size.

Once I cut the slot, I clamped the dowel securely to my workbench, then trimmed the end of the dowel with the slot to 2 ½” long and sanded the rough edges. I did this for 6 dowels total–cutting the slot, then trimming off that end, cutting the slot, then trimming off that end, etc. Again, using the same blade 🙂 I hate changing out blades, so this worked out really well haha.


Step 3: Attach the Dowels into the Mirror Frame
Then, I moved on to attaching these dowels in place. I used my ½” drill bit again to drill holes in the center of the top and bottom mirror frame pieces and in two places on each of the side pieces about 16″ from the ends.

It’s important to drill these as close to perpendicular as possible so your dowels aren’t crooked when you glue them in place. It’s also important to drill these holes in the CENTER of the board front to back. If they aren’t the same, one may cause strain on the mirror and cause it to crack or break.
.
After I drilled all the holes, I taped them and poured in some general purpose 1:1 epoxy to glue these dowels in place. Side note: the tape definitely leaked some, so be careful and don’t epoxy your board to your workbench haha.

I made sure that these were nice and square and that the slots were running parallel to the board and them let them cure.

Step 5: Assemble DIY Floor Mirror Frame
After the epoxy had cured, I gave everything a good sanding and finished the boards with Walrus Oil furniture wax. It’s easier to finish now than after the mirror is in place.
.
Then, I drilled dowel holes to assemble the frame together. I attached the top and bottom pieces to one side piece with wood glue and dowels, then test fit everything before gluing on the last piece.

NOTE: If you wanted to use wood glue and screws, or pocket holes instead of dowels, that would work fine, too. Just make sure that you put your pocket holes on the OUTSIDE of the frame because you won’t be able to get to them on the inside with the mirror in place.
.
I ordered an ⅛” thick mirror that was 2 ½” shorter and 2 ½” narrower than my inside mirror frame opening (so 62″ x 15 ½″ ish…double check your own before ordering) from my local glass shop. I slid it into the slots like shown to test fit everything together before allowing the glue the dry.

Then, I CAREFULLY attached the last piece using dowels and wood glue and lightly clamped while the glue dried. It was really nerve wracking to assemble this with the mirror in the middle. Every tap of the hammer and every twist of the clamp I was so worried I would chip or break the mirror.


But luckily, it all turned out fine and once the glue was dry, I wiped it clean and brought it inside.

I really like the simple, modern style of this mirror and it looks great leaning up against the wall in our garage apartment.

But the best part of all is that I don’t have to ask Danny to take my picture every time I want to check my outfit anymore. #WORTHIT
.
So if you like this project and want to give it a try, be sure to check out the YouTube video tutorial here AND be sure to pin this for later. And stay tuned for plenty more fun projects coming at you soon!

Until next time, happy building! 😊


