• Skip to primary navigation
  • Skip to main content
  • Skip to primary sidebar
Woodshop Diaries
  • About
    • Work With Me
  • DIY Projects
    • DIY Furniture Plans
      • DIY Bed Plans
      • DIY Dresser Plans
      • DIY Nightstand Plans
      • DIY Desk Plans
      • DIY TV Stand Plans
      • Coffee and Side Table Plans
      • Tables
      • Shelves and Bookcase Plans
      • DIY Storage Trunk Plans
      • DIY Bench Plans
      • DIY Storage Cabinet Plans
      • DIY Bathroom Vanity Plans
      • Kids Projects and Furniture
    • DIY Scrap Wood Projects
    • DIY Workshop Projects
    • DIY Home Decor Projects
  • Shop
  • DIY Basics–Tips & Tools
    • Cabinet Building
    • Woodworking Basics
    • Furniture Finishing Tips
    • Tool Guides & Reviews
  • Blog
    • Facebook
    • Instagram
    • Pinterest
    • YouTube
menu icon
go to homepage
search icon
Homepage link
  • DIY Furniture Projects
  • Easy DIY Projects
  • Shop
  • Browse Projects by Category
  • Woodworking Tips
  • About
    • Facebook
    • Instagram
    • Pinterest
    • YouTube
  • ×

    Home » DIY

    DIY Grinch Pillow–A Pottery Barn Knock-Off

    December 6, 2016 by Shara, Woodshop Diaries

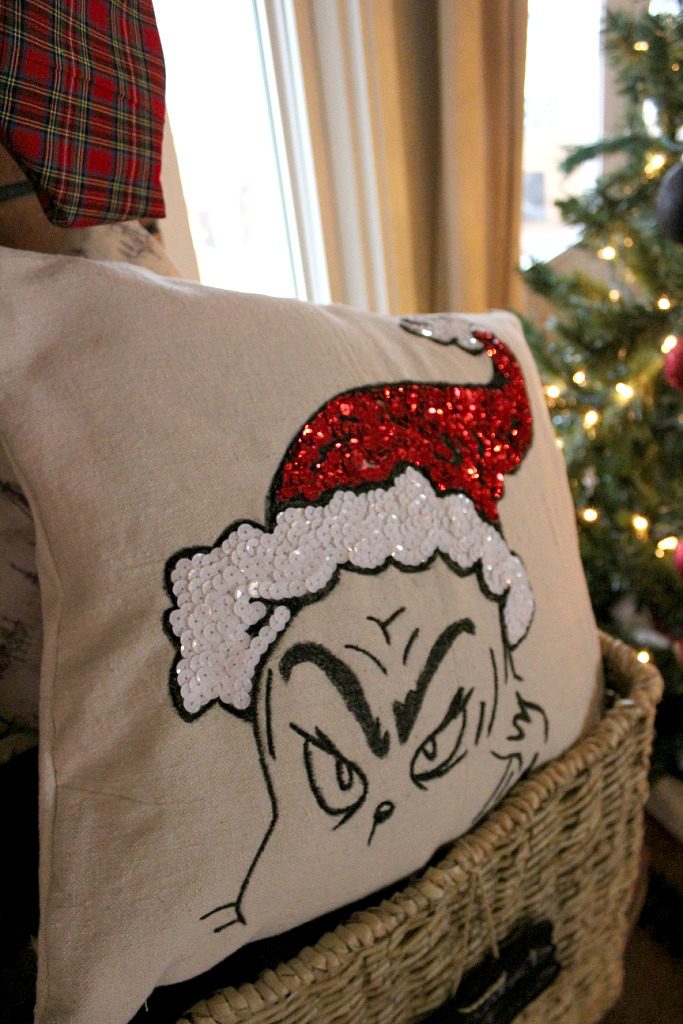
    In this post, I’m excited to share with you how to make this super fun DIY Grinch Pillow!!

    Close up of DIY Grinch Pillow Cover in basket by Christmas Tree

    But first, enjoy a super cheesy poem I wrote when I figured out that this Grinch pillow cover from Pottery Barn was too expensive–plus out of stock–when I figured out that’s what my sister wanted for her birthday. Or…skip the poem and scroll down for the how to 🙂

    .

    My favorite, only sister loves the Grinch a whole lot.

    I, on the other hand, do not.

    But she wanted this pillow with all it’s sequins and shine,

    I thought she was silly, the price was so high!

    .

    But, her birthday was coming and I knew what to wrap,

    I searched for the pillow, but they were all gone in a snap!

    What can I do, they are all sold out?

    So I brainstormed and pondered and let out a shout!

    .

    I can make one myself, I’m a DIYer after all.

    So I headed to the craft store right next to the mall.

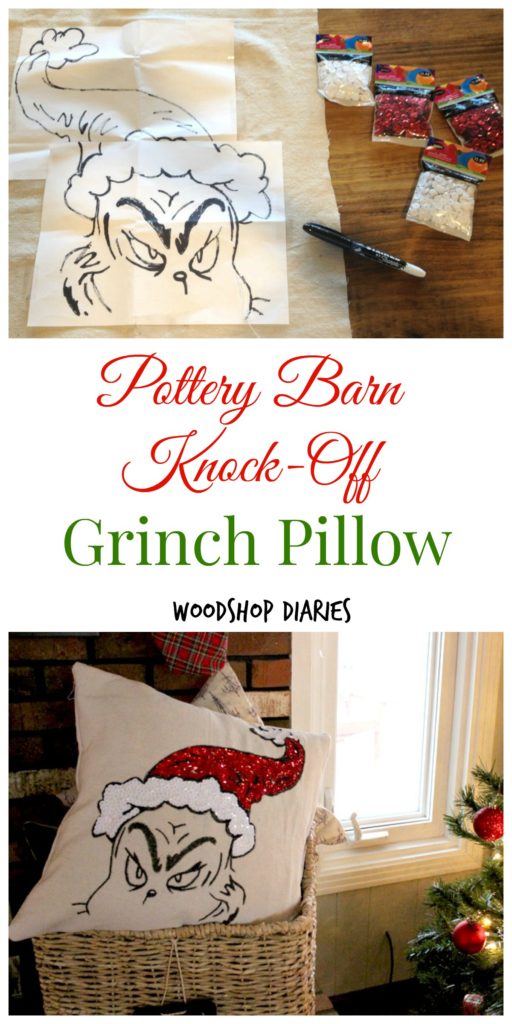
    I bought a few bags of sequins, red and white,

    And a Sharpie that on fabric it claimed to write.

    .

    I traced out a face with a Santa hat dangling,

    And my needle and thread repeatedly tangling,

    Hand stitching each and every tiny sequin with love,

    I sewed her a pillow cover that fit like a glove.

    .

    What’s better than store bought, you ask so sincerely,

    A homemade and thought felt gift, clearly.

    So I will show you how I made this cute cover,

    Just follow the steps and you will discover.

    .

    Okay, I’m done.  I can’t rhyme anymore.  There towards the end it got a little weird, so I figured I need to stop while I was ahead.

    .

    So when I saw that BUYING her this pillow cover wasn’t an option, I put my thinking cap on and decided to just make one.  It was super easy, just a little time consuming with ALL. THE. SEQUINS. But it’s totally worth it.  Trust me.

    .

    This post contains affiliate links for your convenience.  For more information, see disclosure policy.

    .

    To Make a Grinch Pillow, You Will Need:

    • Drop cloth (or other fabric of your choice for the pillow cover)
    • Scissors
    • Black Stained Sharpie pen 
    • A couple sheets of plain 8×11 paper
    • Clear tape
    • Red and white sequins (you’ll only need one bag of each. I used 8mm sequins from the craft store, but here is a link to some on Amazon if you’d rather buy online)
    • Red and white thread
    • Needle
    • Pins and sewing machine (if you don’t have a sewing machine you can hand sew instead)

    AND LOTS OF PATIENCE 🙂

    Materials needed to make DIY Grinch pillow cover

    Step 1: Create Grinch Pillow Cover Template

    I found the picture of the pillow on the website and copied it into a Microsoft Word document. I set the image to layer in front of text so I could adjust and move it around.

    .

    I sized the picture of the pillow in Word at 18″x18″.  Then I rotated it sideways and put only the bottom part of the picture on the blank page.  Make sure your view is zoomed to 100%.

    .

    I placed a blank sheet of paper on the screen and LIGHTLY (don’t damage your screen) traced the outline of the face.

    tracing template from computer screen
    Trace template from computer screen onto paper

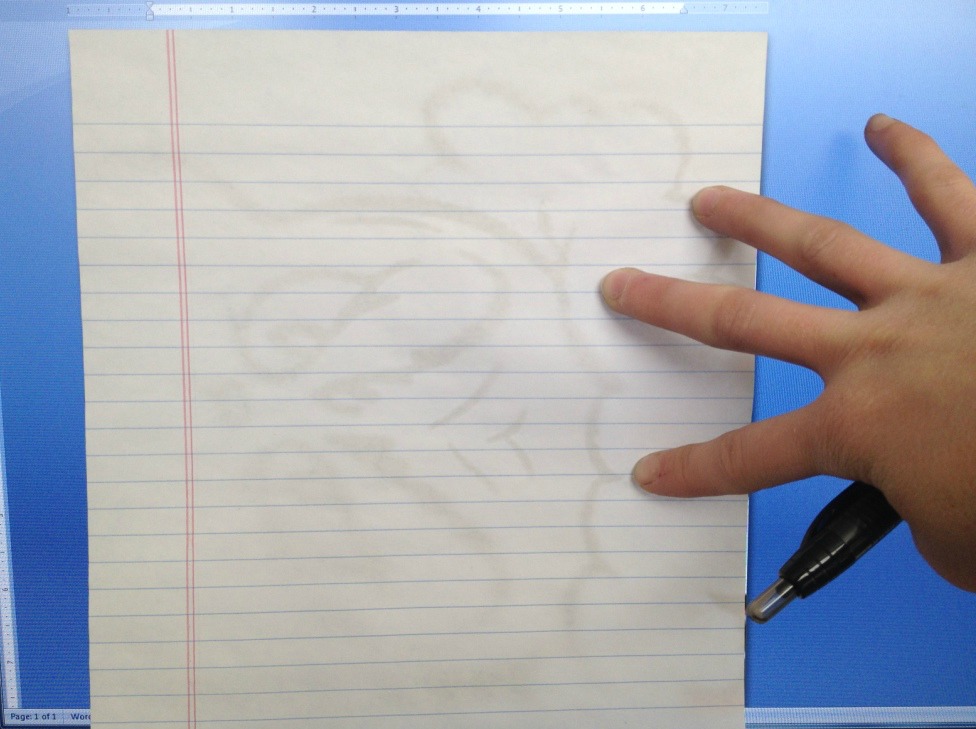
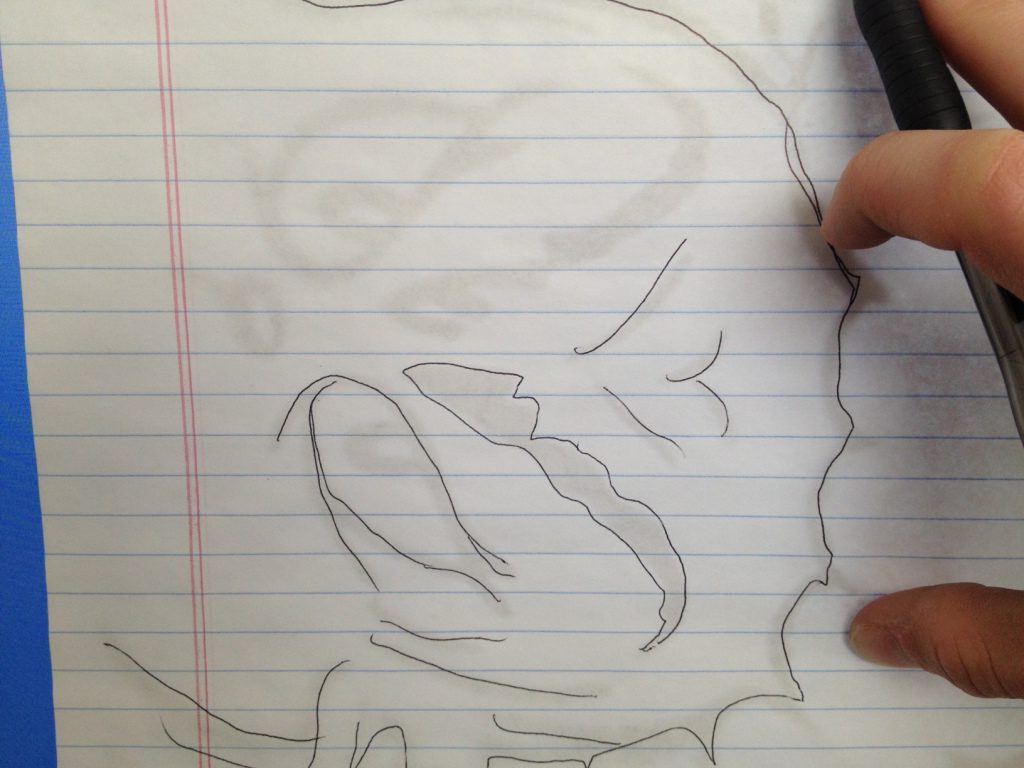
    Then I moved the picture so that the top part of the pillow was on the blank page and traced again on a new sheet of paper.

    Trace template from computer screen onto paper

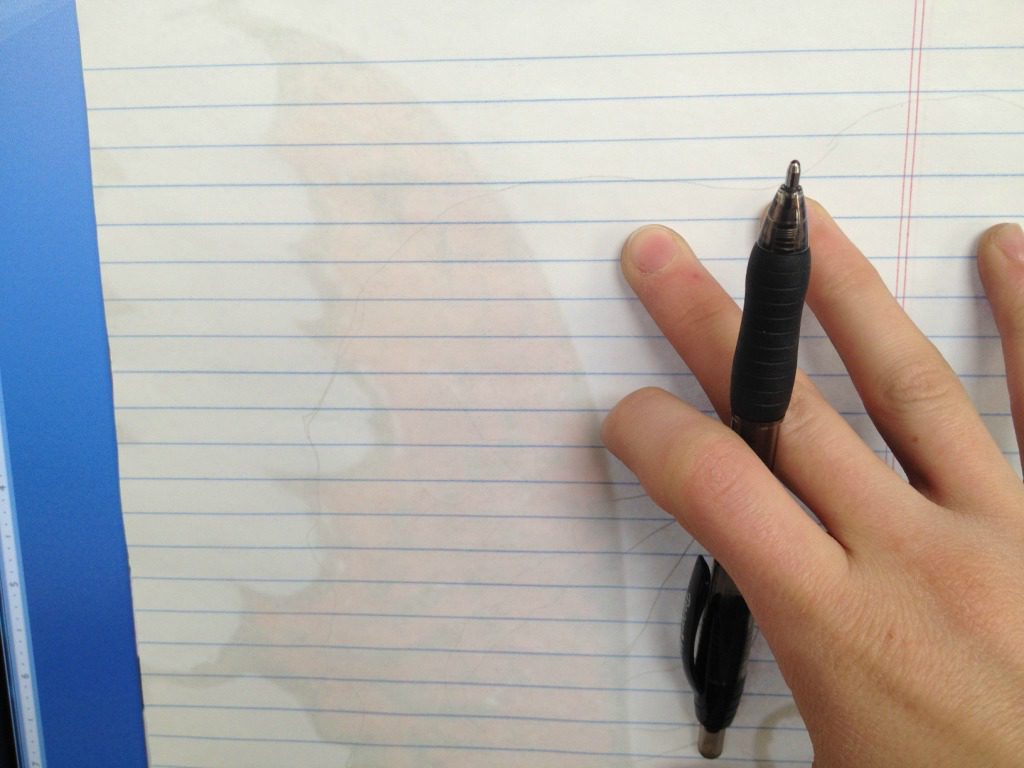
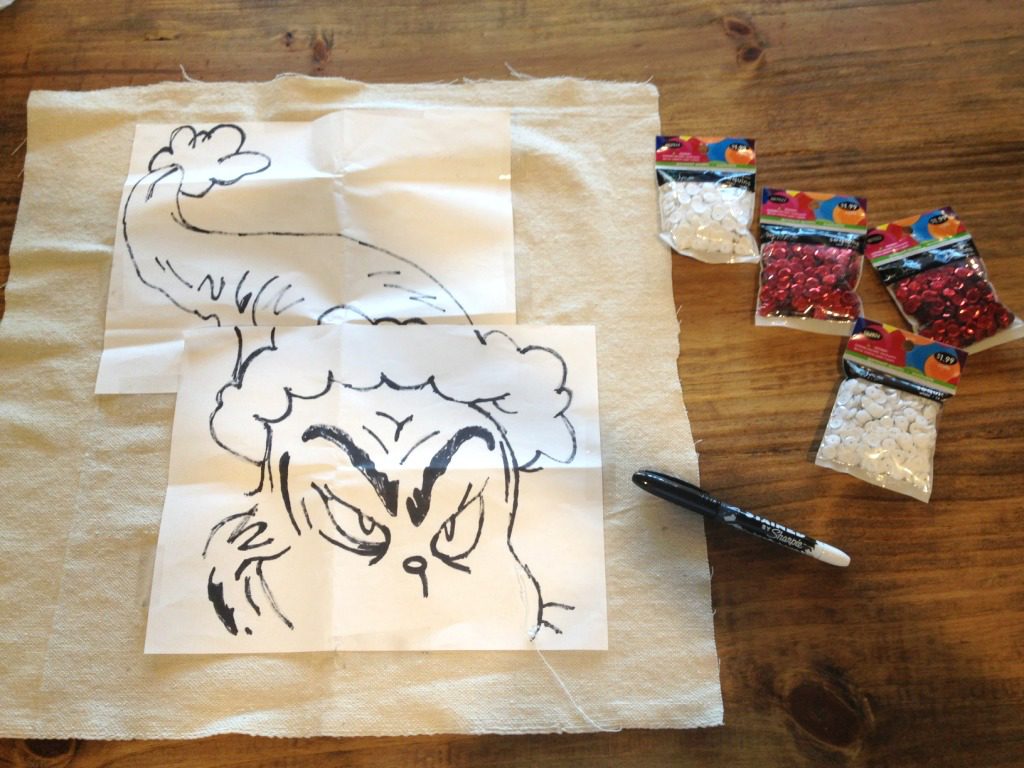
    Once I had it traced out, I lined it up and taped the pieces together and used a Sharpie marker to make the lines thick and dark.

    Grinch template on paper

    Step 2: Apply Template to DIY Grinch Pillow Cover Cloth

    I wanted an 18×18″ pillow cover, so I cut a piece of drop cloth material (I keep this on hand because it’s awesome for all kinds of projects) at about 18 ½×18 ½″ (leaving room to sew) and taped the drawing onto the back (notice I taped it so the image is mirrored).

    Grinch template on paper upside down on fabric

    Then I taped it onto my back door when the sun was shining bright outside and traced the image onto the drop cloth with a pen.  Ignore the cat…you’re lucky only one of them got in the picture haha.

    pillow fabric on back door to draw trace template

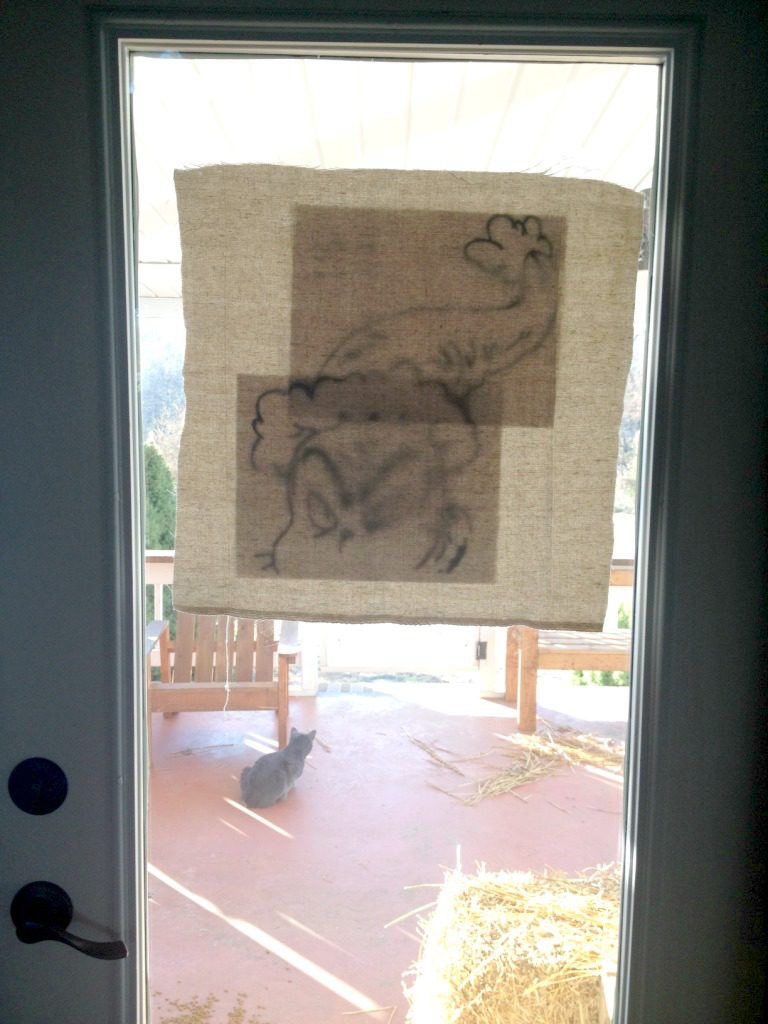
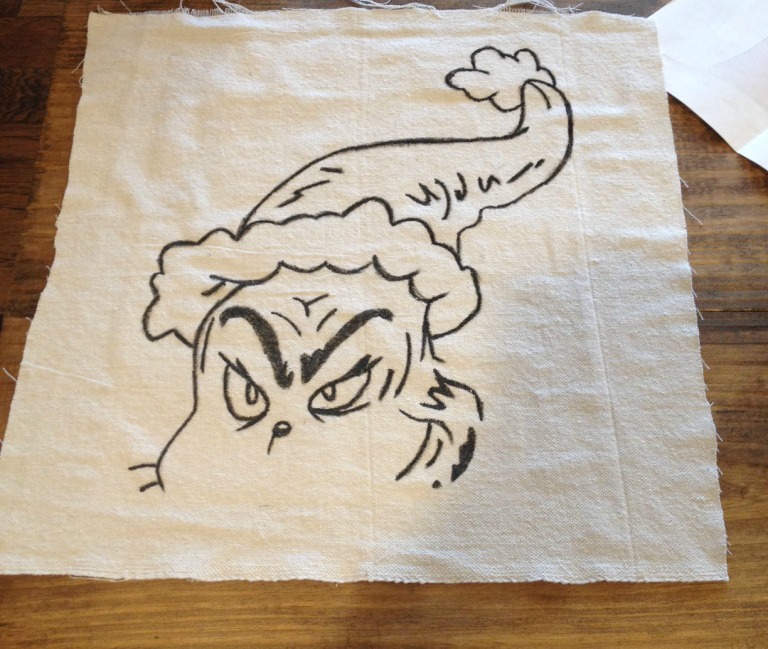
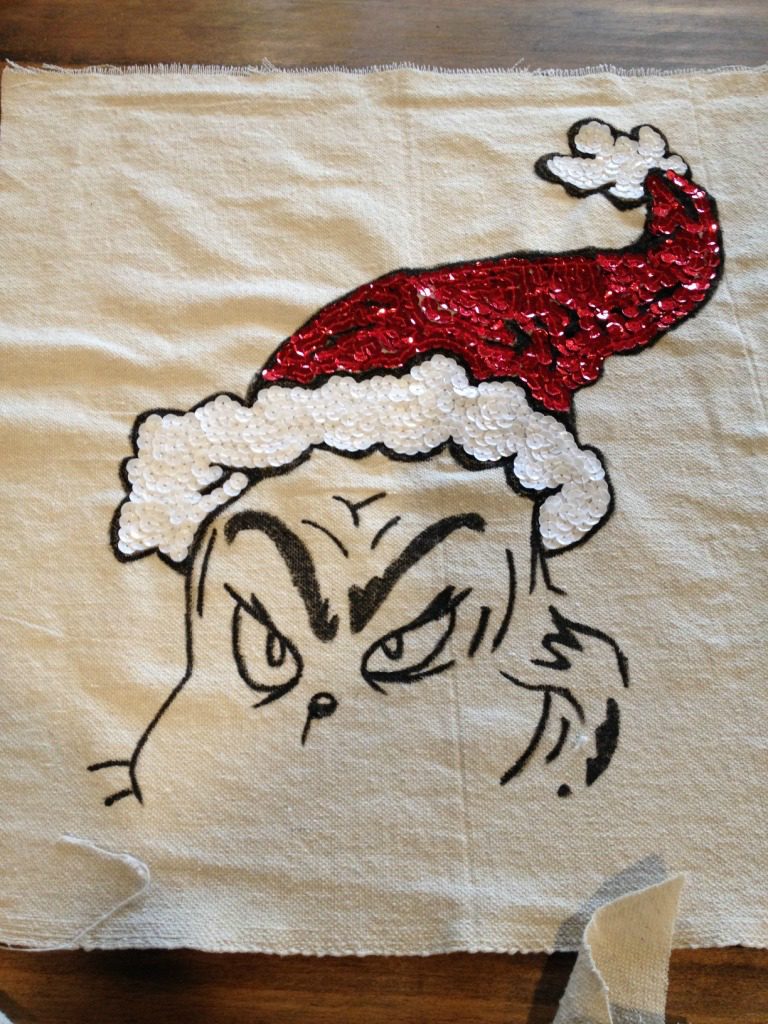
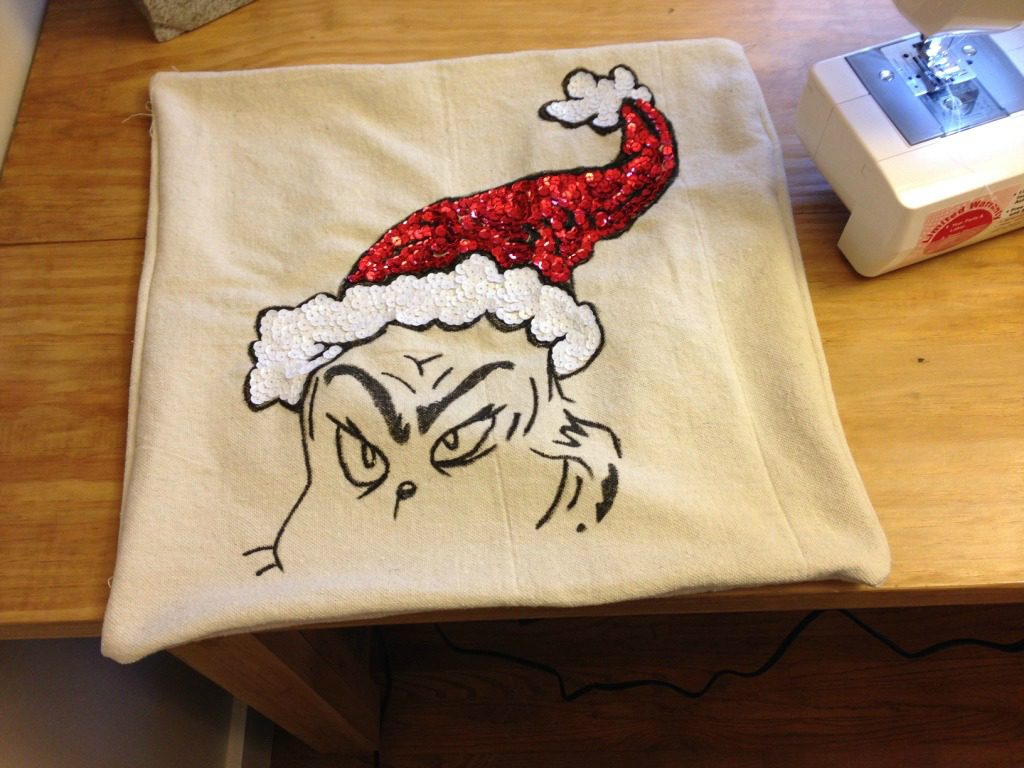
    I took it off the window and over to the kitchen table and used my Stained Sharpie pen to color in the lines.

    Grinch template applied to fabric

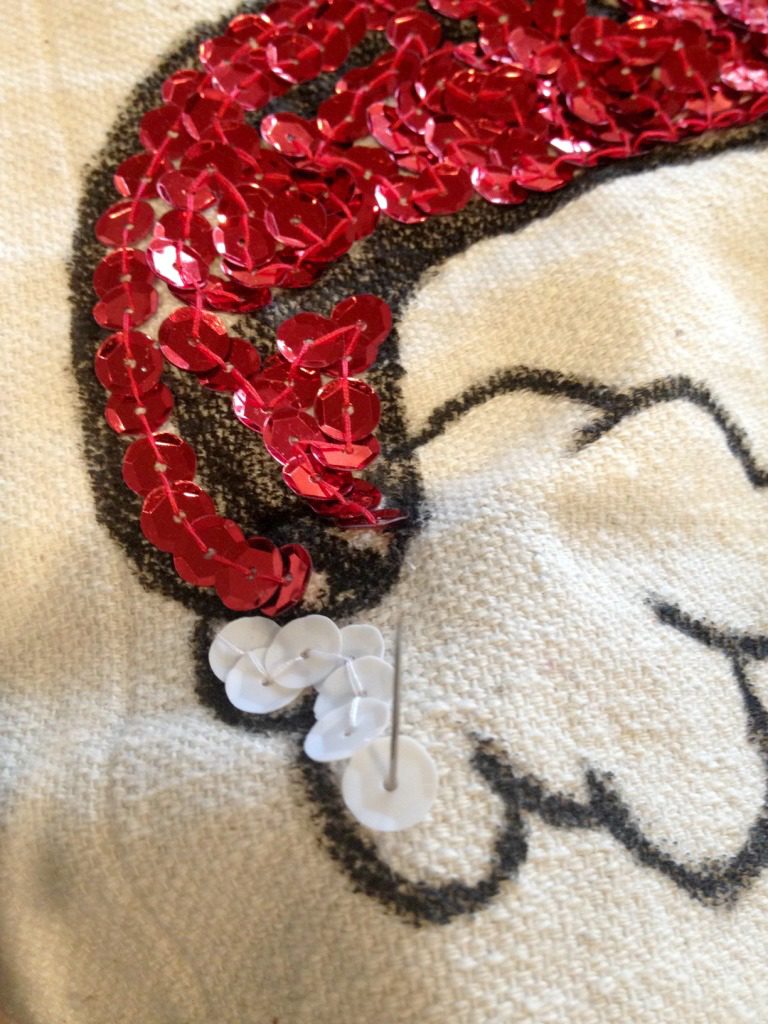
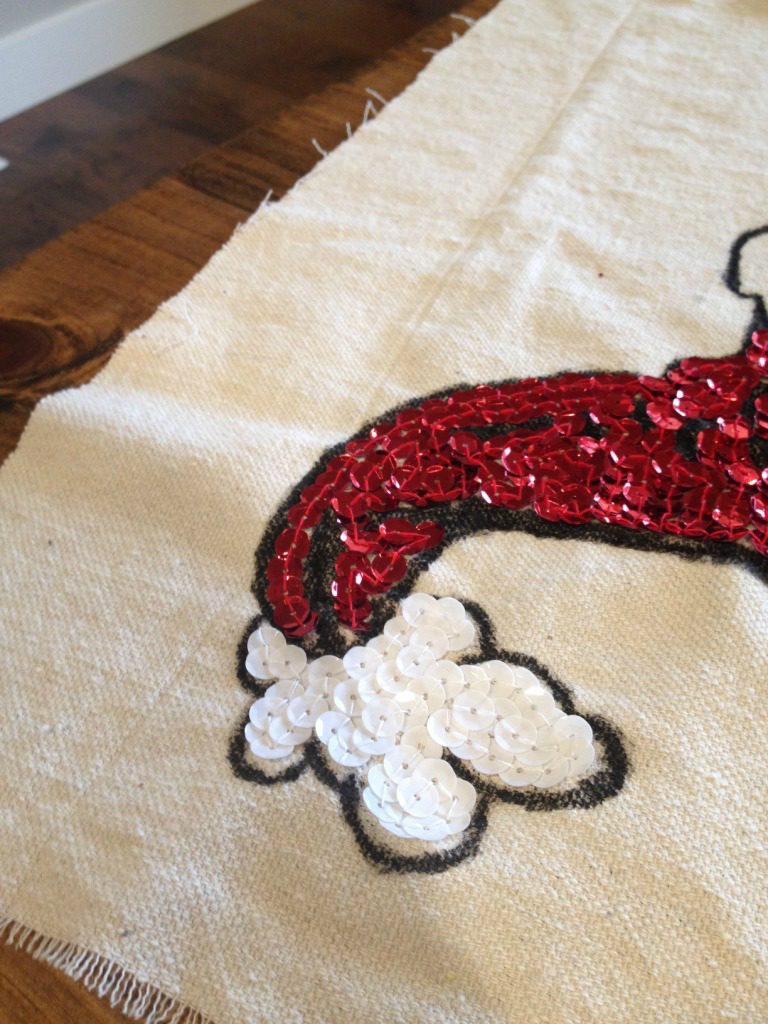
    Step 3: Sew on Sequins

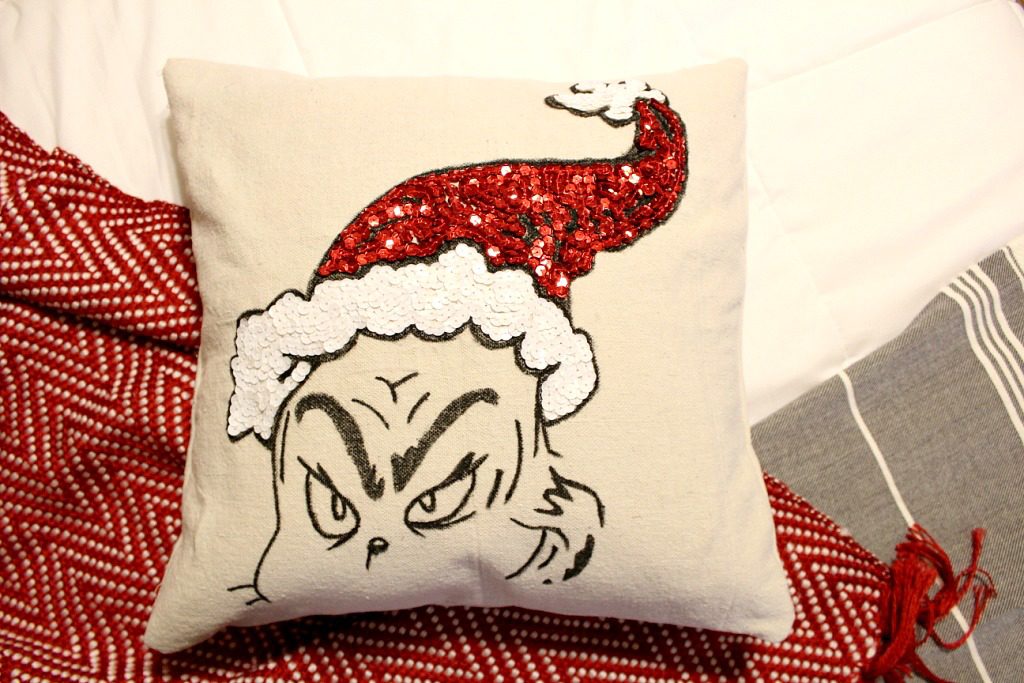
    Then I began hand stitching the sequins on inside the lines of the hat.  I used red thread for the red sequins and white thread for the white sequins.  I filled all the areas where there weren’t black lines.

    Red sequins completed using red spool of thread
    Close up of needed stitching sequins onto fabric
    Close up of red and white sequins on drop cloth material
    Close of of stitching sequins onto pillow cover
    Sequins sewn onto pillow cover front fabric

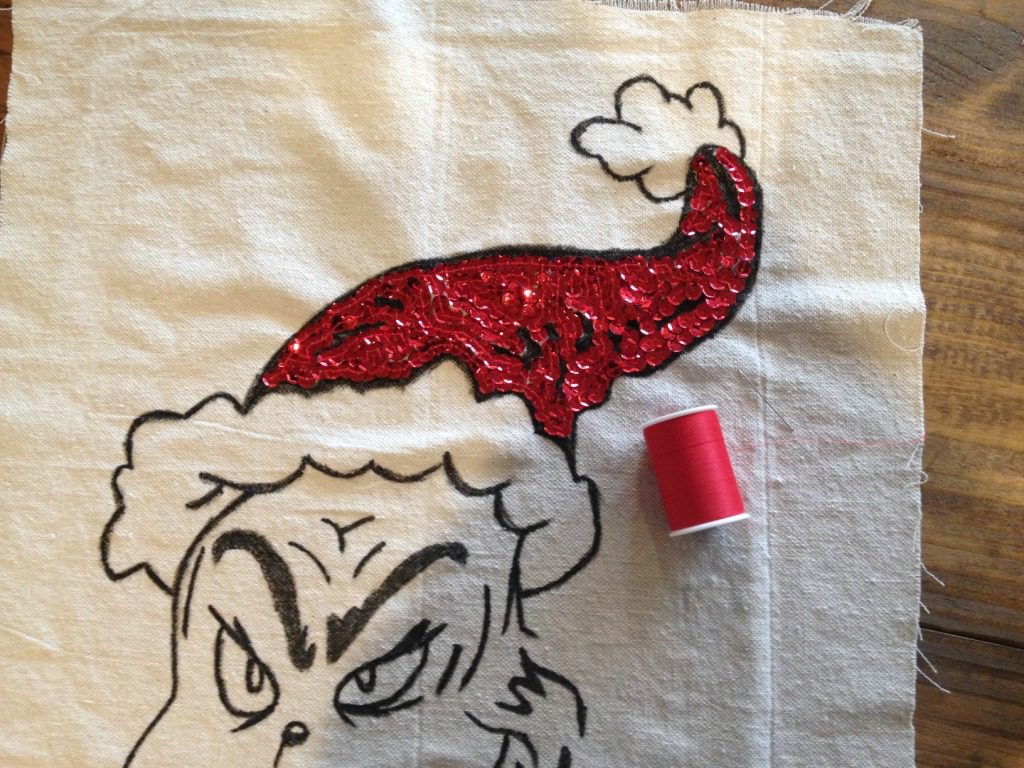
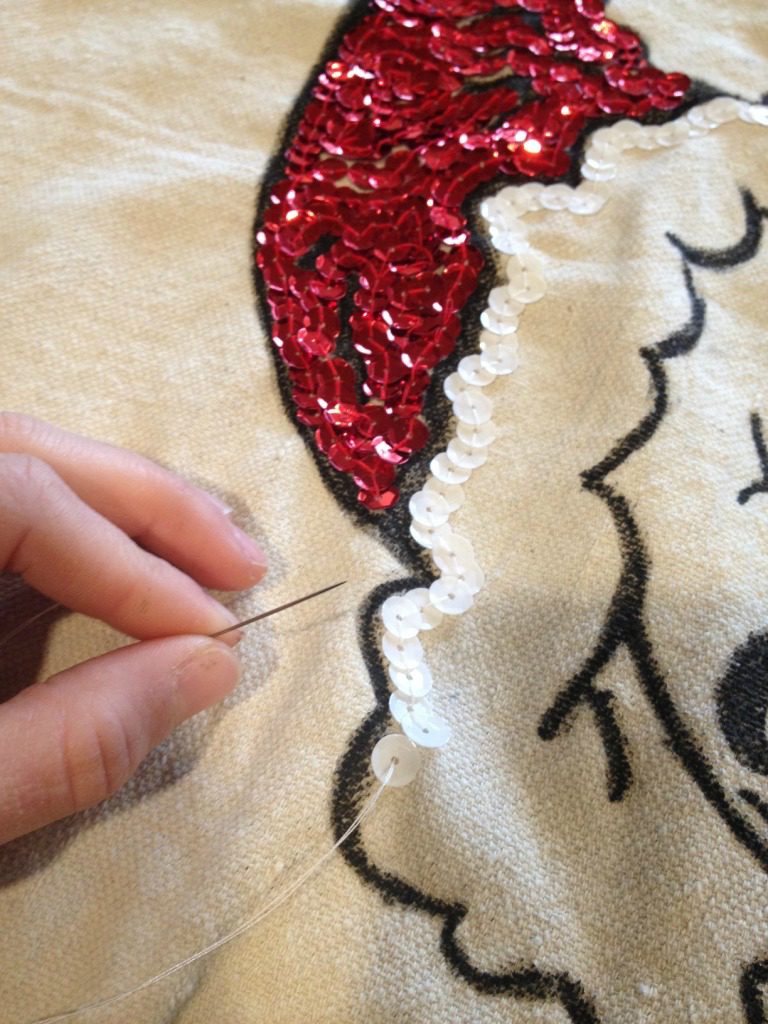
    I felt like the Grinch when he is sewing his Santa outfit in the cartoon while I was stitching these on.  Appropriate haha.

    Step 4: Sew Up Pillow Cover

    Once I had all the sequins on, here comes the sewing part.  I’m just winging it, so you may want to read tutorials on this that are better than mine.

    .

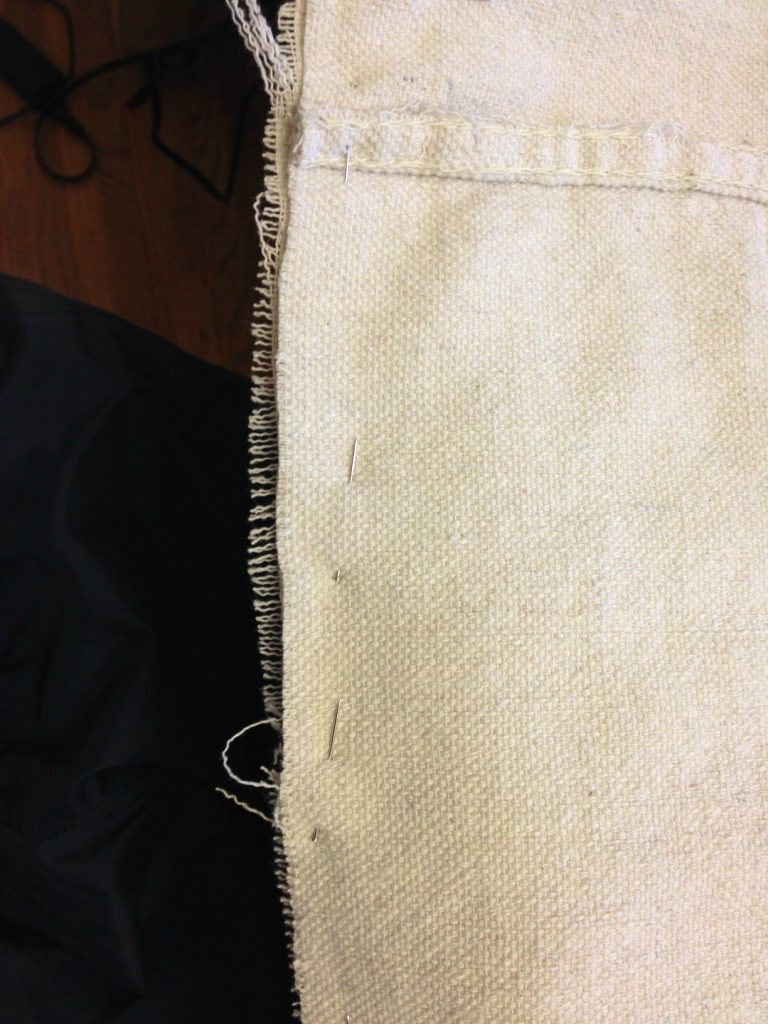
    I cut two pieces for the back side of the pillow both the same height as the front piece (18 ½″) but, cut their width so that one piece overlaps the other a few inches.

    Pillow cover fabric pieces turned inside out ready for sewing
    Drop cloth pieces overlapping each other on table

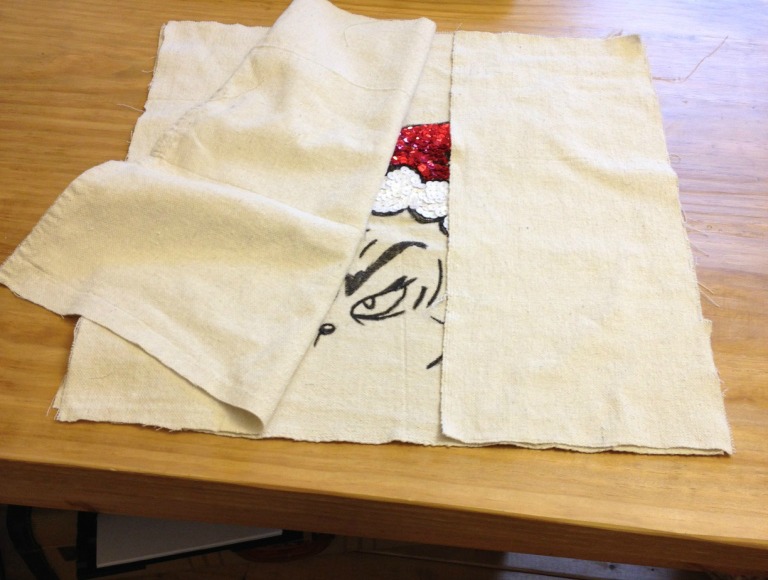
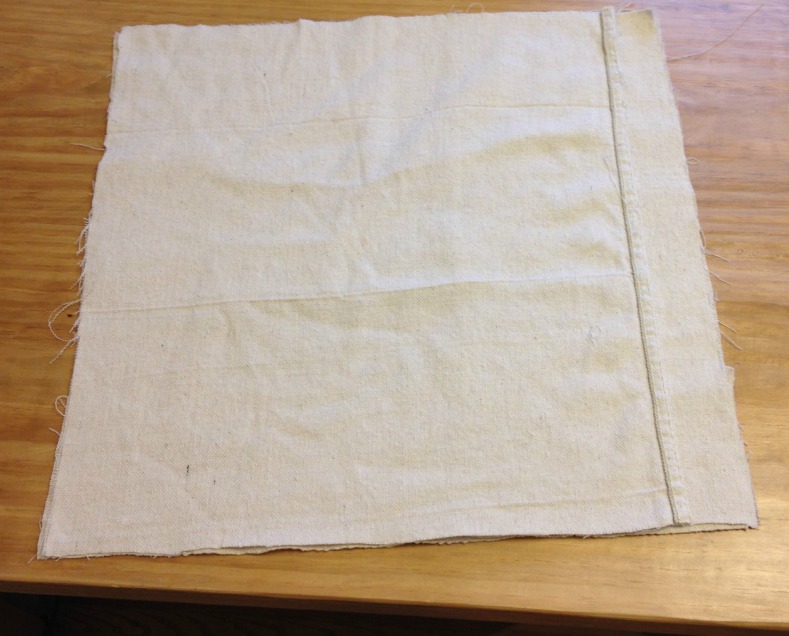
    I turned the pieces so the pillow would be “inside out,” pinned around the edges and sewed around all sides with my sewing machine.

    Close up of pins in pillow cover fabric ready to sew up

    Then turned it right side out.

    Finished pillow cover laying on worktable

    I stuffed an 18×18 pillow I had laying around into the back and that’s it!

    Close up of Grinch Pillow cover with sequins
    Grinch Pillow cover in basket next to Christmas tree
    DIY Grinch pillow cover with pillow inserted laying on blanket

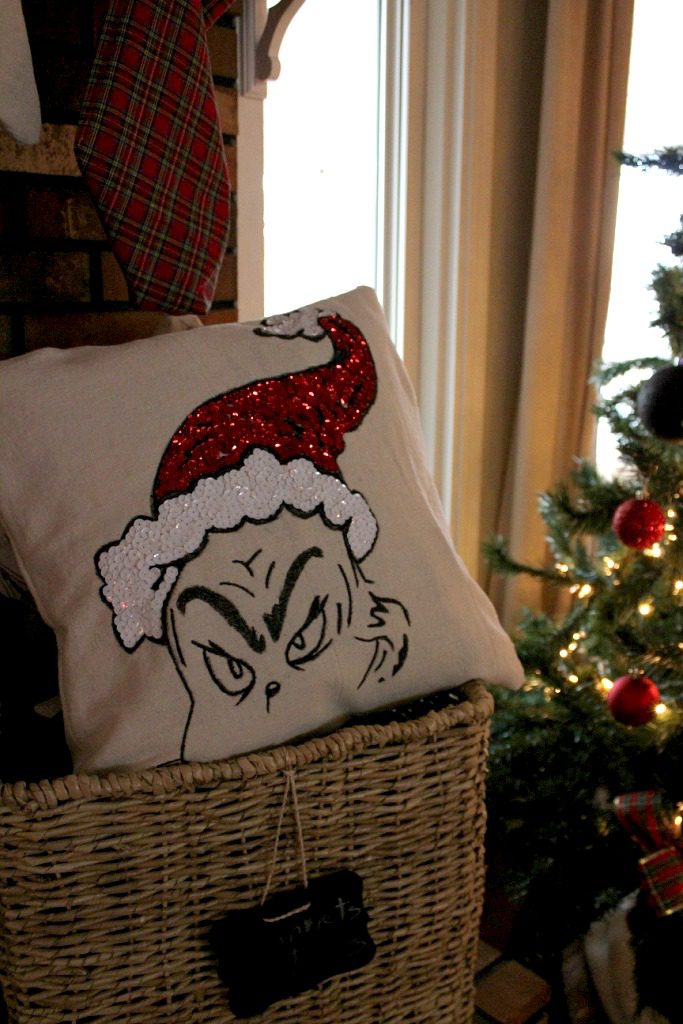
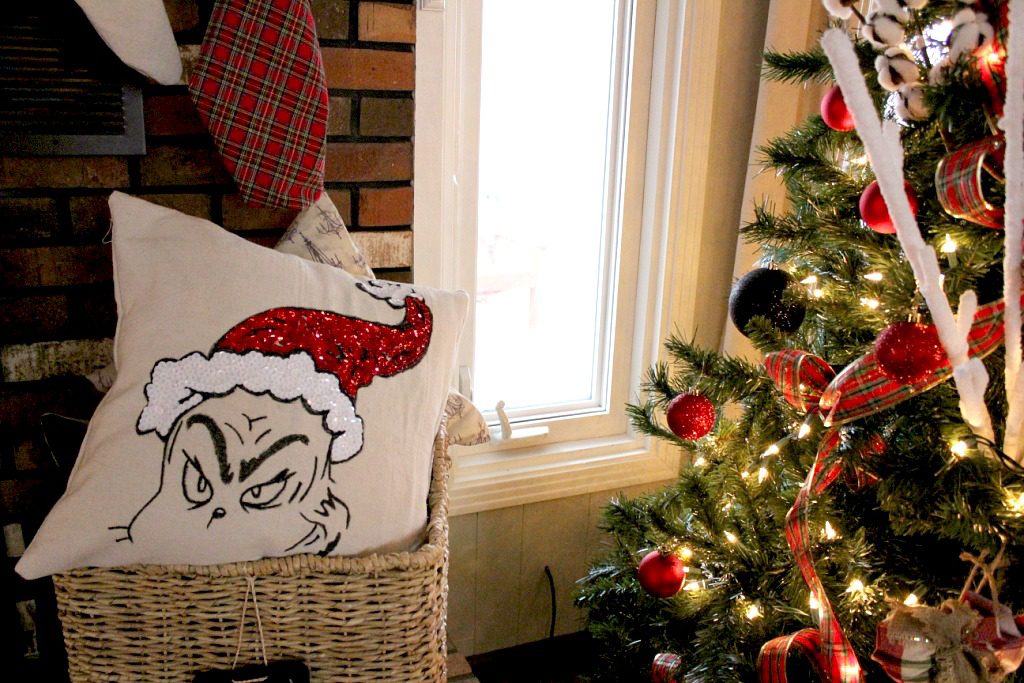
    My sister loves it, and I’m so glad! This tutorial would work well for basically any template design you wanted and would be really cool for making seasonal pillows throughout the year!

    .

    I hope you’ve enjoyed this DIY Grinch Pillow and if you want to save this for later, be sure to pin it!

    Materials needed and finished Grinch pillow cover pinterest collage image

    Until next time, happy DIYing! And Merry Christmas 🙂

    « DIY Interior French Doors
    Woodshop Diaries First Year as a Real Blog–2016 Year Review »

    Related Posts

    How to Build an X Base Console Table
    How to Build an X Base Console Table
    The LAST Bathroom Update–Because Sometimes If You Don’t Laugh, You’ll Cry
    The Home Depot DIH Holiday Workshop

    Reader Interactions

    Comments

    1. Sylvia

      February 01, 2017 at 7:09 pm

      Thank you for the Grinch pillow project! I did things for a Grinch Christmas, for my grandsons, they would love the Grinch pillow!

      • Shara, Woodshop Diaries

        February 02, 2017 at 8:11 am

        So glad you enjoyed the project!! 🙂

    2. Jean

      January 08, 2017 at 12:06 pm

      Love, love, LOVE this!! I have loved the Grinch since it came out 50 years ago! I have many Grinch (and other Suess) items and apparel. In fact, while writing this I’m wearing my fuzzy, green, Grinch jammie shirt! I took a picture of it but it wouldn’t paste it with this comment. Thanks for the idea! You should sell them!!

      • Shara, Woodshop Diaries

        January 09, 2017 at 8:15 am

        Thank you! It was a really fun project!

    3. Kate

      December 07, 2016 at 11:01 pm

      I come here for the wood projects but holy crap I didn’t know you could sew and rhyme too! I’m so impressed.

      • Shara, Woodshop Diaries

        December 08, 2016 at 8:13 am

        HAHA thank you! I didn’t even know I could rhyme, myself! Thanks so much for following along 🙂

    4. Linda

      December 07, 2016 at 8:23 pm

      I’m going to take your process and make some drop cloth pillow covers with musical notes of differing sizes – LOVE the idea of drawing the image from online! Love the idea of putting them up on a door to trace!!! You get a dozen Atta Girls for that idea alone!!!

      LOVE your blog!

      • Shara, Woodshop Diaries

        December 08, 2016 at 8:12 am

        Thank you so much! The music note pillow covers sound like a super cute idea!

    5. Cecilia

      December 07, 2016 at 8:31 am

      I think you’re an awesome sister. The pillow turned out great too. ? Love your attempt to Dr. Seuss! Too cute.

      • Shara, Woodshop Diaries

        December 07, 2016 at 1:34 pm

        Thanks friend!! 🙂

    Trackbacks

    1. DIY Christmas Lantern Post says:
      December 16, 2017 at 7:48 am

      […] If you like the little truck, you can find the tutorial for it here.  And that snowflake pillow tutorial is here, too!  If you like pillow covers, also check out my very popular DIY Grinch Pillow tutorial here. […]

    2. 10 Charming and Fun Christmas DIY Ideas to Try This Year - Megan Morris says:
      December 14, 2017 at 6:03 am

      […] This Pottery Barn inspired Grinch pillow is stylish and charming. Tutorial: Woodshop Diaries […]

    3. Staying in Bucharest Over Winter Break? We’ve Got You Covered. – The Bite says:
      December 14, 2017 at 12:18 am

      […] craft for a Dr. Seuss lover. Create a sparkly and festive pillow to show your love of the cartoon, How the Grinch Stole Christmas. The craft requires easy items and is easy if you follow […]

    4. How to Make a DIY Snowflake Pillow says:
      November 25, 2017 at 9:21 pm

      […] and let me also remind you of the DIY Grinch Pillow from last year in case you missed it.  It’s my most popular pin and has been one of my most popular blog […]

    5. Grinch DIY Decorations and Craft Round-up - Leap of Faith Crafting says:
      November 13, 2017 at 9:09 pm

      […] on over to Woodshop Diaries and find out how she made this adorable […]

    6. Pottery Barn Inspired DIY Entryway Storage Bench--#PlywoodPretty Challenge says:
      April 1, 2017 at 10:01 am

      […] (If you’re a fan of the knock off, too, be sure to check out some of my other knock offs like the PB Grinch Pillow and the Ballard Inspired Pantry Cabinet.) #noshame […]

    7. 30+ Awesome Pottery Barn Style DIY Projects For Less - Crafts Booming says:
      March 25, 2017 at 2:52 am

      […] via woodshopdiaries […]

    8. DIY Baby Gift Idea--Ultrasound Picture Frame says:
      March 1, 2017 at 4:24 pm

      […] followed the same steps here as I did when I made the Grinch pillow and just traced the outlined image onto a sheet (it took two sheets to get it as large as I wanted) […]

    9. DIY Destination Map Picture Frame Thingy--Yes, You Read That Right says:
      February 14, 2017 at 1:29 pm

      […] can probably purchase stencils, but I used the same method as I used with the Grinch Pillow project (because I’m cheap) to get a stencil of the United States. By the way, you can do individual […]

    10. Handmade Dr. Seuss Grinch Pillow says:
      December 22, 2016 at 7:00 am

      […] ends up being sold out right as you get ready to buy it? You’d DIY it! Shara from the Woodshop Diaries ran into this problem with a beautiful Dr. Seuss Grinch pillow from Pottery Barn. Originally the […]

    Primary Sidebar

    Hi! I'm Shara, the designer, maker, and videographer behind Woodshop Diaries. Let's get building, friends :)

    Learn more →

    Woodworking Tips & Guides

    • DIY Simple Shaker Cabinet Doors
    • 5 Tools To Get Started Woodworking
    • DIY Kitchen Cabinets–From Only Plywood
    • Woodworking Tips: How to Square Board Edges and Make Your Own 2x2s

    Footer

    ↑ back to top

    Tips to Take Your Projects to the Next Level

    --5 Secrets to Professional Looking DIY Furniture

    --How to Properly Finish Raw Wood Furniture {Without a Sprayer!}

    --How to EASILY Cover Plywood Edges

    --4 Ways to Fill a Pocket Hole

    --10 Must Have Tools for Furniture and Cabinet Building

    Printable Building Plans

    Check out our shop to browse printable PDF building plans!

    Website Policies

    This website is for entertainment purposes. Using any information provided is to be at your own risk.

    This site uses cookies to provide you with a better experience.

    All images and text on this site are property of Woodshop Diaries, LLC. Please be respectful and don't steal this content.

    See policies page on this site for more information.

    Want to get in touch? Contact Us Here

    Copyright © 2022