
THIS IS NOT A PREGNANCY ANNOUNCEMENT.
.
I had to make sure this was clear from the beginning. Since the day I got married, everyone (except me) keeps hoping that announcement is coming. However (sorry mom…well, sorry, not sorry), I hate to disappoint (really, I don’t), but this is not it. 🙂
.
But, I have a friend who is expecting her first little girl very soon and, of course, you know me…I’m like what can I make for a baby?!!
.
Wooden diapers?? Probably not very practical.
.
A crib? Let’s not even talk about shipping costs for that thing.
.
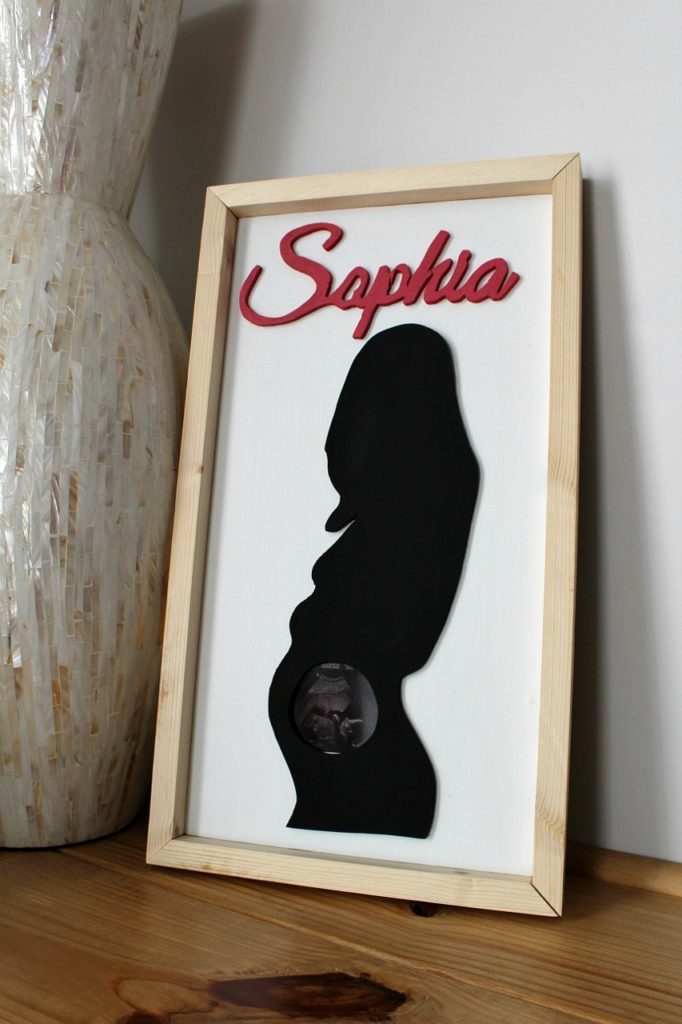
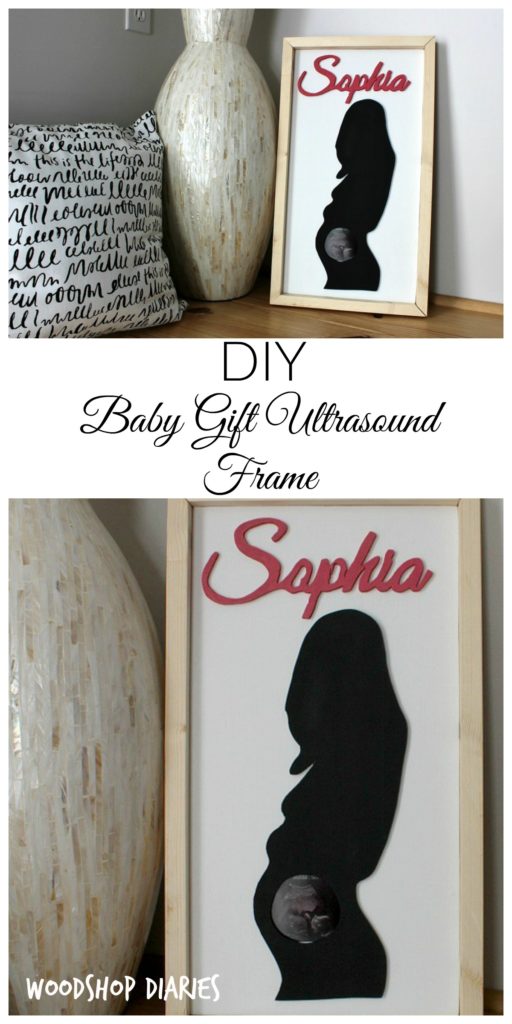
Personalized picture frame for the ultrasound?? Okay, now we are talking.
.
And this is something that I honestly think could go one of two ways…this is either super creepy, or super cute. SOOOOO, you tell me 🙂
.
Let me explain how I made it, then at the end, you tell me….creepy or cute, okay?
.
This post contains affiliate links. If you purchase through one of these links, I may receive a small commission at no extra cost to you. This helps pay to keep this site running and the content free. Thank you for supporting me and this site! Please see disclosure policy for details.
.
Supplies and Materials Needed:
Small piece (2×2 is plenty) ¼″ plywood
Small piece (quarter sheet is plenty) ¾″ plywood or 1×10 or 1×12
1x2x8
Scroll saw (optional)
Paper and pen
Step 1: Draw the Silhouette for the Frame
This is the part Danny thought was creepy. I got on Google and searched “pregnant silhouette.” (As if that’s not weird enough, the creepy factor gets worse…keep reading…)
.
But nothing looked like my friend. Some were too “cartoony” looking, some of their hair just didn’t match hers, I just wasn’t liking any of them. So, being the creeper that I am, (here’s where it got worse) copied a picture of her showing off her pregnant belly at 20 weeks on Facebook and pasted it into Microsoft Paint. I used the eraser tool to erase around the outline of her body so I could see it clearly to trace around.
.
I followed the same steps here as I did when I made the Grinch pillow and just traced the outlined image onto a sheet (it took two sheets to get it as large as I wanted) of paper. Then I cut it out. I drew some extra details for a different idea I had, but then changed my mind…so ignore that. So here is my stencil.
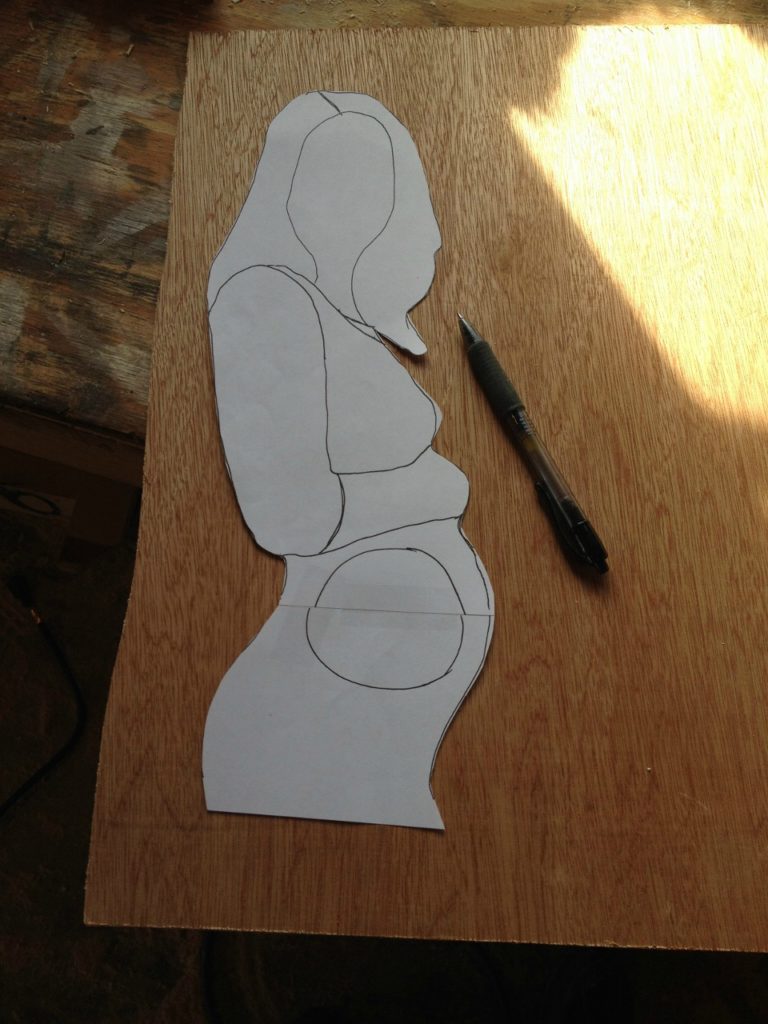
Step 2: Cut out the Silhouette
I traced around this silhouette onto ¼″ plywood and cut it out with my jig saw.

Then I used my wood glue bottle to draw a circle for the ultrasound image to go. I used a drill to drill into the center of the circle and then cut it out with my jig saw.
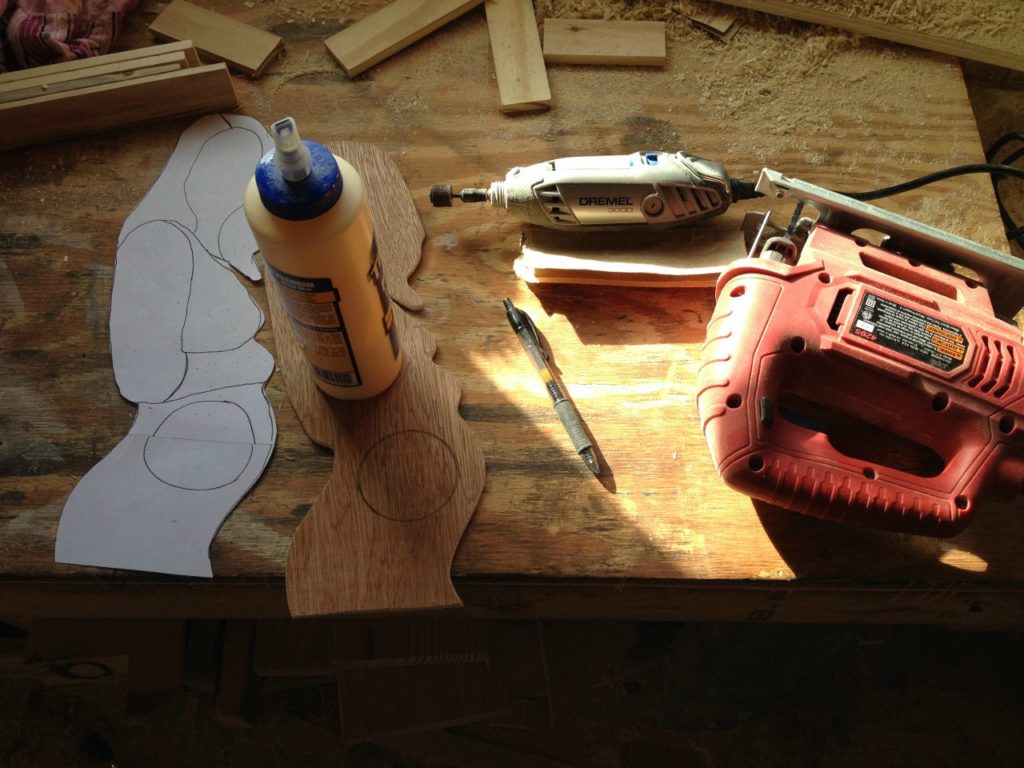
Side note, you will need to sand this really well. The Dremel is awesome for sanding these edges nice and smooth.
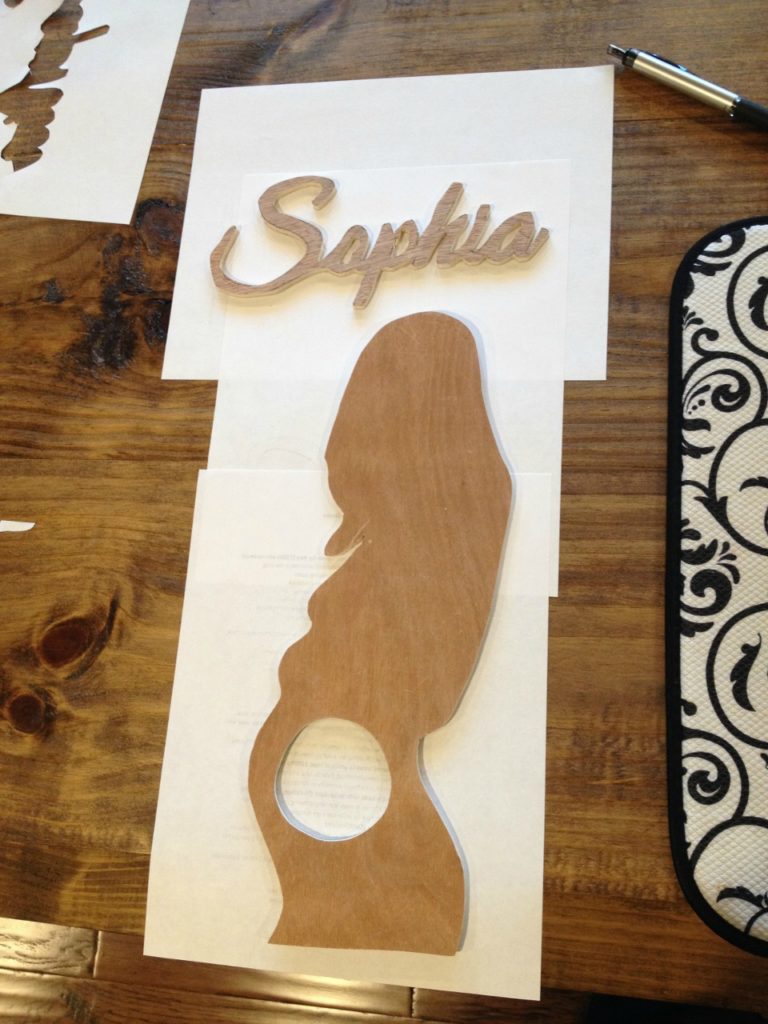
Step 3: Add a Name
Obviously, my friend’s baby’s name is Sophia…because you know I didn’t just cut that name out for fun…
.
For the name, I got on PicMonkey and found a font I liked and typed out the name. (I used Great Vibes.) PicMonkey is free for a ton of cool fonts. You can pay for some extras, but I just use what’s available for free (helloooo, I’m cheap). It’s super easy to use. Just go here, click on design and then click the Tt button on the left, then add a font. You can enlarge the font however big you want it. Once I got it how I wanted it, I just traced it again onto a sheet of paper and cut it out. You could also do the same thing in Microsoft Word and just print it, but I couldn’t find a font on there that I liked.
.
Then I traced it onto ¼″ plywood and cut it out on my scroll saw. You could use a jig saw as well, I just needed some practice, so I used the scroll saw. Then I sanded the crap out of it.
Step 4: Make a Backing
This is exactly the same as the backing I made for the U.S. Destination Map Frame, except a different size. You can use ¾″ plywood, or cut a 1×10, or a 1×12 for this. This piece is only to glue the silhouette and name to. Cut it however large you want it to be (but make sure it’s big enough to fit the name and silhouette). Then I framed it out with mitered 1x2s. I glued and nailed these around the edge, but that’s an optional step.
Step 5: Finish and Attach
I painted the silhouette, the name, and the back piece and once the paint was dry, I used wood glue to attach the name to the back piece.
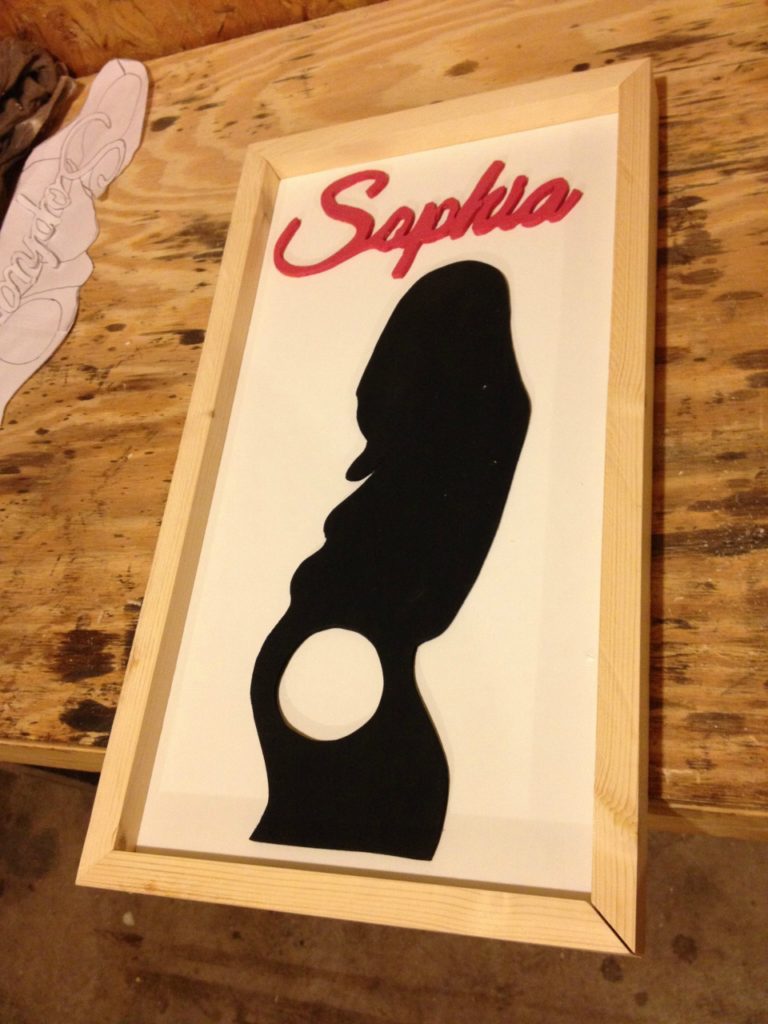
I taped a ultrasound picture (that my friend sent me….so that’s a little less creepy than stealing that off Facebook, right?) onto the back of the silhouette, then glued it on as well.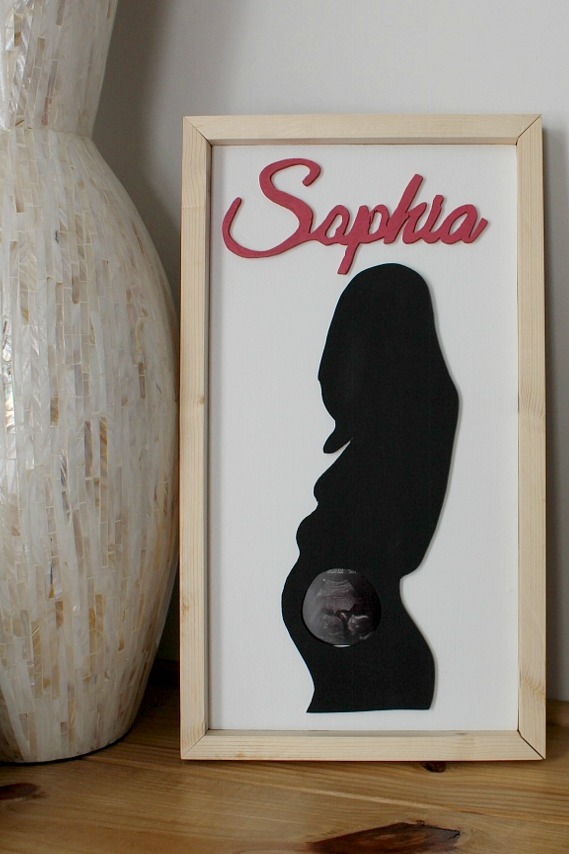
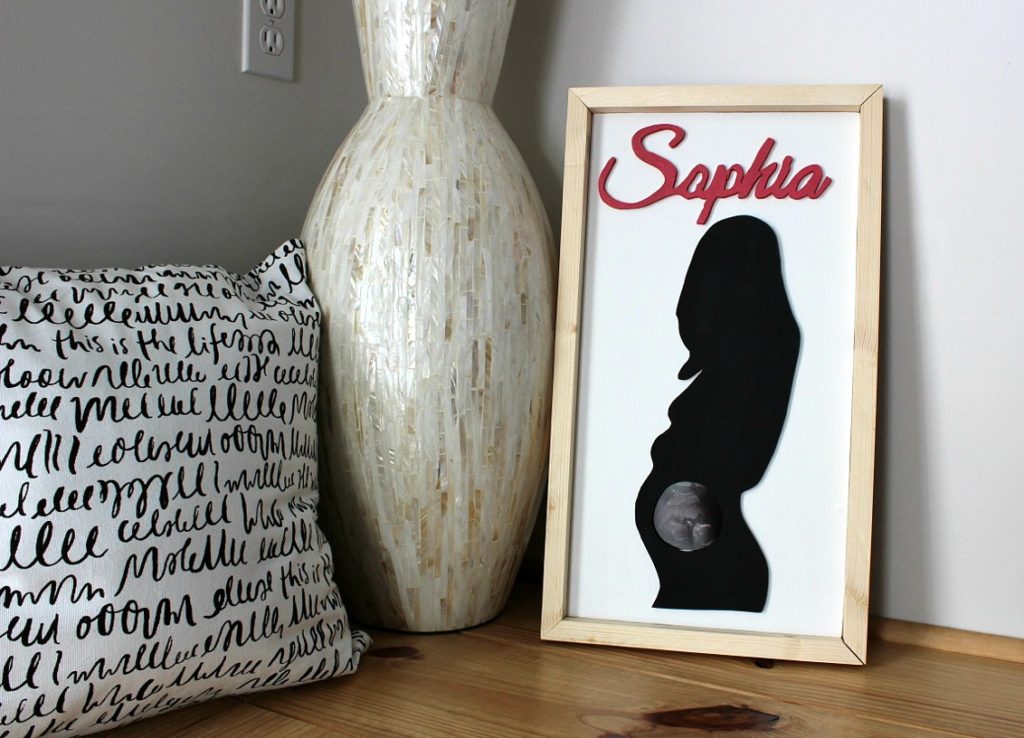
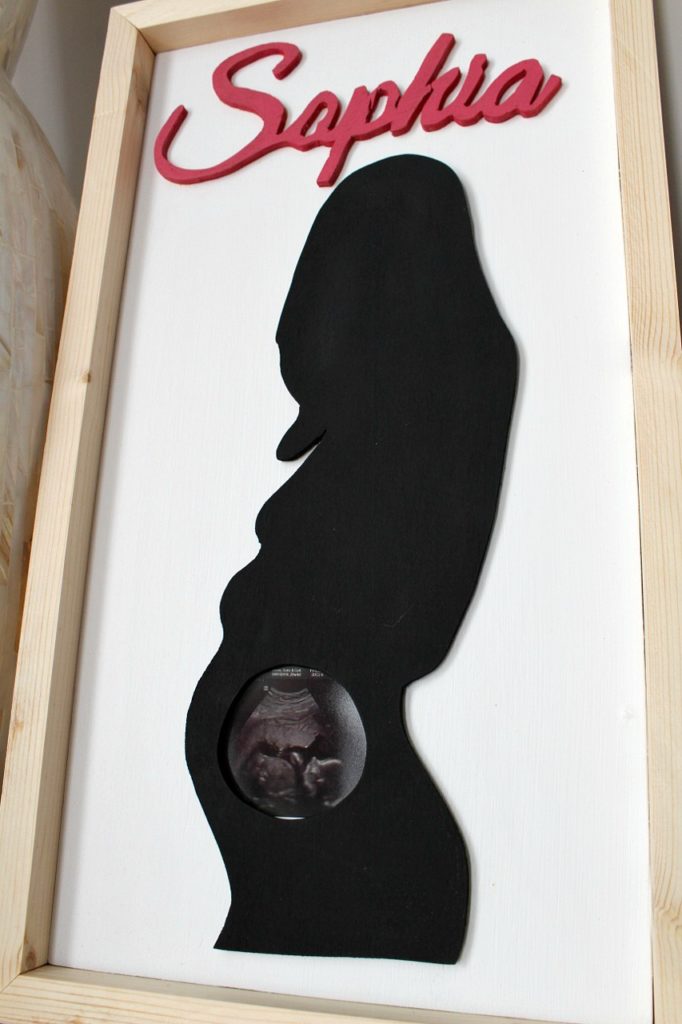
Okay, so you tell me…cute that this is literally the actual mother’s silhouette??
Or creepy that I stole it from Facebook, traced it out on my computer, and cut it out on plywood?
.
Cast your vote in the comments below!! I think it’s cute. She thinks it’s cute (yes, I asked her if she was creeped out…we are cool like that). Danny thinks creepy…but what does Danny know?? HAHA Let me know what YOU think.
.
Don’t forget to pin for later 🙂
Until next time, happy DIYing!

Jackie says
I think it’s adorable. I just found out yesterday that my daughter, who has been trying to conceive for 2 years, is pregnant. I am another woodworking addict so I will be making her one of these. Thanks for sharing.
Shara, Woodshop Diaries says
Yay! Congratulations to your daughter and to you as well! So glad you enjoyed this project 🙂
Frances Batson says
Cute and creative
Shara, Woodshop Diaries says
Thank you!
Mary says
CREEPY! Just frame the actual ultrasound picture in a small frame to fit just the picture. Sorry, but you asked for an opinion.
Tom Clarke says
Cute and very creative.
Shara, Woodshop Diaries says
Thanks, Tom!!
M Amello says
I’m not quite sure when these untrasound pictures suddenly became something we all would want to put on a wall. I had a untrasound done to find a blocked artery once, but I have a hunch that not many people would say, “Awww..look at the cute little blocked artery.. You can even see the cute little plaque stuck to the artery wall.”
Maybe it’s just me, but I prefer pictures of actual kids who can smile and wave and do the things actual babies do.
Shara, Woodshop Diaries says
I don’t have kids, so I may not be the best judge, but I’m betting the ultrasound picture of a long prayed for baby is a little different than an ultrasound of a blocked artery 😉 I’m sure once she has the baby, she will prefer pictures of her newborn OUTSIDE the womb (who wouldn’t?) to those of her inside of it, but while she is waiting, I’m sure the ultrasound picture is a sweet reminder of the blessing she was able to carry for 9 months while she eagerly awaited the opportunity to take a picture of the new born baby doing “the things actual babies do”
Mary @ The Cofran Home says
You’ve got that right, Shara! I LOVED my ultrasound pictures when I was pregnant with my kids. I still love to look back at them! It is truly a blessing! I love your project! So thoughtful and creative. xoxoxo
Shara, Woodshop Diaries says
Thank you so much Mary! XOXO
Linda says
I think she will love it. It is something that can only be special to a Mom, well Dad too. She will remember this for the rest of her life. Yes, you are giving your friend a special gift that can’t be purchased. BTW, you did a great job on the picture.
Shara, Woodshop Diaries says
Thanks so much!! 🙂
Becky says
Definitely not creepy and super cute! Although, I must admit that I stalked my family on Facebook and swiped some of their pictures to make personalized ornaments this Christmas (which they LOVED by the way) so I may not be the best judge. 🙂
Shara, Woodshop Diaries says
Haha I think we all do it 😉 #facebookstalkersanonymous
Jan says
I think it’s a beautiful gift! Very thoughtful
Shara, Woodshop Diaries says
Thank you!!