
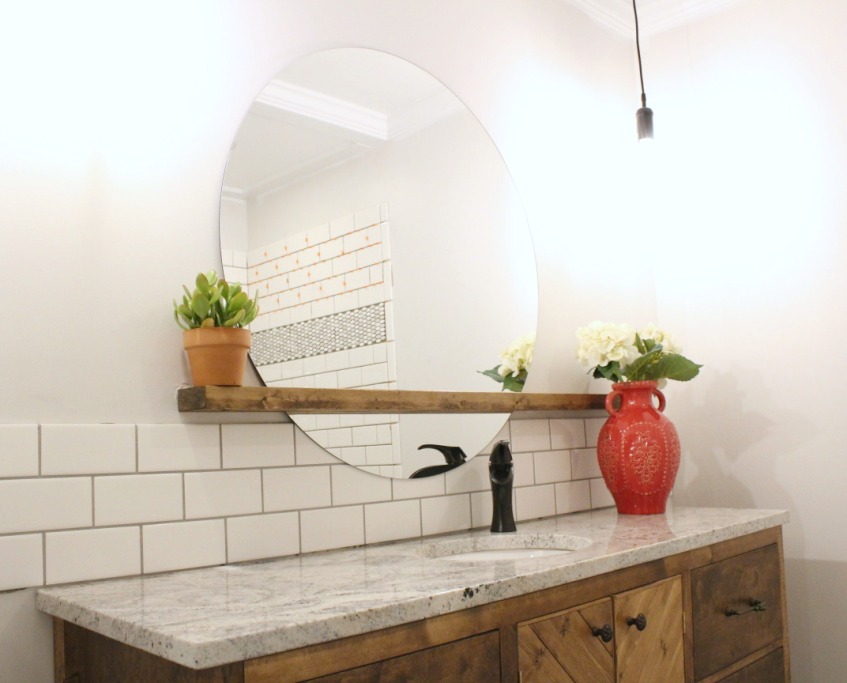
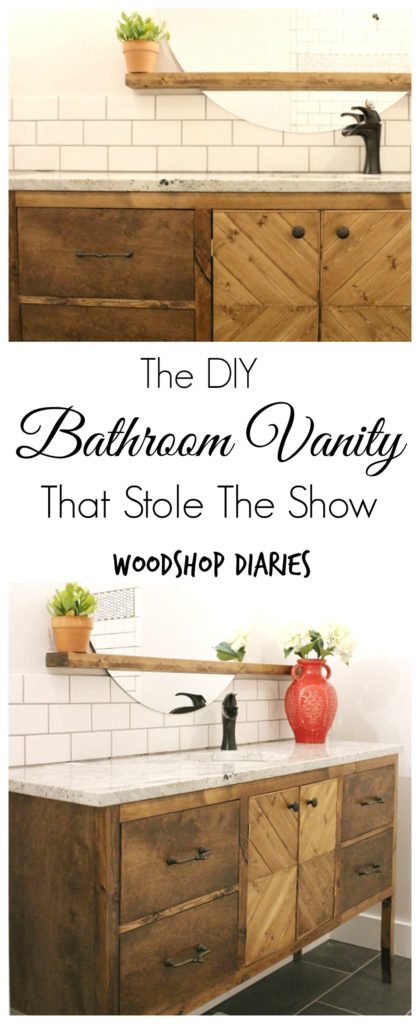
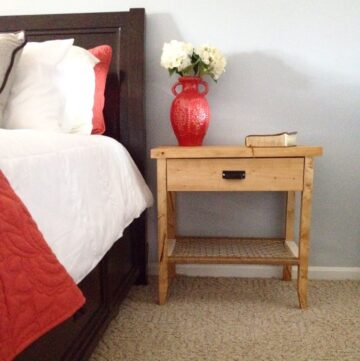
Last week I posted about my new bathroom mirror. People seemed to love it…which was awesome! (Thank you!) But, the bathroom vanity seemed to steal the show. Which is kind of rude, don’t you think?
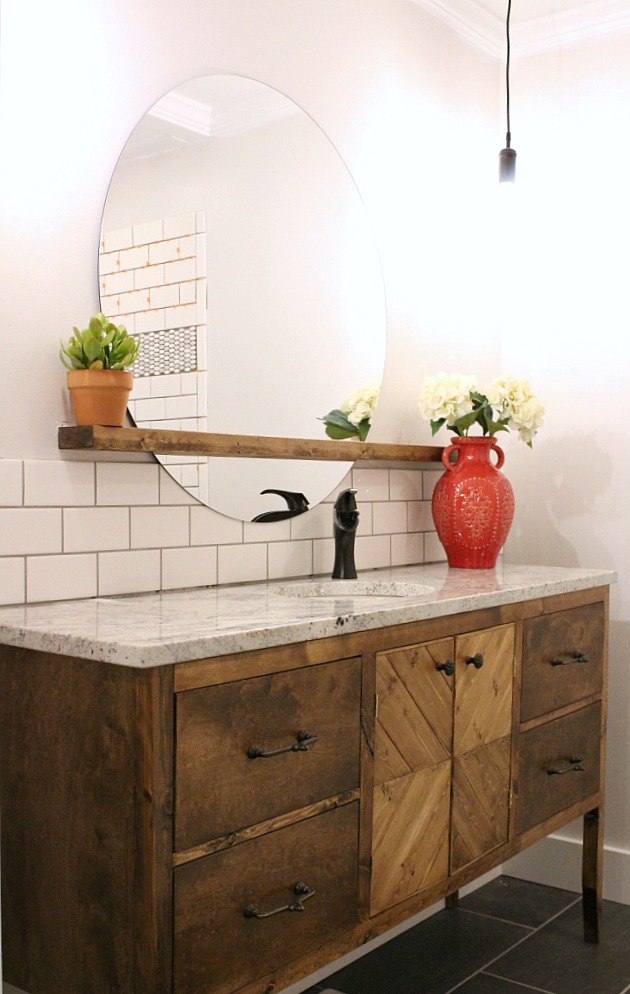
The mirror is over here trying to get its 15 minutes of fame, and the vanity cuts it short by photo bombing all the pictures. I guess it gets its name honest….vanity. It’s so vain. It thinks every bathroom post is about it. So finally, here is an actual post about the vanity so maybe it will quit being so arrogant.
.
When I started trying to decide on a vanity design for our new bathroom, I spent MONTHS on Pinterest searching ideas. And you know how that goes. Pin this and pin that and you never go back and look at what you actually pinned and you keep finding better ideas and sooner or later you’re overwhelmed with options and you don’t really like any of them. Maybe that’s just me?
.
So, back in June (JUNE! That was 3 months ago!), I decided to quit obsessing over what kind of vanity to make (and quit spending hours a day on Pinterest looking at them) and just build one and be done with it. When I got done, it sat in my bedroom for a couple months while stared at it every day and tried to convince myself that it was the most awesome thing I’d ever built in my life. But, it wasn’t. It would do I suppose, I just wasn’t really sure about it.
But, last week when we got it installed in the new bathroom (FINALLY), I made a final decision. I decided that (drumroll please….) I think I like it 🙂 And many of you seem to like it too based on the compliments you sent when you saw it in my post about my new bathroom mirror last week!
.
So, without further blabbering, I will show you how I made it.
.
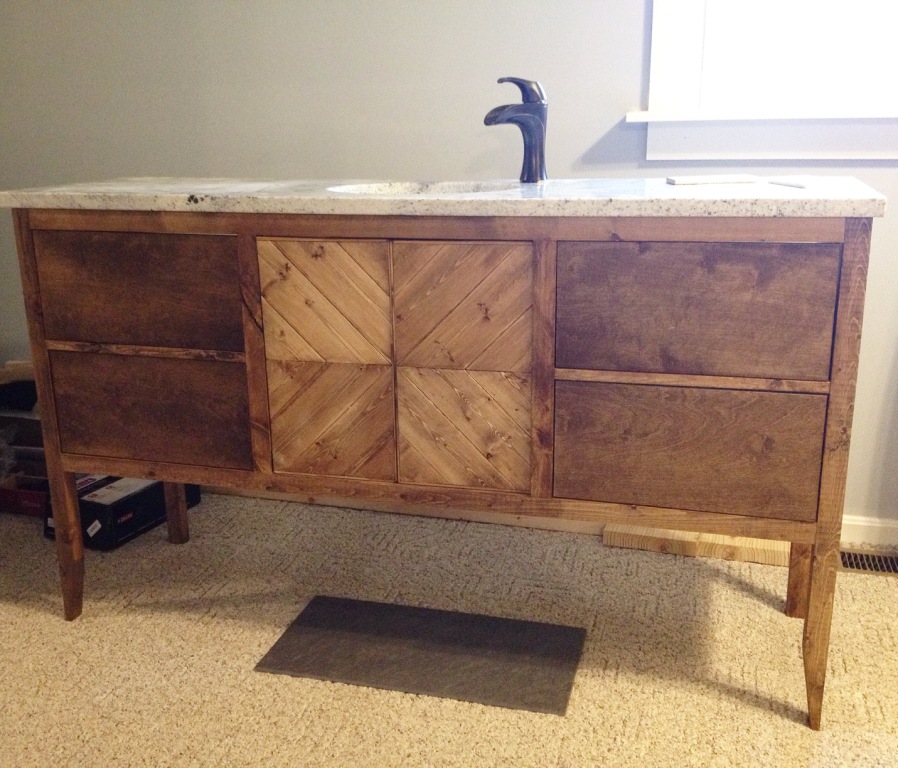
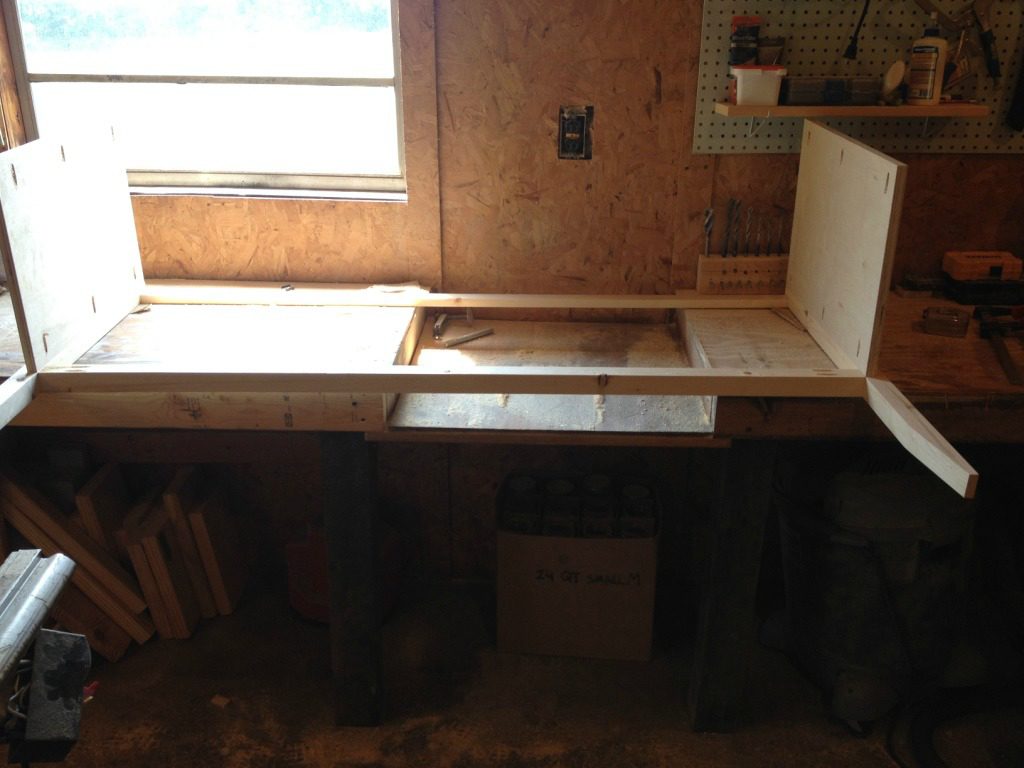
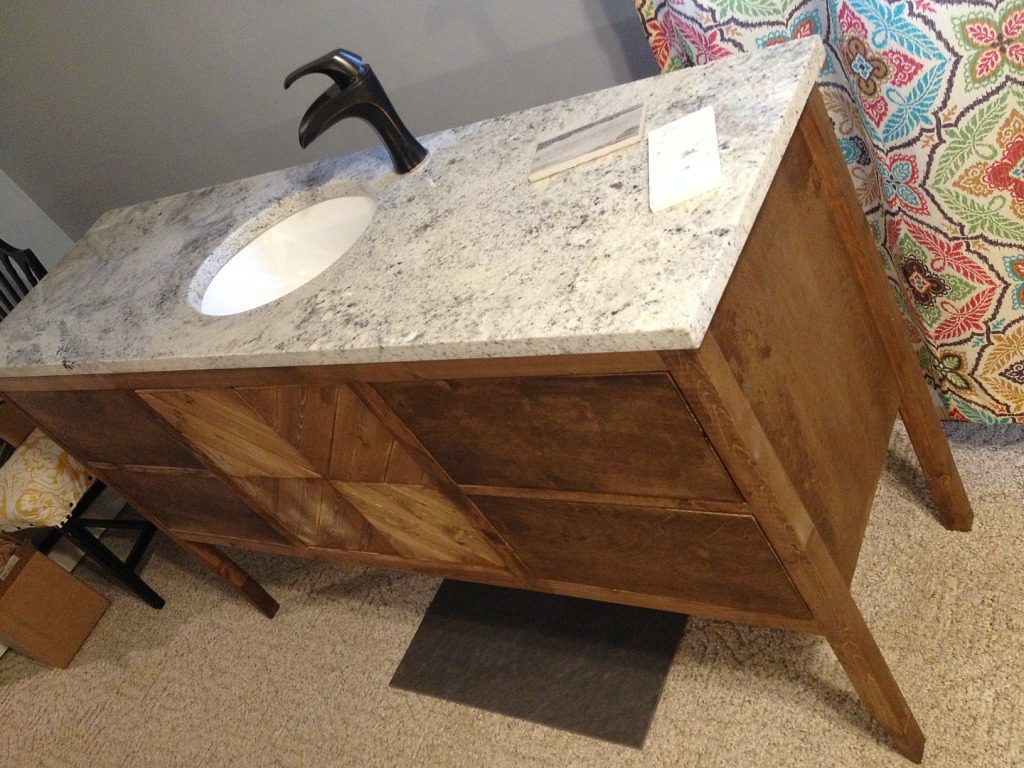
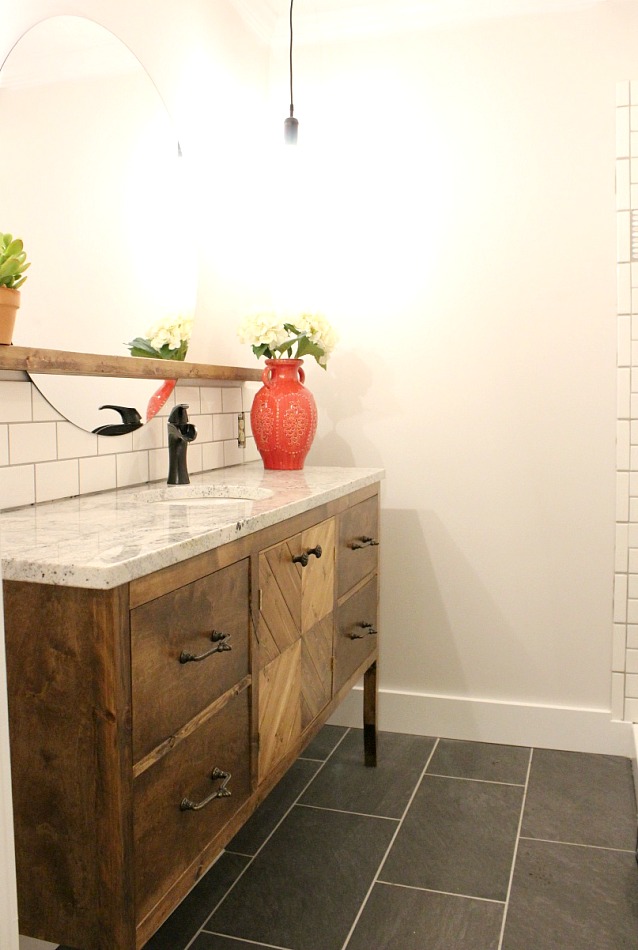
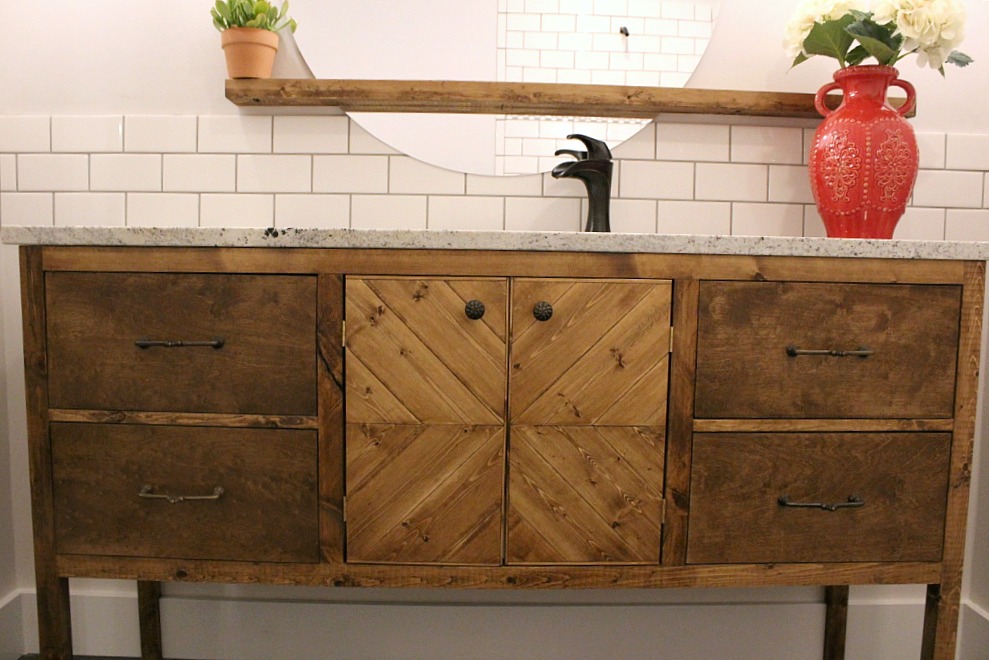
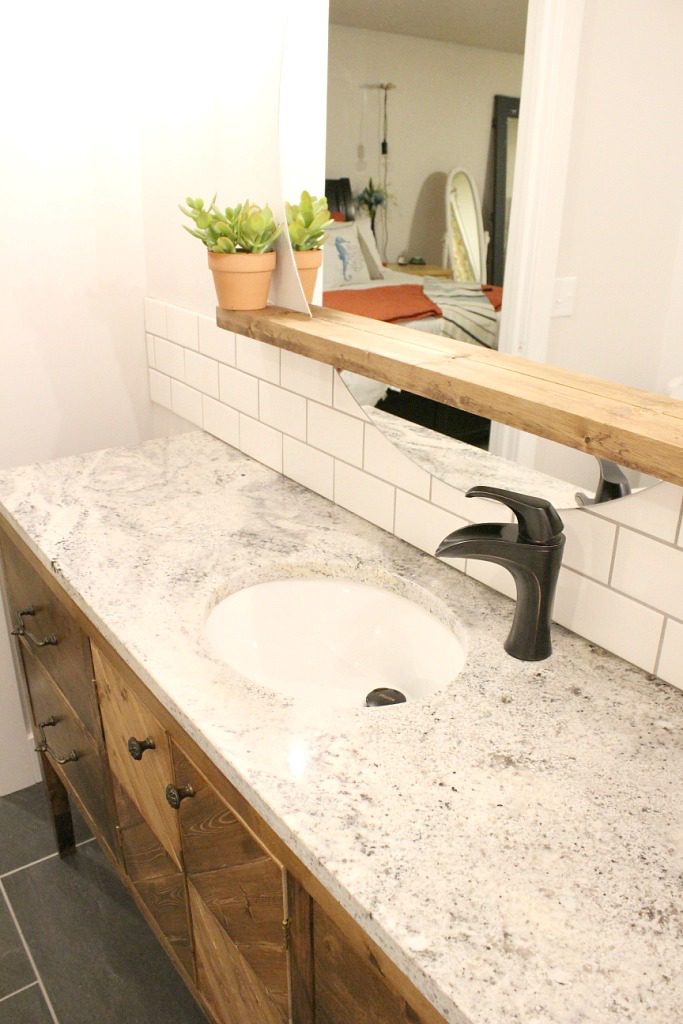
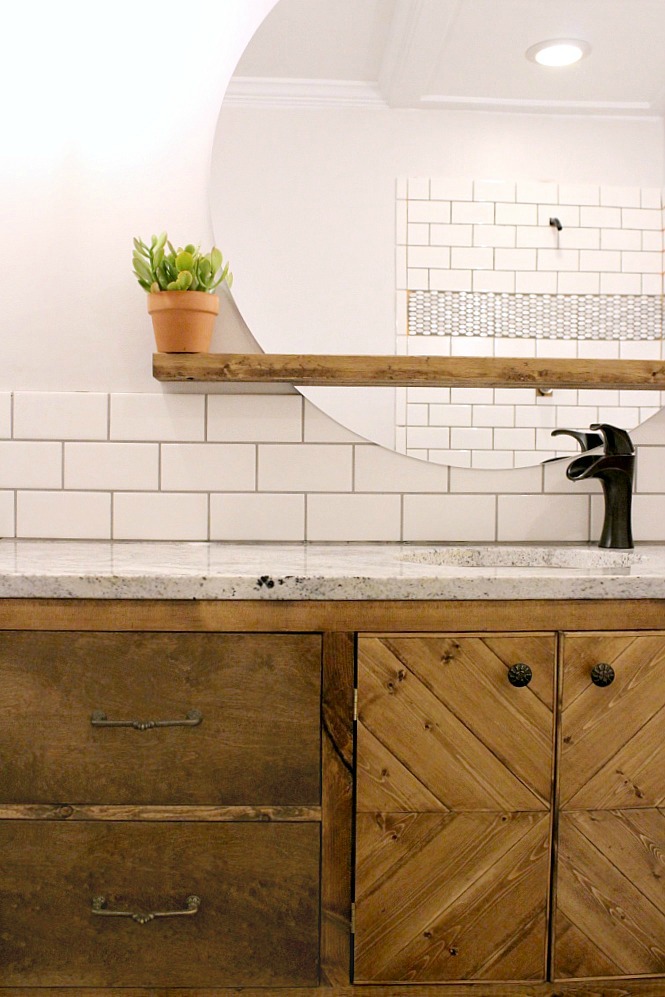
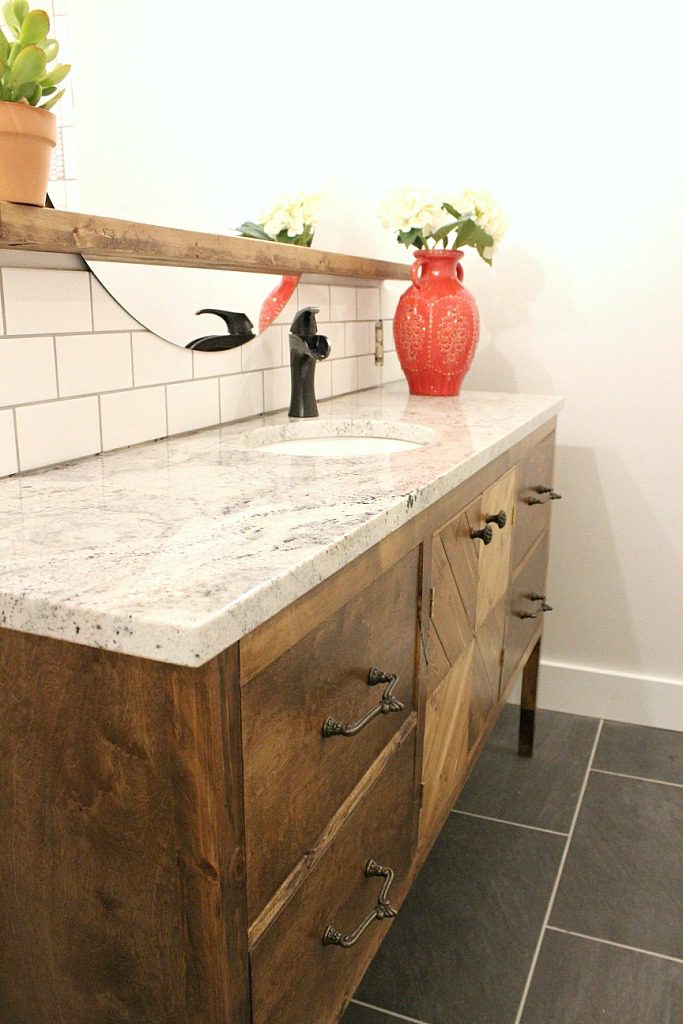
But first, I need to tell you a few things. The countertop is granite. I bought it custom from a local granite shop. They cut it to size and cut the hole for the sink and faucet and attached the sink for me before I got it. Because of the small space in our bathroom, our vanity couldn’t be deeper than 18”. So, I had the shop cut the top 18” deep. I made my actual vanity 17 ½” deep to allow for a slight overhang. Due to the odd size of my vanity, I won’t give you exact dimensions that I used because likely you would want to make yours deeper if possible. However, I will show you the steps I took to build it.
.
Note: This post contains affiliate links. Please see disclosure policy for more details. I only link to products that I highly recommend and/or use myself.
.
For the build, I used:
.
Tools/Hardware:
2 ½’ wood screws
Sandpaper
.
Lumber:
2×2 pine
1×4 pine
1×6 pine
1×2 pine
Birch Plywood
.
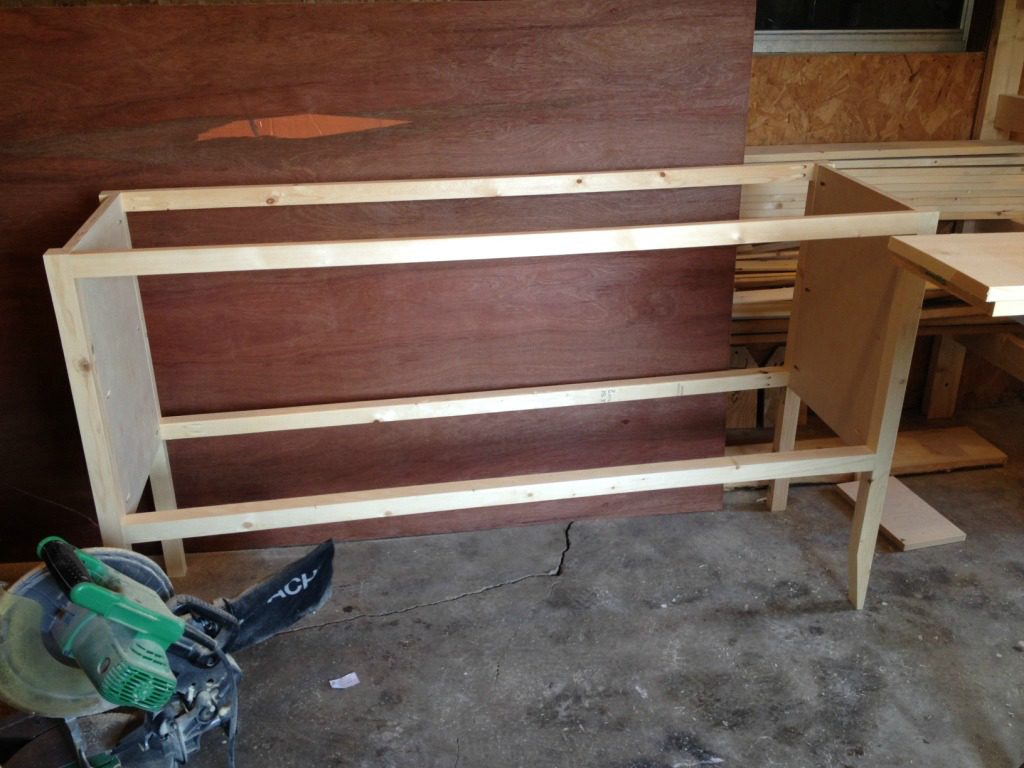
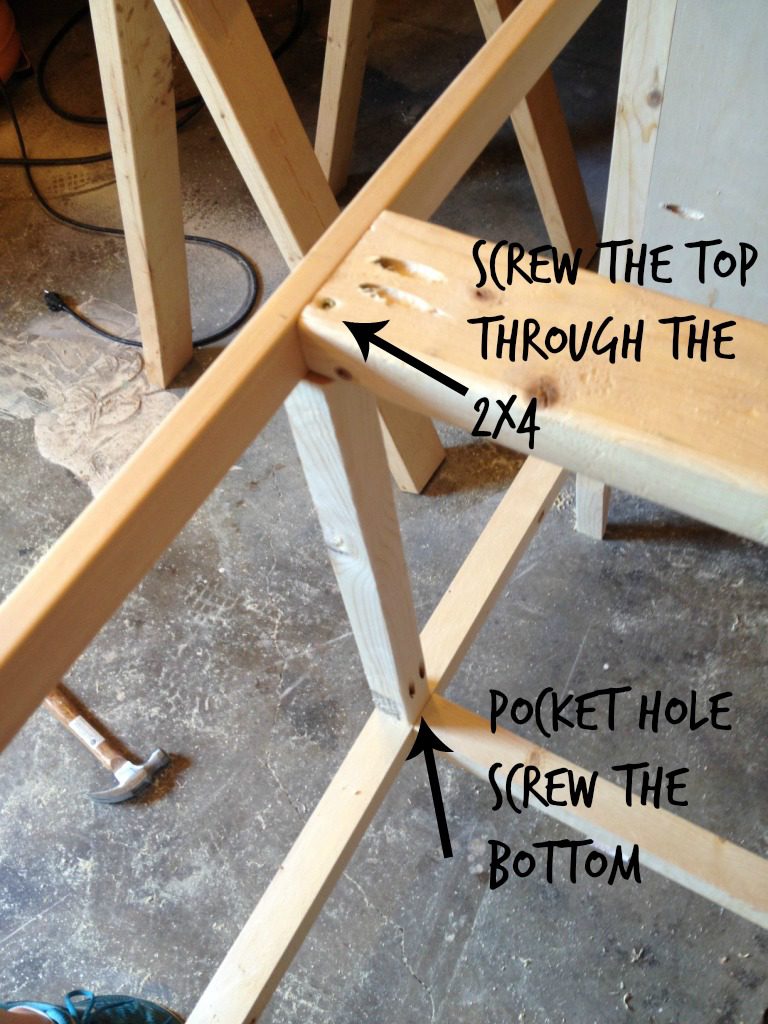
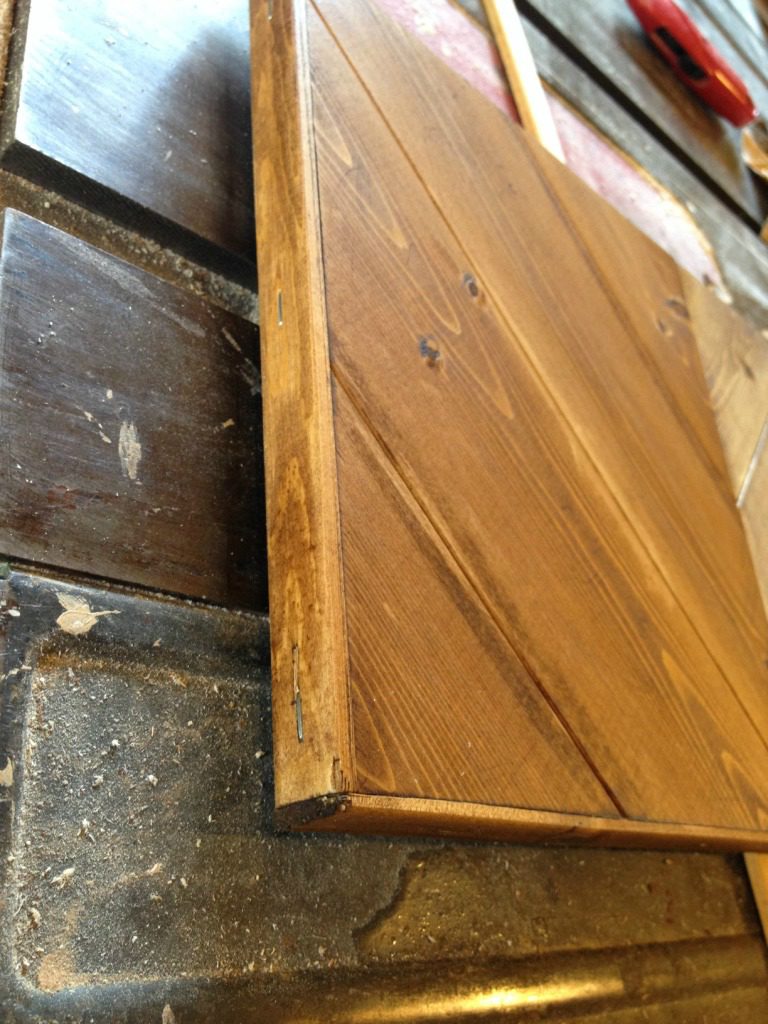
1. Build front and back frames
For my legs, I cut 4 pieces of 2×2 at 35” long. I tapered two of them for the front legs. I attached the 2 front legs together with a 1×2 on the top and a 2×2 on the bottom both pocket hole screwed using my Kreg Jig into each leg.
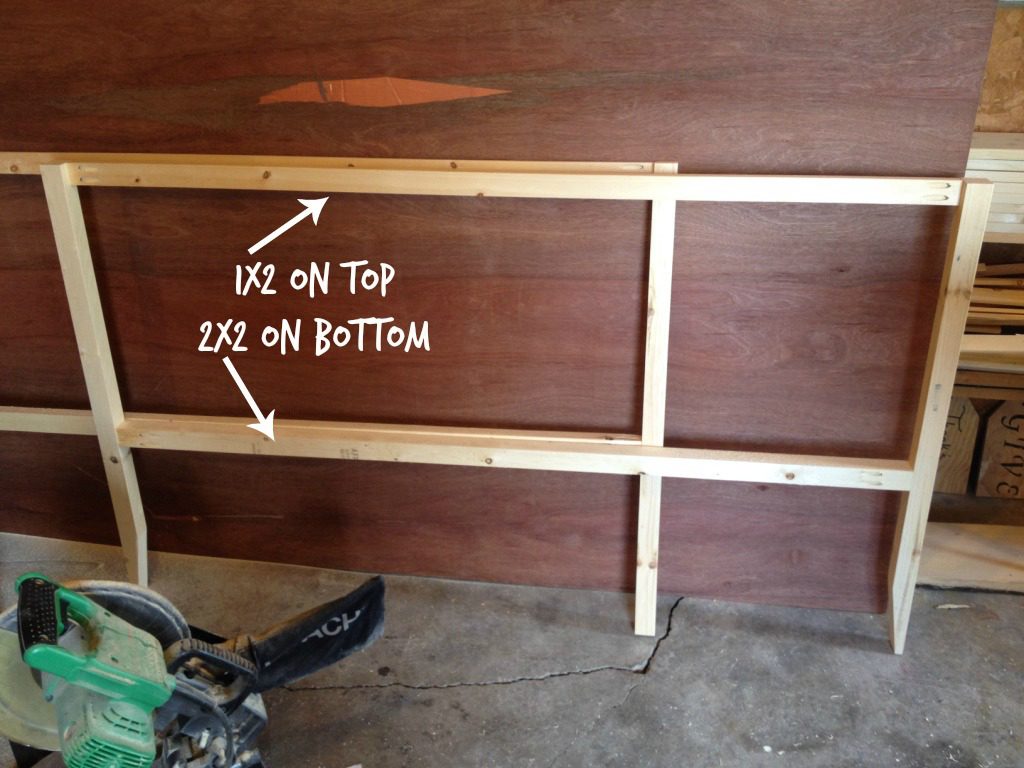
Now, things would have gone smoother if I was able to use a 2×2 on both the top and bottom, but because of the sink size, I didn’t have the space and I had to use a 1×2 on top.
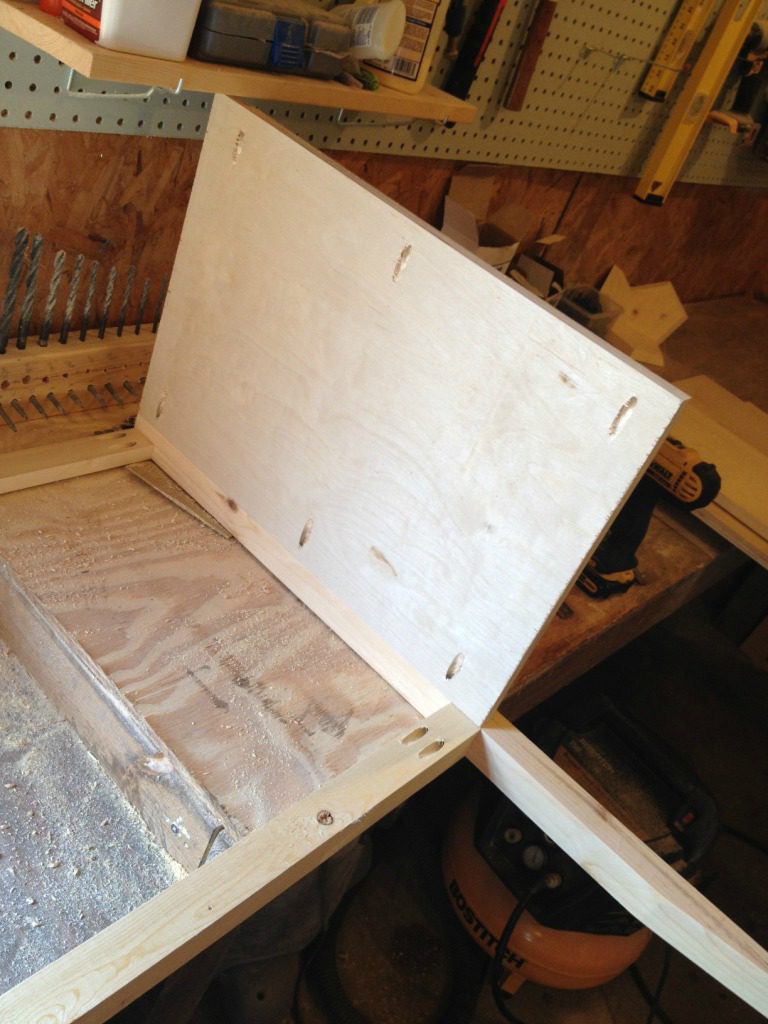
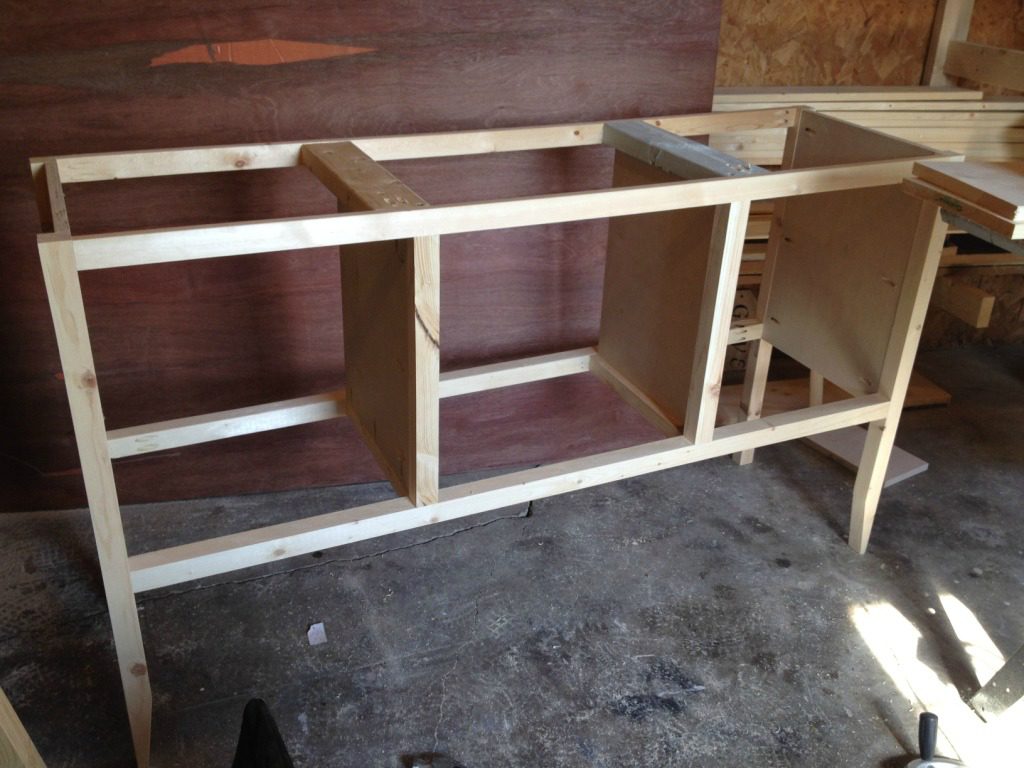
2. Add side panels
I used my Rip Cut to cut my plywood sheet down to pieces 15 ½” wide because I will need them all that size for the side panels and middle dividers. The Rip Cut makes cutting plywood SO much easier than a straight edge when you need several pieces the same width. I cut two pieces of plywood for the side panels and drilled pocket holes using my Kreg Jig into each side. I used 1 ¼” pocket hole screws to attach these pieces to the sides of the two frames like the pictures show.
3. Add middle dividers
I used 2x2s for the bottom middle supports and attached them using pocket holes and screws in the bottom front and regular wood screws in the back. You could use pocket holes for both the front and back, but I was running short on 2 ½” pocket hole screws so I used wood screws where I could use them and you wouldn’t see them. Helpful hint 🙂
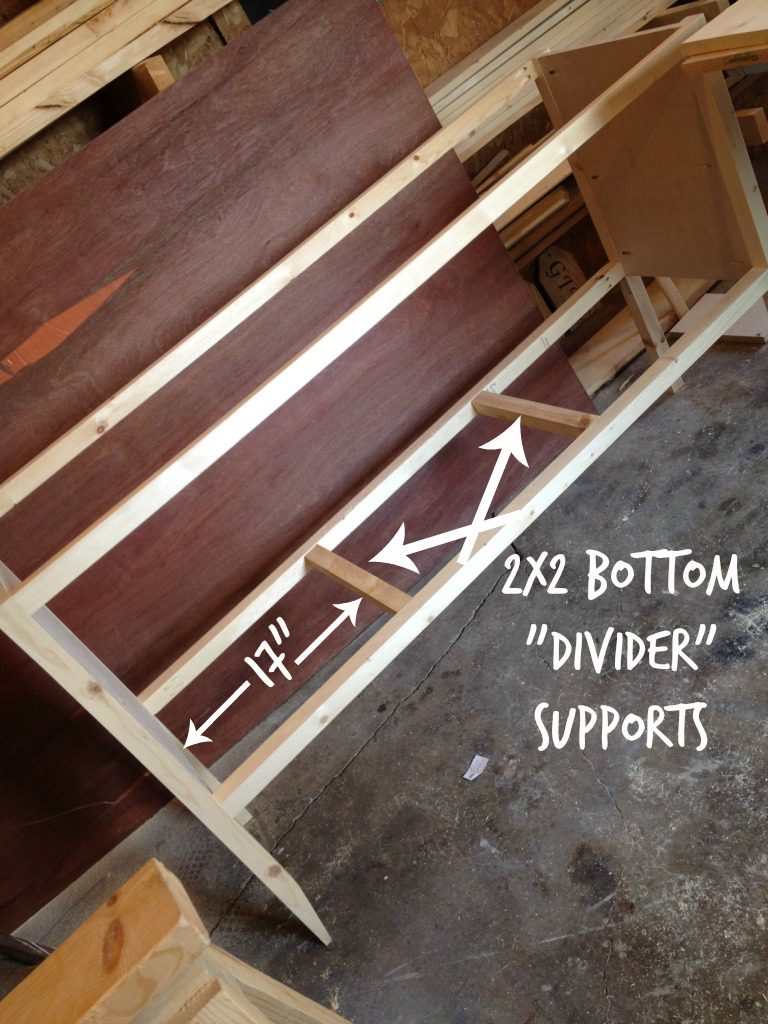
Then I attached 2x4s across the top as shown here. I used 2x4s here because I needed some surface area to silicone the top to the vanity. 2x4s gave me more surface area to glue than a 2×2 would. I used ¾” pocket holes and 1 ¼” pocket hole screws to attach them (not 1 ½” pocket holes). Then I added in the two front 2×2 dividers. I pocket hole screwed them into the bottom support and used wood screws to screw through the 2x4s into the top of the 2×2 dividers.

I know this would be so much less complicated if the top 1×2 was actually a 2×2. Bear with me.
.
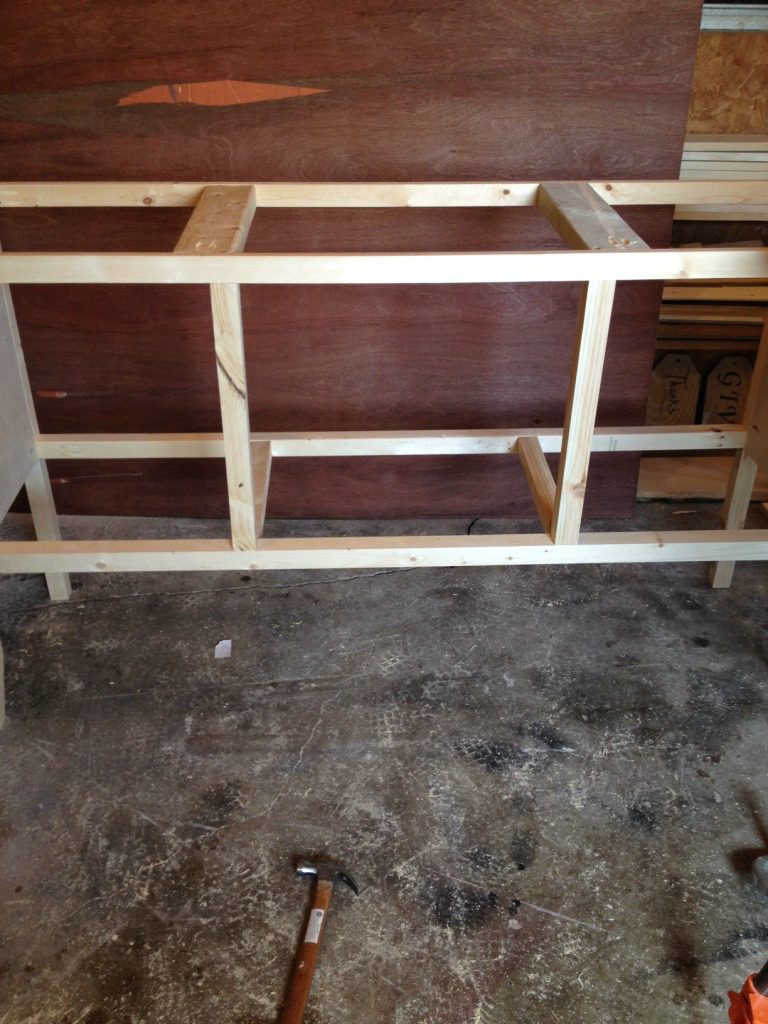
Then I added plywood pieces using pocket holes and screws as the picture shows.
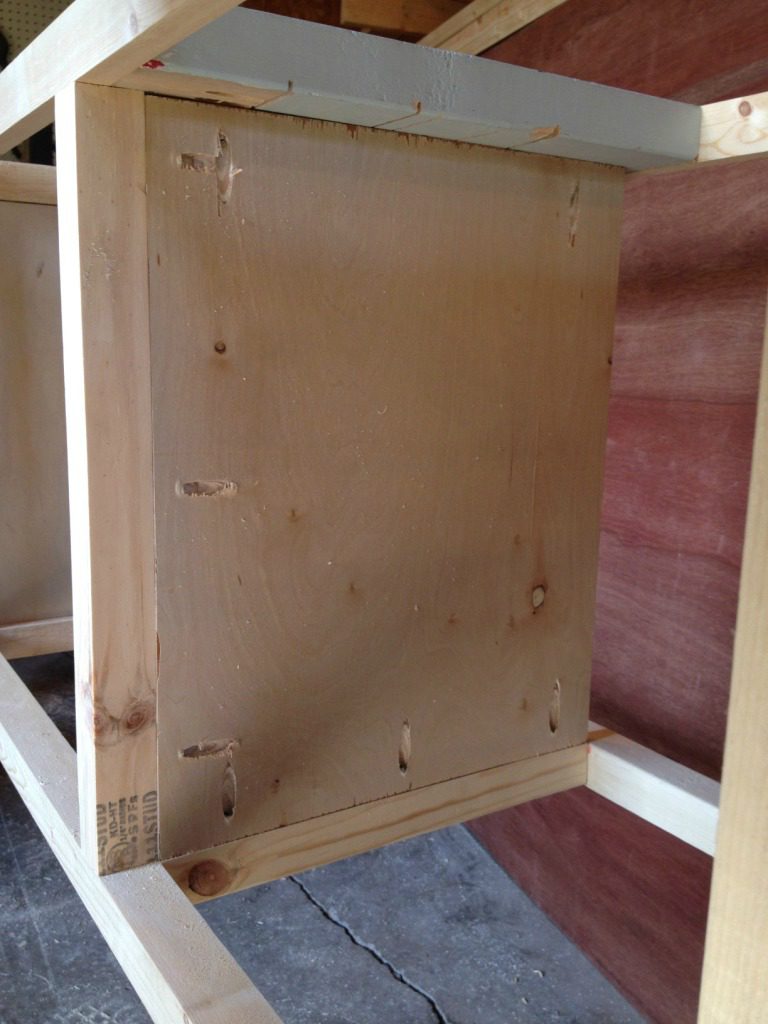
After this, it is a good idea to add 2x2s on the back side like you did the front, but I did that step later because I wasn’t sure if I wanted to put backing on it. I chose not to, so I later added the back 2x2s. You can see in the picture where I screwed these 2x2s into the plywood dividers.
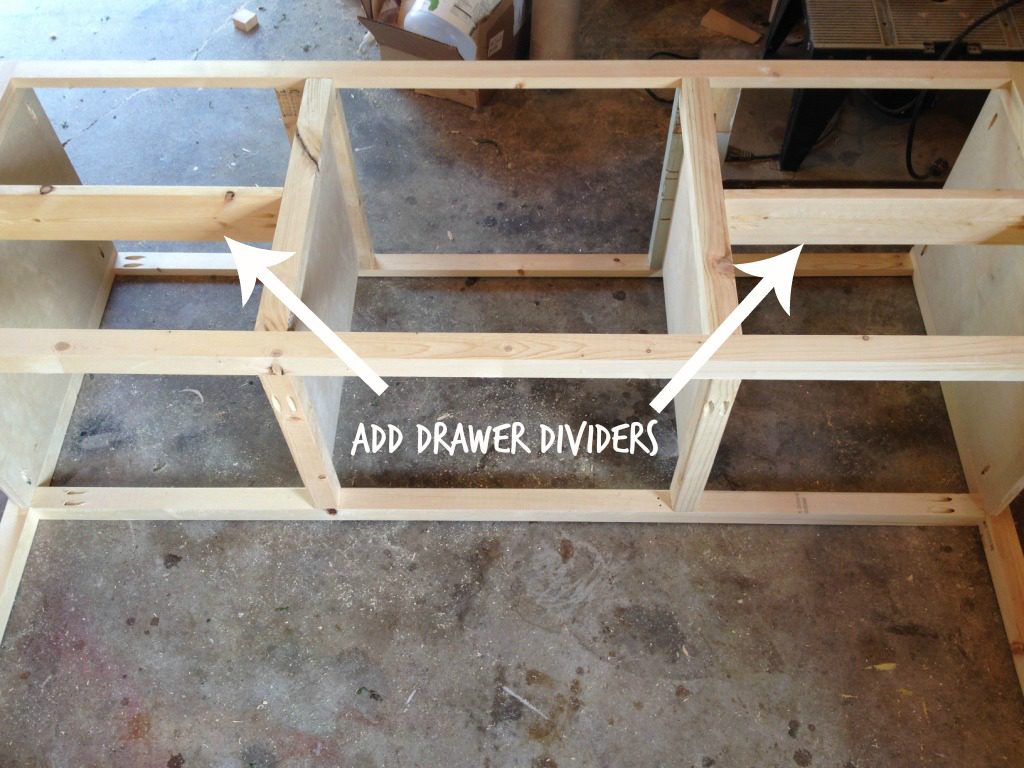
4. Add drawer dividers
I added dividers between the drawers at this point using pocket holes and screws on the bottom side. This is totally optional, I just liked the extra divider.
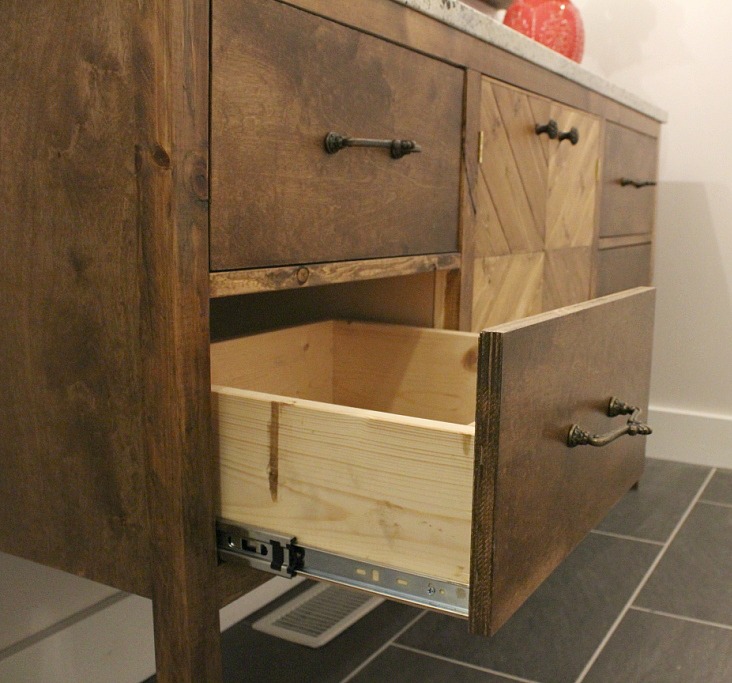
5. Add drawers
You can check out how to make drawers a few different ways in my post here. I used these ball bearing drawer slides and they are awesome! Easy to install and the drawers slide smoothly. These on Amazon are the cheapest that I have found if you are buying several at a time. I used these when I made my dresser, too, and they work great!
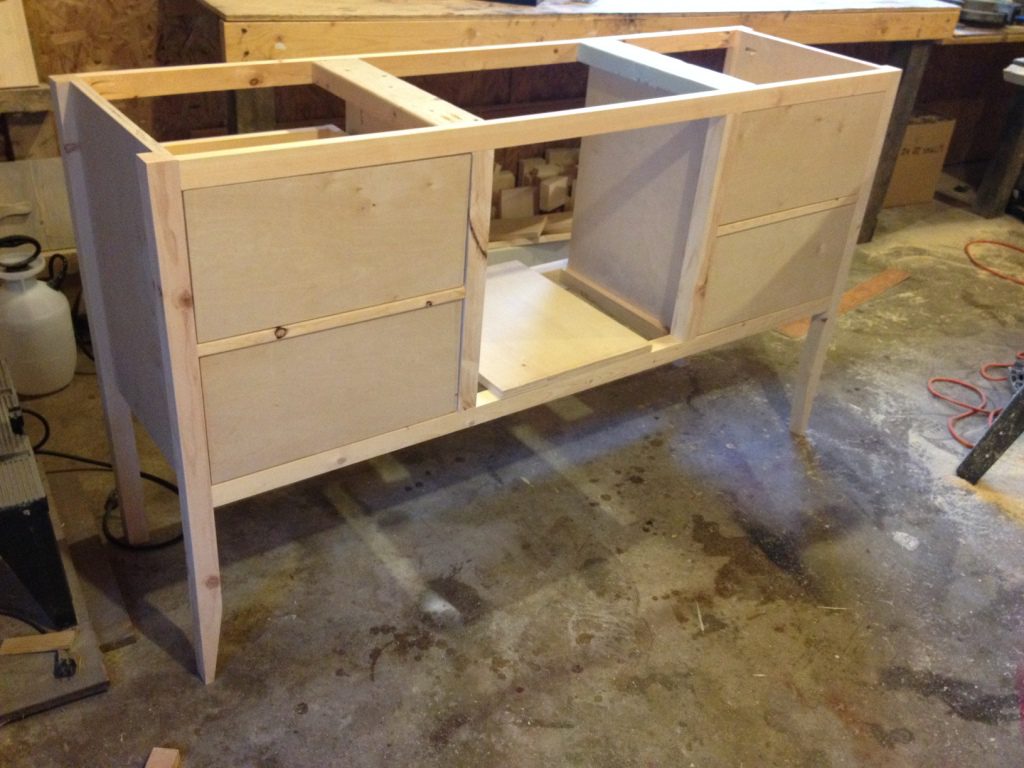
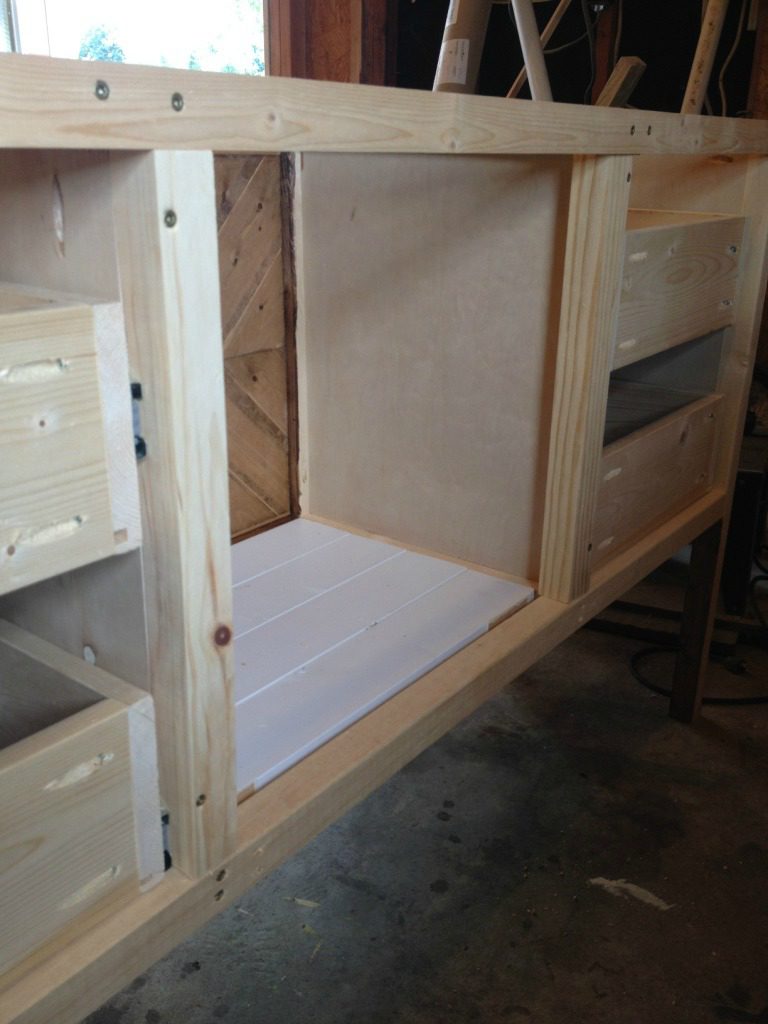
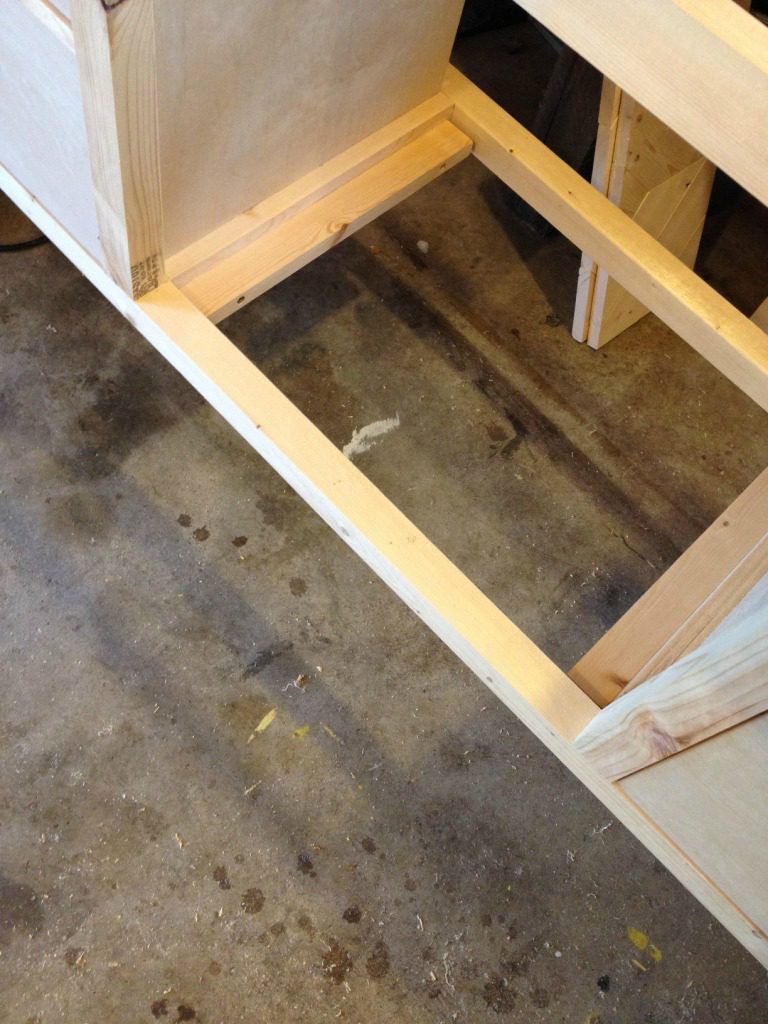
6. Add bottom piece
Okay, I’m going to digress for a minute. I have really long hair. (See? This was 6 months ago…it’s actually even longer now.)
I know…like what the heck does that have to do with anything? Well, if you have long hair, sometimes it gets in places…places that tend to clog. Think drains…and p-traps. I know…totally gross. But that’s real life.
So since I made the bottom of the cabinet so high off the ground, there isn’t a lot of room to work on the p-trap…which has to be cleaned out fairly often. In order to make this easier on everyone Danny, I cut my hair I made the bottom piece removable.
.
I screwed scrap pieces of 1×2 into the middle divider supports on the bottom and set a piece of plywood in. This way, when it’s time to clean the trap, we just remove the plywood, clean the trap, then put the plywood back in place. Easy peasy. If you don’t have this problem, you could simply screw the bottom piece in place and enjoy not having to deal with your nasty p-trap.
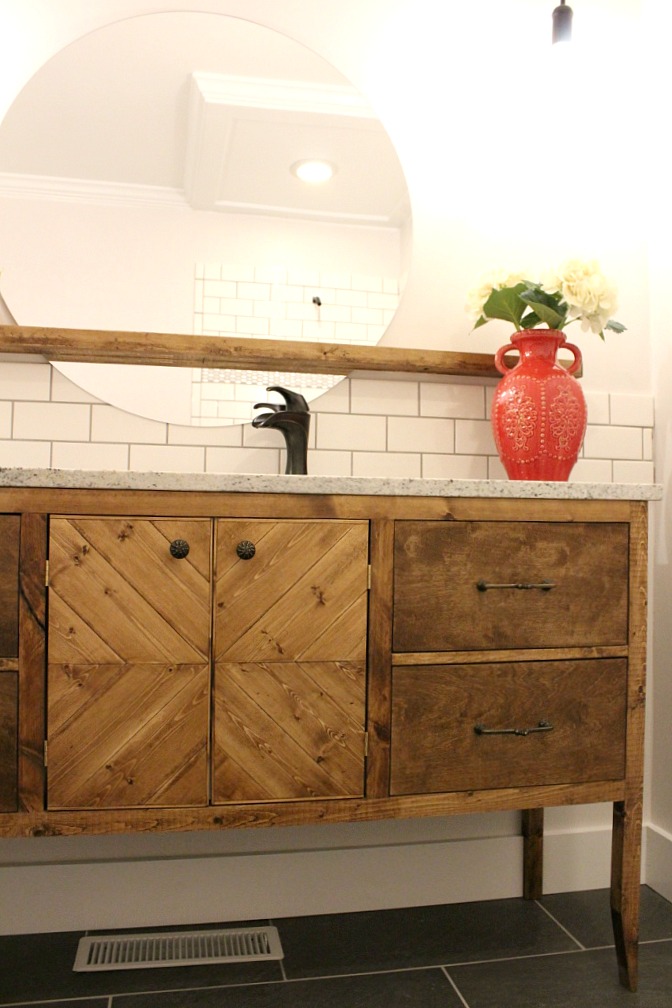
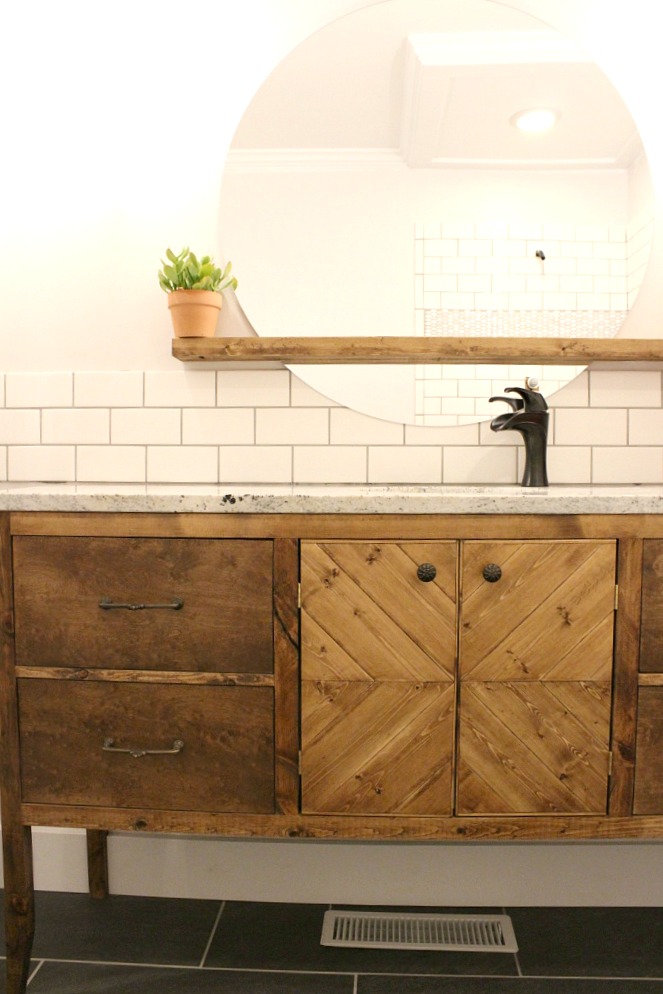
7. Add doors
You can make doors lots of ways. I have a tutorial here on how to make simple shaker style doors. You could also just cut plain, flat pieces of plywood for your doors. Or use plywood and attach some fancy molding. Possibilities are endless.
.
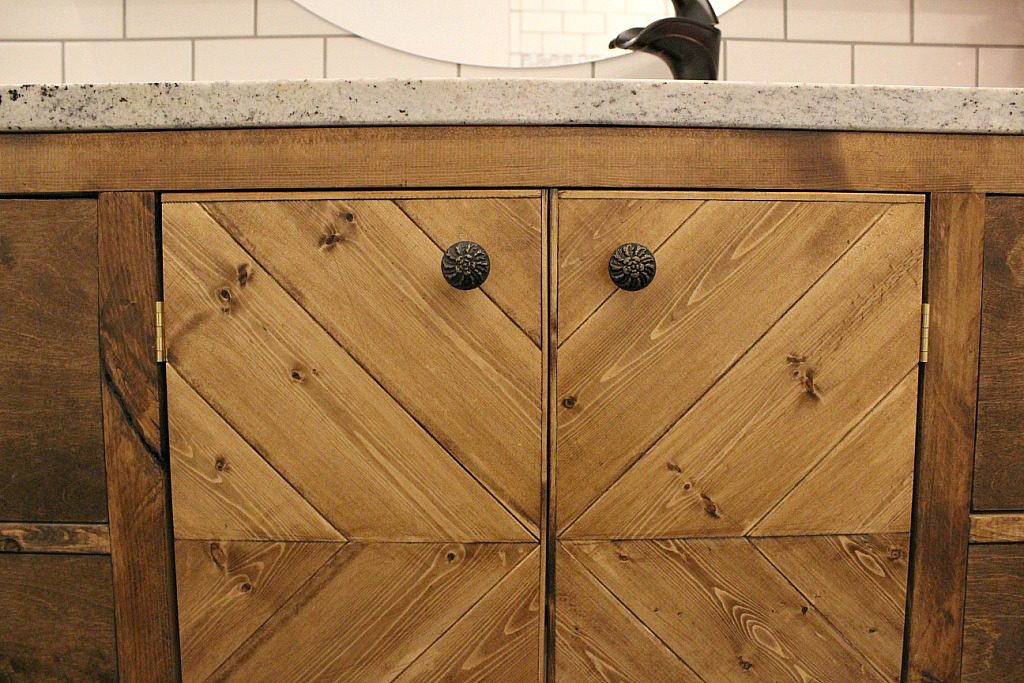
I wanted something different, so I make these “geometric” doors. I have no idea what you would call them, but “geometric” seems okay haha. Bascially, I made four squares of identical size out of 1x4s cut at 45 degree angles. The length will obviously depend on the size you need your doors.

First I cut all my pieces and dry fit them together to make sure the total height and depth was large enough for what I needed.
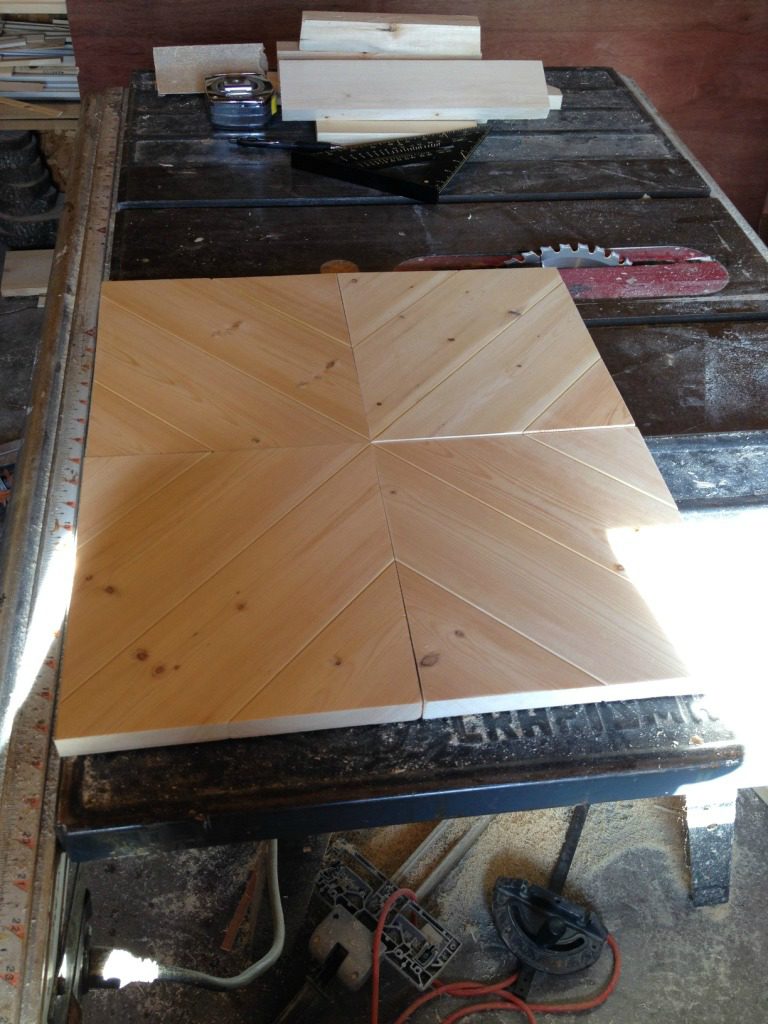
Then I glued each individual square up separately.
Once the glue was dry, I glued two squares together at a time. These were my two separate doors.
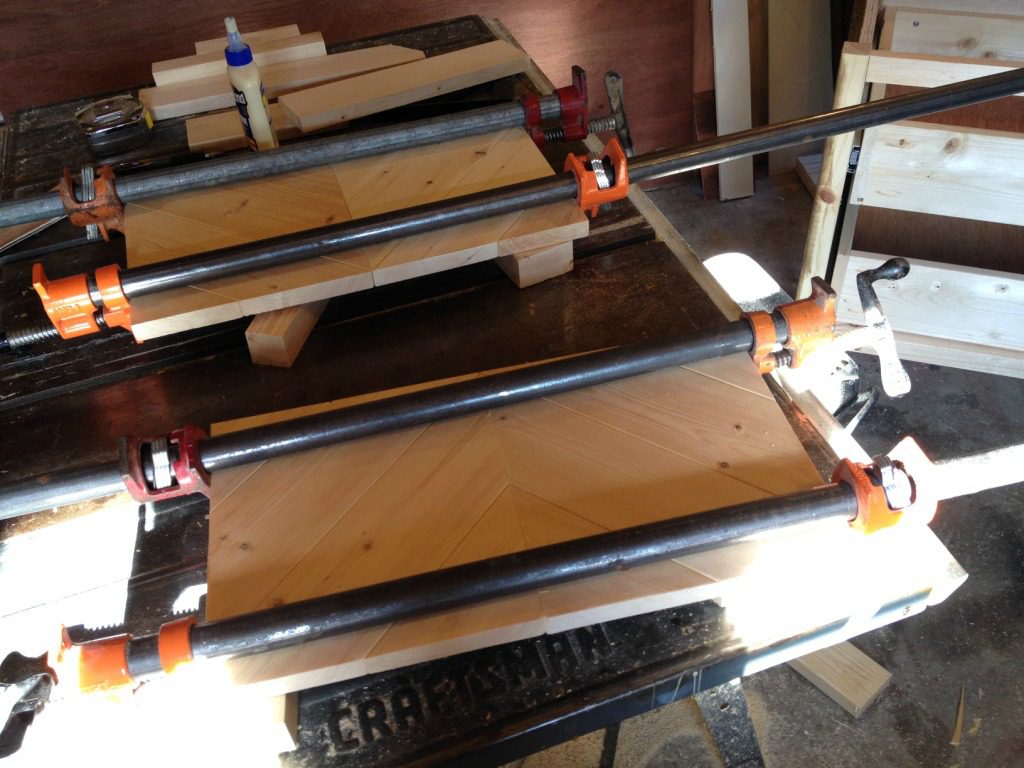
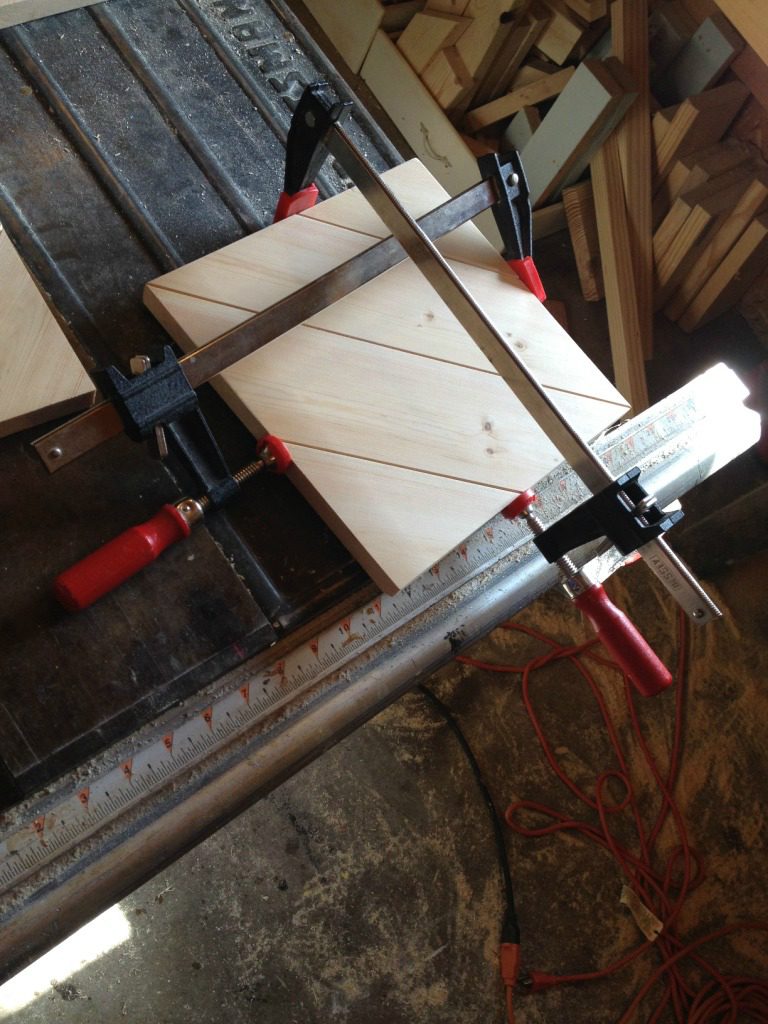
I trimmed the edges on the table saw (but you could use a large miter saw or circular saw) to make them straight and smooth. I added a thin trim piece around the edges for some extra detail. Sorry, I forgot to take pictures of that until after I already stained them.
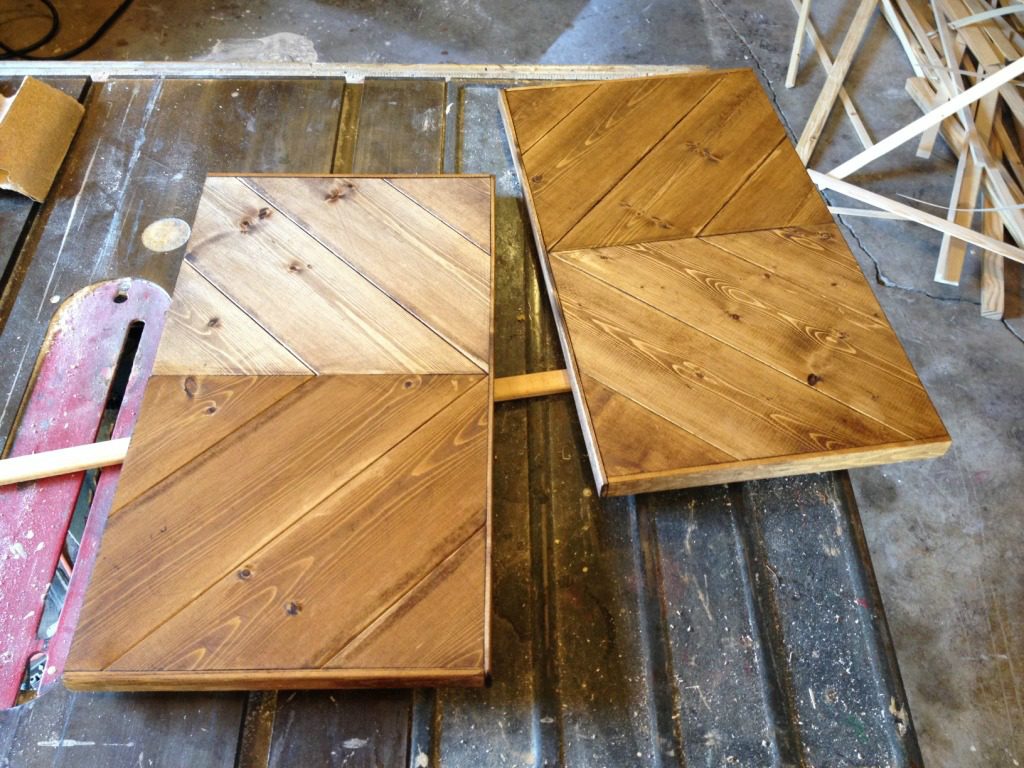
After everything was stained, I attached the doors using small brass hinges.
8. Finish with stain and poly
I stained the piece in Minwax Provincial and used Minwax Polycrylic for a clear coat. I really love Polycrylic…it’s easy to use, doesn’t stink, and it’s easy to clean up.
.
We sat the top on just to make sure it fit and the color looked okay together. And like I said before…left it sitting in the bedroom for 3 months haha.
I added some brass hardware that I found at Hobby Lobby. I originally bought the pulls for my dresser, but changed my mind. You can read that post and get the whole story about my indecision on hardware.
When it was time to install, we attached the top to the vanity using silicone on those 2x4s I mentioned earlier. Danny was afraid it would be a little wobbly since the legs and frame were so small and the granite so heavy, but it’s rock solid after screwing it into the wall during install.
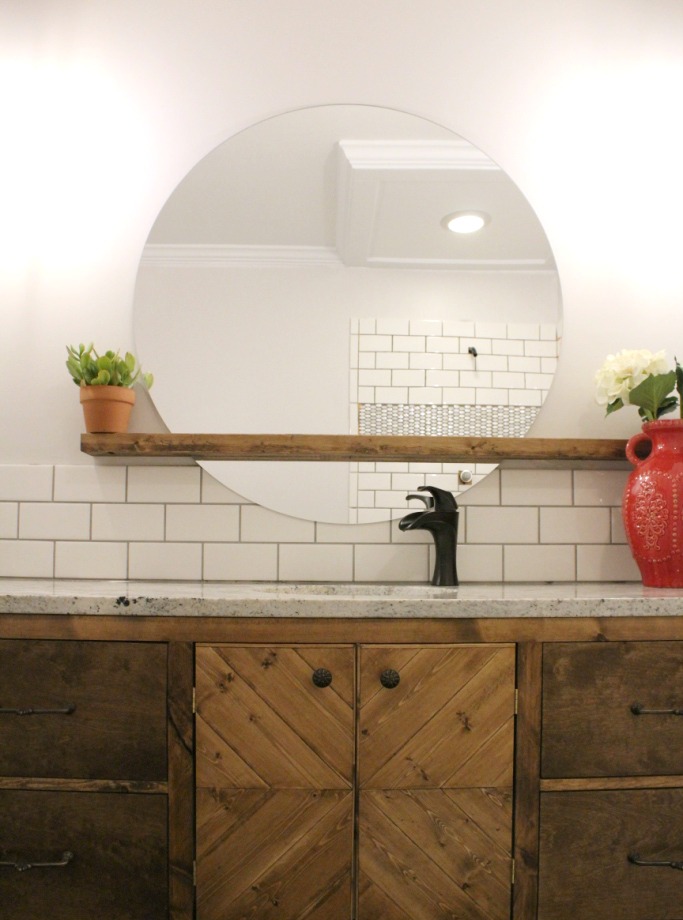
I was afraid it wouldn’t look good in our new bathroom, but I’m really loving this design and style in here. I wanted our bathroom to have a modern/boho/eclectic/mid-century feel and this vanity along with this mirror are really doing a good job I think.
What do you guys think?

Love it? Hate it? It’s cool…you can tell me : )
.
But, for real, I love it. I don’t blame it for stealing the show every now and then, but once the whole bathroom is done, it’s going to have to share the spotlight with a few other super fun projects I’ve got in here. Can’t wait to show you what I decided to do above the toilet AND what I’ve decided to do for “wall art” in here. I’ll go ahead and tell you that Danny says it is “creepy,” but I think it’s cute. Stay tuned 😉
.
But, before you go, don’t forget to pin for later! Until next time, happy building!

Shirley says
Shara as much as I adore the cabinet (and I would build one) I have to say my favorite is the mirror. I’ve had my eye on that style ever since I first saw it quite some time ago. I always loved round and even oval mirrors but this took it to a new level. They really do look great together! To me the cabinet almost looks craftsman style.
Shara, Woodshop Diaries says
Thank you! Yes, I love this mirror, too!
Elisa says
Hi. What a lovely piece! Not including waiting for dry times, etc…how long would you estimate it took you in “man hours” to do this piece (at your skill level.)?
Shara, Woodshop Diaries says
Thank you! I would say it probably took around 6-7 hours.
Taylor says
I love this vanity! My husband and I just bought our first house and our space and budget are tiny. I love how you made a single sink vanity beautiful and with lots of counter space. We will be building this when we get to that phase of our bathroom remodel. Thanks for sharing!
Shara, Woodshop Diaries says
Thank you! I’m so glad you liked this project! Good luck on your remodel! 🙂
Kelsy says
SUch a cute vanity! Can you tell me how long the legs are from floor to cabinet? I’m working on something similar and trying to decide if I like a shelf on the bottom or if forgoing one is ok. I’d love to know how much leg I’m looking at for comparison ?
Shara, Woodshop Diaries says
My vanity is 36″ tall, but the countertop is 1″ thick, so my legs are 35″ long. Hope that helps!
Lauren says
Hey there! I’d love to give this project a try for our bathroom vanity but I’m on a pretty tight budget… approximately how much did this cost to build, not including the cost of the granite top?
Shara, Woodshop Diaries says
Hi!! I would estimate this costs about $125 if you bought all the hardware and lumber.
Crystal says
I just have to say this is bsasically my favorite on all I’ve seen on pinterest!!! I’ve been scouring for a while now as I’m planning out our new house, and like you, I’m so indecisive because I like so many different things. Yet, you pulled off the combo of the feel you wanted in here quite well! (same combo I like) I wish I had the time and knowledge to do what you do! I can’t believe you didn’t know if you liked it, though!! ha It’s gorgeous!!!
Shara, Woodshop Diaries says
Thank you so much! I think I got lucky with the design coming together haha. I didn’t plan for it to look like this, but I do really like it now! It’s a little modern and a little classic 🙂
Craig says
What kind of hinges did you use on the door?
Shara, Woodshop Diaries says
Hi Craig, I used brass butt hinges for the doors on this vanity.
Saps says
This vanity is gorgeous! Amazing job! I was on Pinterest looking for inspiration for a wood master vanity and came across your site. What is the length of this vanity? I would absolutely love something like this in my master vanity with double sinks. You think that would be doable? I’m assuming we would have to have cabinets on each side below the sinks and then drawers in the middle to account for plumbing and such. Also, what does the cabinet look like inside in terms of storage? Is there any or does the plumbing take the whole space? Sorry for the millions of questions!! This is all so new to me, thanks!!
Shara, Woodshop Diaries says
Thank you!! This vanity is 58″ wide. The top is 60″ so this allows for an inch overhang on both sides. This is definitely doable with two sinks, we just wanted to have more counter space and storage inside the cabinet, so we went with one. You could do drawers on the sides still even with a sink over it, but you would have to cut out the drawers so they would fit around the plumbing. For me, that was more trouble than it’s worth, so I did an “open cabinet” to house the plumbing instead. This vanity has plenty of storage for us. The drawers are fairly large, so they are great for storage and behind the doors has quite a bit as well, but we have to fold our towels an extra fold and stack them on each side of the P-trap since it comes down in the middle. We can still store 7-8 towels in there at a time. I store the rest of our towels in a small cabinet above the toilet. I hope that helps!!
M Amello says
My love affair with pocket screws ended when I realized just how inferior the joints become as opposed to more traditional joinery that was developed over the centuries of holding things together. Sure, they’re more work and it takes more effort, but nothing about pocket screws will ever beat a tenon and mortise or even a half lap joint. Pocket joinery is a joint failure just waiting to happen.
Other than that it looks great.
Shara, Woodshop Diaries says
I appreciate your outlook and your comment. I am writing to weekend woodworkers and beginners. I try to keep things as simple and cheap as possible. Most of my readers cannot afford the equipment, nor do they have the time to learn the details of fine woodworking. But they can afford and quickly learn to use a $40 pocket hole jig. So that is what I do. If my readers were fine woodworkers, I would not use pocket holes. But, most of my readers claim woodworking as their hobby, they aren’t cabinet builders by trade. For the record, however, everything I’ve built with pocket holes is still functioning just fine 🙂
Emily says
Beautiful design- what color white paint is on your walls?
Shara, Woodshop Diaries says
Thank you! The paint color is SW Eider White 🙂
Kelsey says
Absolutely beautiful!
Shara, Woodshop Diaries says
Thank you!!
Chris Griffin says
I Love the vanity it is bad ass.!!! I just have one small question about the drawers how did you make them? Did you just make a box and nail a faceplate to the drawer? Thanks again and love the plans.!! Thanks
Shara, Woodshop Diaries says
Thank you so much! I have a post about how I make drawers (you can search the blog for “drawers” to find it). For this vanity, I screwed four boards together to make the box, put 1/4″ plywood on the bottom and screwed the face on from the back side.
Jen Attridge says
You are so talented! I want the vanity base mirror and shelf should you ever decide t sell it!
Shara, Woodshop Diaries says
Thank you! 🙂
Mindi says
Definitely love it!!❤️
Shara, Woodshop Diaries says
Thank you Mindi!!
Tom Clarke says
I too am a DIY’er but it’s from other folks plans including many of yours. I am always impressed not only with your shop skills but with your design creativity. This project is almost at the top of my list behind the “twisty table”. Keep those projects coming.
Shara, Woodshop Diaries says
Thanks Tom! I appreciate you always following along 🙂