Hey guys, how was your weekend? I hope it was awesome! It’s Monday again, so that is a little depressing, but I am still riding on a high from this weekend (not literally…). I was featured by ANA WHITE!!!! In case you think I am lying, check it out here. I know, right!? I am giddy! Just out of the blue I got on Facebook this Saturday and saw that she had featured me and my sliding barn doors. Seems like that was a popular post…it was featured on Hometalk as well! If you haven’t seen it already, you are missing out 🙂
.
On top of that excitement, I also finished this twisty table to submit for the one board challenge. I have seen several DIY bloggers advertise a one board challenge contest where the main rules are that you can only use a 1x8x8ft board, but you can build anything you want out of it. And you get a chance to win some sweet tools! I told Danny “I’m totally doing this!”
.
So I thought for weeks about what to build and I finally decided on a twisty side table. I could have done a million things (and may should have in order to win), but this sounded fun because it was a challenge to figure out. When I posted it on Instagram as my “official submission” yesterday, I had a couple of what I consider “big names” in the DIY blogging world comment on it!!! Like, whoa! I know, I am a little crazy, but that is exciting to me!
So, today I wanted to show you how I built it. I’m going to attempt to explain how this was done…but it’s a little hard to explain, so bear with me, ok?
.
You can find the downloadable plans here that might explain a little better.
.
NOTE: This post contains affiliate links. As always, all opinions are my own. Please see disclosure policy for more information.
.
First I cut two pieces from the board a little longer than I wanted the height of the table to be. These will be the “legs.” I made a jig from a few pieces of scrap wood that would accommodate the angle of the board so that it would cut a straight line from top left corner to bottom right corner.

I placed the board in the jig as shown and pocket hole screwed it to the jig so that it wouldn’t move while I ran it through the saw. If you don’t already own a Kreg Jig![]() for pocket holes, I highly recommend getting one. They are SUPER handy and it’s probably my most used tool in the shop. (PS don’t forget the screws
for pocket holes, I highly recommend getting one. They are SUPER handy and it’s probably my most used tool in the shop. (PS don’t forget the screws![]() )
)

I tilted my saw blade to a 45 degree angle and lined my board up so that the blade would cut right at the top corner as shown in the pic below.

I ran the board through the saw using the jig. Ignore the mess in my shop. I have a nice wood rack to hold all my wood….but I have a MASSIVE pile of random scraps on the floor with no place to go. I hate throwing away scraps…but let’s be honest, I will probably never find a use for 60% of what is there…I’m a scrap wood hoarder. Forgive the fact I am not wearing safety glasses…regular glasses count, too, right? Haha, no, no, they don’t. Do as I say and not as I do, kids.

Once that is cut, I had two triangle shaped boards. The board that is attached to the jig is the good one, so I set it aside. Then I ran the other triangle and the other board through the same way.
You end up having four triangles that look like the ones below.

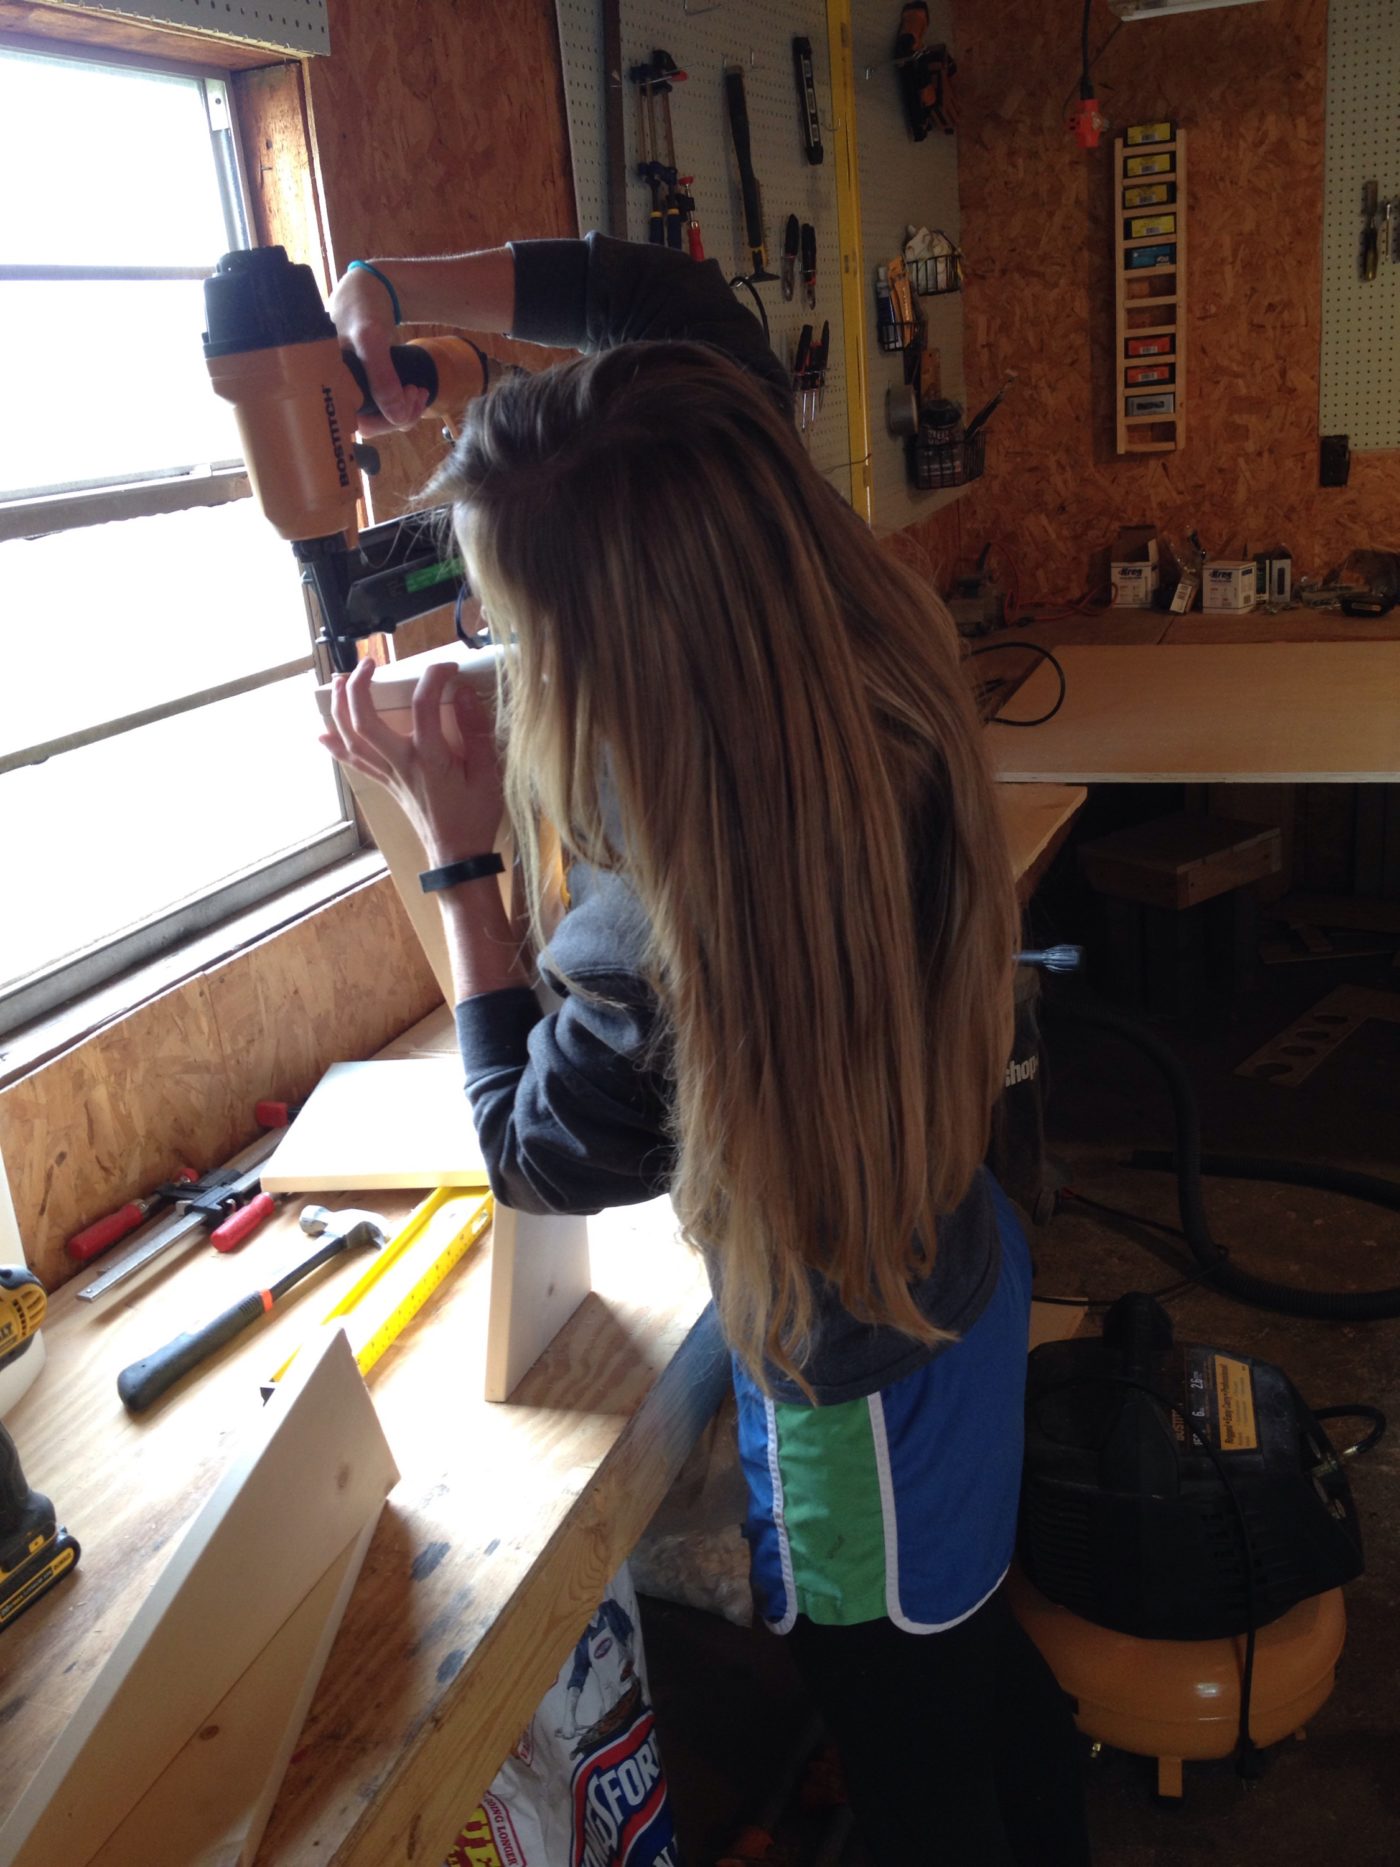
I took two triangles and fit them together like the picture shows below. I put some glue on the edge of one and then I….wait for it…..NAILED IT! HAHA…get it, nailed it? No, really, I put a few nails in it with my nail gun![]() . I’ve been waiting for a while to find a good spot to be able to say that I “nailed it.” You know, like “I totally nailed it with this project”? Ha…funny, right? No? Okay, moving on…
. I’ve been waiting for a while to find a good spot to be able to say that I “nailed it.” You know, like “I totally nailed it with this project”? Ha…funny, right? No? Okay, moving on…
.
I did this with all four triangles, so I had two “legs” that looked like this:

It took me forever messing with these angles to finally figure out it was really this easy.
.
I placed the board on my miter saw as shown. I did this for both ends of both legs. I cut one at a time and set the legs up like they would be on the table to make sure that I got the directions right on the angles.


Danny took these pictures for me….I never realized my hair was this long. WHOA. I may or may not be a hippie…and I may or may not need more highlights…don’t judge…
.
Once the angles on the legs were cut, I fit everything together to make the top and bottom pieces. I lined them up on the remaining pieces of the 1×8 board and marked where I needed to cut for the top and the bottom piece, and cut it. Then, I nailed it on with the nail gun.
Once the bottom was nailed on, I flipped it over and marked where to cut for the top piece and cut it and nailed it on the same way, making sure to line everything up well.

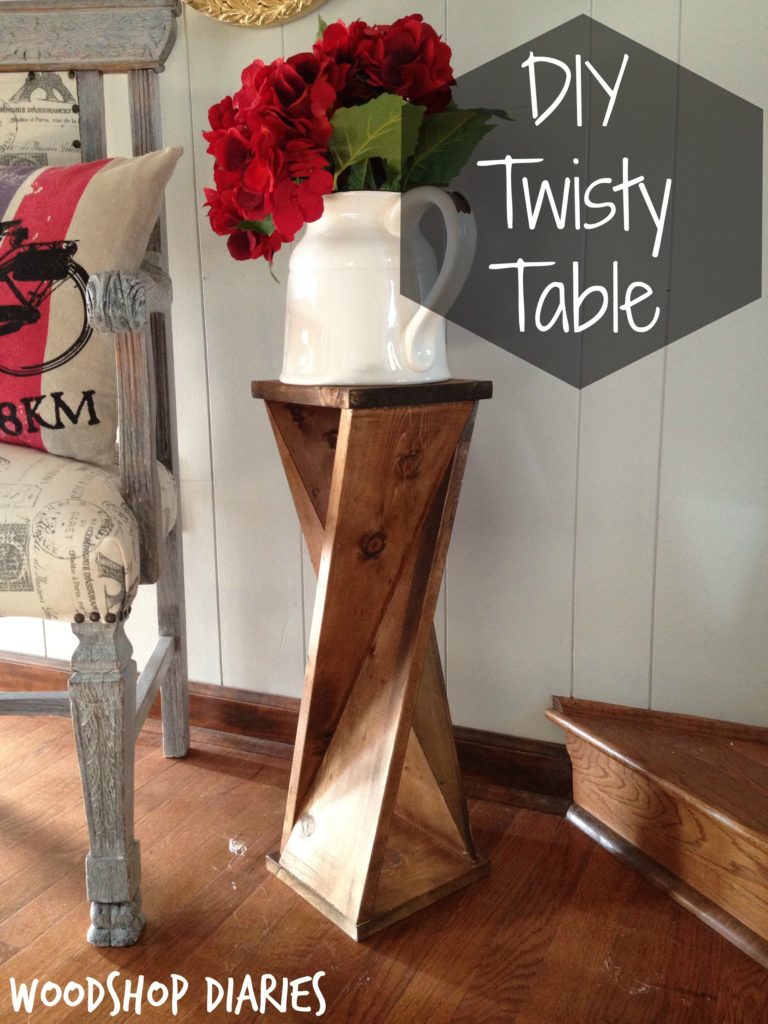
Then, I stained it, and brought it inside! I know you can see marks where I sanded against the grain…I know this is against the “rules” of woodworking. My miter saw blade is dull and I haven’t gotten a new one yet, so I have to sand off the rough spots after each cut and I thought I sanded off all the scratches, but apparently I did not. Amateur mistake. That’s me….an amateur…

But, seriously, isn’t it adorable!?! Please ignore the dust bunnies…I’ve been busy in the shop and haven’t vacuumed in….let’s not discuss details.


Hope you enjoyed the making of this twisty table as much as I did 🙂 Trust me, you couldn’t have…I had so much fun making this!
.
Now, get to building! Oh and if you have any more ideas for another one board challenge project, I would love to hear it….I’m running out of creativity and I’d love to make one more project! Be sure to follow me on Instagram and Facebook for lots more projects coming soon!
.
Don’t forget to pin for later!
NOTE: As with any tutorial and how to on the site, I am happy to provide you with the instructions for free in the post. I enjoy inspiring others to make their own furniture and crafts. However, since I receive no compensation for these “plans,” I ask that you please be respectful of the time that was put into making and writing these projects and instructions and please ask permission before using them to make and sell for profit.
Just found this, and I think it’s great. Love the fact that you just ‘visualize’ the cuts. The video demo was Awesome!
I’m going to try to adapt this into various heights, between 3 and 8 inches tall, using thin pallet wood to make candlesticks. Might have to do some math to calculate the width to rip the boards.
Thank you! That sounds so cool to make different sizes to use as candlesticks!
Just found your blog….gotta love Google! Looking at making a side-table to fit in the awkward corner between two rectangular couches. Got some ideas for the top (chevron reclaimed pallet wood), and I now have my idea for legs. 🙂 Two of these would look awesome, but I’ll probably make the base a little bit wider on each side for stability. Bookmarking your site!!!
P.S.: A day without sarcasm is ….like….a nightmare.
Awesome! That top sounds like it will look REALLY cool. I’d love to see what you do with these as bases. I hope you find the other tutorials and projects on the site inspiring as well. And PS, there is always a little sarcasm thrown into every post 😉 so I hope you stick around!
Well, never got around to the table, wife couldn’t think of a place to put it. So I got into scroll-sawing instead. LOL Plenty of wall space! I did put a twisty-table together this weekend, we recently relocated from DFW to Austin and its been over a month since I’ve had a proper shop. Used some reclaimed wood that came from our old attic, no idea what it was other than wood-ish. For a first attempt, I think it turned out fairly well, considering most of my tools are hand-me-downs older than I am and made more for portability to a worksite than in a dedicated woodwork shop. They work, but my table-saw, for instance, wouldn’t fit the jig and the fence so I had to eyeball everything. It all fit together (with a few well-placed screws and a lot of prayer) and stands more or less level, so a win overall!
Loved the idea so I built one for myself. I could not get the top bottom angles to line up right. I watched how you cut them, but still had to do quite a bit of shimming to get the table to sit flat.
PS you did a much better job explaining it on the tutorial below:
https://www.youtube.com/watch?v=_hyLzyDlPSA
Love the twisty table I made one and it turned out great
Awesome!! So glad to hear you enjoyed the project and was able to make your own! 🙂
Great job, love ur personality! I want to make this table, I love it btw, and I had a few questions…can I use a circular saw instead of table saw? Can I use the jig with the circular saw? If so are there any adjustments? Then when I make the cuts do u cut at an angle? I think it said 45 degree in the post…just want to make sure? I really love this ideas and want to make it but I’m having a bit of trouble understanding the jig, I read the other comments and saw how u described how to make it but how u described it isn’t sinking in, also I hope I can make it with a circular saw. Thanks for ur great post!
Hi Michelle! Theoretically, you should be able to make it with a circular saw, BUT, when I tried it (because I tried that before using the table saw) i had some trouble. You have to bevel the circ saw blade to 45 degrees and since the board is pretty small, it was difficult to cut it like that. My blade kept getting pinched and wouldn’t cut. BUT it may work better for you. If you do it with a circ saw, just draw a line from a top corner to the opposite bottom corner and cut along that line with a 45 degree bevel. You can clamp a straight edge to it cut cut a straight line. You will then cut one of those pieces again at the same bevel just like you would have to if using the table saw. Think of it as basically cutting out a little 90 degree angle block from the middle of the board so that they will “fold” together at the corners. I don’t recommend using the circ saw for this, but it might be possible…but i didn’t have much luck with it. For more info about the jig, i have a video on my facebook page (it was back in Nov.) you can check out 🙂 Hope that helps!
My Grandaddy did these style end tables for my Grandmama and Mom for mothers day one year. It was that same year he was diagnosed with lung cancer and passed away a short time later. He was always in his wood shed ( as we called it ) making new styles of wood decor. It made me so happy to see someone else had a vision like his. Thank you for bringing back a beautiful memory of my Grandaddy. Just a side note you can make them larger and also do the same affect with a coffee table as well. If you feel interested in doing so. He did a whole living room set for them and a couple small ones for plants. Just a idea if you wanted to add to this style. Best wishes to you and your wood adventures.
Jo
My saw tilts to the right…will this make a difference?i guess I would keep piece that is not on jig.
I believe that would make sense…keep the one that isn’t on the jig.
What is the final height of this table?
I believe the final height of my table was about 22″.
So cool 🙂
I love this project and want to make a few of these to go on my deck. The angles make my head swim but my hubby will have no trouble with them and together I think we can knock a few of these out in no time.
Awesome! So glad you liked the project!
I would really like to try this it would look great on my porch. I don’t have a 1 x 8 here. I will read it and look at the pictures again before I cut anything.
So glad you liked the project!! If you build one for yourself, I would love to know how it turns out!
Crazy, so beautifull !!! thank’s for the plans i’m going to do it !!! send love & gratitude from israel 🙂
Thank you!! Good Luck!
I’m trying to cut the top and bottom for the table but for some reason they don’t square up at one of the ends . Are the top and bottom same size?
Yes the top and bottom pieces should be the same size, or VERY close to the same size.
That is really cool! How did you make the jig you made from the scrap wood?
If you look in earlier comments, I give details on how to make the jig. Hope that helps!
I’m stuck on how to cut the ends of the legs for the top and bottom can you elaborate maybe more pics if you have any thanks
I’m sorry the picture in the post is the only picture I have of this part of the project. Try to copy what I did in that picture and it should work.
Trying to cut the top and bottom of the table but it’s not lining up on both ends. Are they the same size? What am I doing wrong? I want to complete this twisted table. Please help…I need some guidance. Thanks.
Yes they should be the same size. I cut one piece by setting both legs on the board and lining up the edges. I marked where to cut and cut that piece. I nailed it on, then flipped it over and set the legs on the board again, marked, and then cut the other side. They both should be about the same size, but I didn’t measure exactly, just marked and cut. Also, they should be pretty close to square, not a rectangle.
Gracias, hermoso proyecto ¡imposible no solicitar su permiso para hacer una mesa igual!!!!
Hello Sarah
Very nice project
Your cutting jig is a good idea
I will try to make one for me in the future
Thanks for sharing
Thank you! Glad you liked it!
Who cares about the dust bunnies when there is this beauty there? Great work!
Thank you! I agree…I ignore the bunnies as long as possible 🙂
This is a nice project. Could you please share the link to instruction. Also how did you make the jig you used.
Hi Reggie, thanks for you comment! Actually, these are the instructions. I believe everything you need can be found in this post. And as far as how the jig is made, you basically need to cut a notch in a piece of scrap wood so that a diagonal line on the 1×8 (or whatever size piece of lumber you are using) leg piece is parallel with the straight edge of the scrap wood. The easiest way I do this is draw the diagonal on the leg piece and lay it on the scrap wood so the diagonal is parallel with one straight edge of the scrap. Trace around the leg piece onto the scrap and cut that notch out.
Loved this project and thanks to Miss Allen, my high school trigonometry teacher I had no problem figuring out the angles.
what kind of stain did you use and the color. I loved the table it is different but cute.
Thank you. I used Minwax Provincial on this one.
love the design and complexity but simplicity of your piece, but please please tie back your hair when working with power tools.
Thank you!
But if she ties back those gorgeous locks how can she keep looking like a mermaid princess who can kick ass all around a wood shop?! 🙂
HAHAHA this cracks me up!!
Just a few things…
#1. I totally “get” your sense of humor. It’s like talking to myself, which I often do.
#2. Do you have a PINK compressor, and if so, WOW!
#3. And probably most importantly, I love, love, love your table design. Best part is if one table top gets wonky, you can just flip “er over, win-win!
Great work!!!
Prudence Canfield
PruVisions
Thank you so much! And my compressor is actually yellow…I’m not a big fan of pink haha. I do appreciate you taking the time to read and I hope you enjoyed it.
Do you have measurements of your jig? That would really help!
I’m so sorry! I do not have these measurements on hand. I can go home and measure it, but honestly I think it’s probably easier to make your jig this way: cut your board to the length you want it (as I said in the blog, I did 2ft, but you could go shorter if you wanted a shorter table). Take a straight edge and draw a line from one corner to the other to make a diagonal. Place the board on top of the scrap you will make your jig out of and measure from a straight, square edge of the jig to the diagonal you drew. Do this in a few places and adjust as needed to make sure the distance from the straight edge of the jig to the diagonal is the same at both ends. Then trace the corner where the board is laying on the jig and cut that piece out. Does that make any sense? Then your board will fit perfectly and when you run the jig along your rip guide, the blade will cut straight alone the diagonal.
So, after you cut the second diagonal on the other two pieces, the the third and fourth triangle are quite a bit narrower than the first two, correct? And do you pair a wide and a narrow triangle together?
So, after you cut the diagonal cut the second time, it’s quite a bit narrower than the first triangle, correct? Do you pair together a wide and a narrow one?
Actually all four triangles should be exactly the same size. Did you make adjustments to the table saw between pieces?
I must be missing something then. If you cut the full 1×8 diagonally in half, then you recut half of it to get the angles right, it is going to get narrower. Do you recut the first ones down to the size of the second ones?
They should be the same size. Try to look at the pictures in the post…this is hard to explain with just words. I’m sorry, I probably should have taken even more pictures during the process. You run your full 1×8 board through and cut it at 45 degrees along the diagonal. In the pictures, the piece on the side with the rip fence is the good piece, so take the other piece and flip it over and run it through the same way. DO NOT adjust the rip fence or the angle. It should end up the exact same size as the first diagonal you cut. Think of it this way: with the blade at 45 degrees, you are basically cutting a wedge out of the diagonal. So if you laid both pieces out like they were before you cut them, one side would touch on the diagonal and the other side would have a wedge cut out. Does that make any more sense?
No, I’m still struggling with this. If you cut the first diagonal, then flip that second half over and cut it without moving anything, you wont get a nice 45 degree angle. I’ll be able to make it work, but the photos and description aren’t adding up somehow. Thanks for your help. I really like the finished product.
The issue is that you’re trying to cut the entire 1×8. Shara cut two 2 foot pieces off of the 8 foot board. She then cut THOSE two foot pieces diagonally from one corner to the next
I’m going to have to try this , really is a cool idea ! Thankx for the instructions & pix !
Thank you! Let me know how it turns out!
This looks SO COOL! I love your style! 🙂
Thank you!
this is so different and so cool looking, it should win hands down xx
Haha thanks! I hope you’re right! There are some pretty awesome submissions so far. I’m impressed with what people can make out of a single board!
Did cutting the ends of the legs turn out to be a 7 degree angle?
Those angle cuts have to be just right for the table to sit flat. I say you did a Ha-Sum job. It looks great.
Yeah I agree. There is no way you just eye ball the angle for the top and bottom. And you cannot lay flat on the mitor saw after you attach each leg. Do you have more info ?
Hi, the saw blade on the table saw is a 45 degree angle. I didn’t eye ball the blade angle, just the distance from the rip fence to the blade. You can spend the time to figure out the miter angle for the miter saw, but it was easier not to do the math and just cut it according to the picture in the post where its sitting at a slight angle.