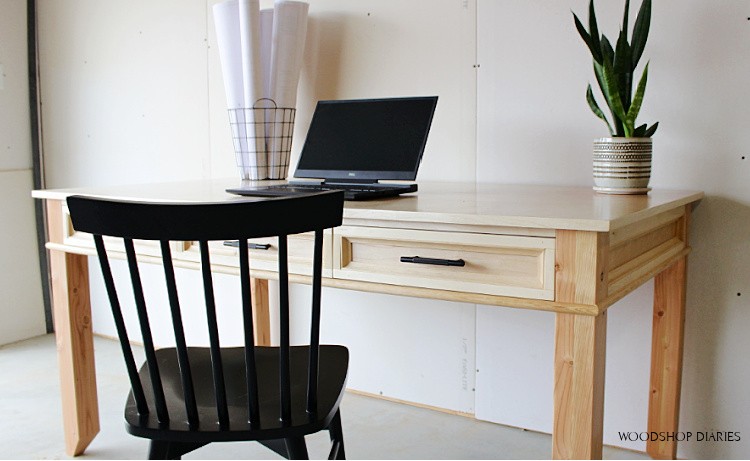
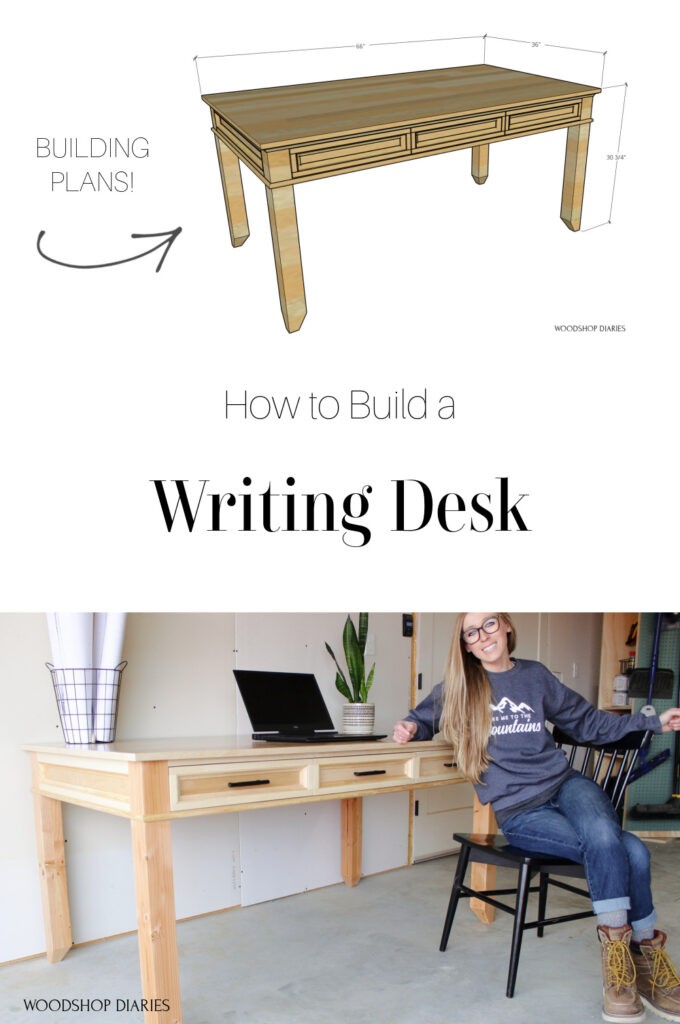
Build your own DIY Writing Desk with this tutorial!
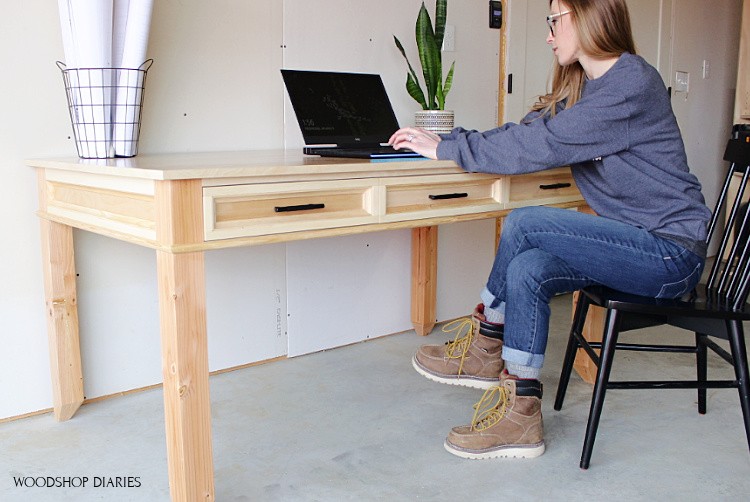
Towards the end of last year, I built several different types, sizes, and styles of desks, but I never built one quite like this.
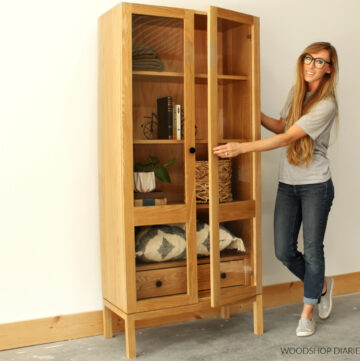
RELATED: Check out more DIY Desk Ideas Here!
.
It’s a pretty basic build—nothing super fancy–but it’s nice because unlike my other desk designs, this one has a pretty large work surface and can be used as a writing desk or even as a craft or dining table (with or without drawers!).
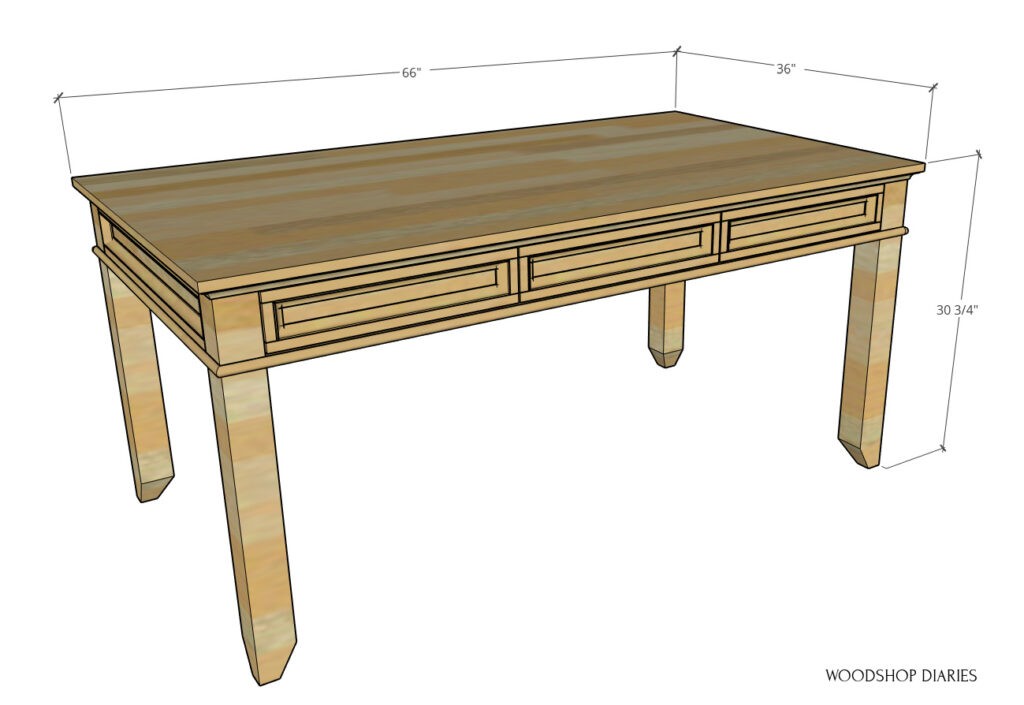
I actually built this for my Dad’s office to use when he meets with clients and customers and the large surface will be nice to lay out design ideas and look through portfolios.
.
So if you’re needing something similar for your home or office, I’ll show you how to build one in this post! Check out the video here and the step by step below:
I built this DIY writing desk using birch plywood and pine wood. My parents and I didn’t care to make this more difficult or expensive than it needed to be, so we didn’t mind using cheap wood.
.
However, if you’re not a fan of pine, feel free to use any type of wood you prefer for this.
.
This post contains affiliate links. See policies.
For this DIY Writing Desk, You Will Need:
- (3) 2x4x8 boards
- (2) sheets ¾″ plywood
- (½) sheet ¼″ plywood
- (3) 1x2x8 boards
- ¾″ square dowels (about 16 ft)
- Cove molding
- Half round molding
- Edge banding
- Circular Saw
- Miter Saw
- Drill
- Nail Gun
- Pocket hole jig
- 1 ¼″ pocket hole screws
- Wood Glue
- Table saw (optional)
- (3) pair 16″ drawer slides
Free plans are available below in this blog post in the steps below. Printable copies are available in my store here:
Step 1: Assemble Writing Desk Legs
To get started, I needed to glue up the posts to use for the legs. I laminated two pieces of 2×4 together to make each leg. (You could also use 4x4s instead.)
.
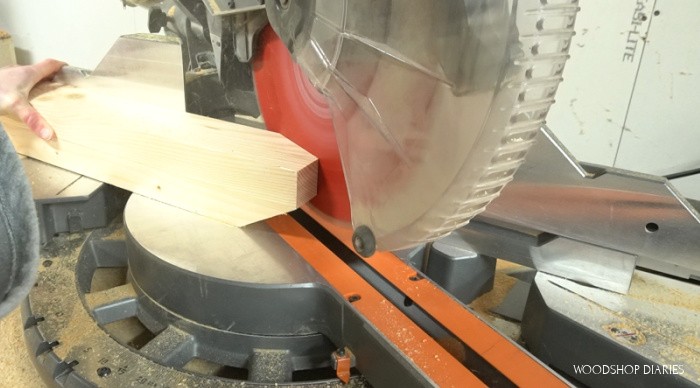
Before gluing them together, I trimmed them down to their rough length (about 32″) on the miter saw and cut about ⅛” off each edge to square them up on the table saw.
.
Check out this post for details on squaring off board edges. That is optional, but produces a cleaner looking finished project.
.
Then, I glued two together for each of the 4 desk legs.
.
Once the glue dried, I trimmed another ⅛” off each edge to clean up the glue joints and also give me four posts 3” x 3” overall.
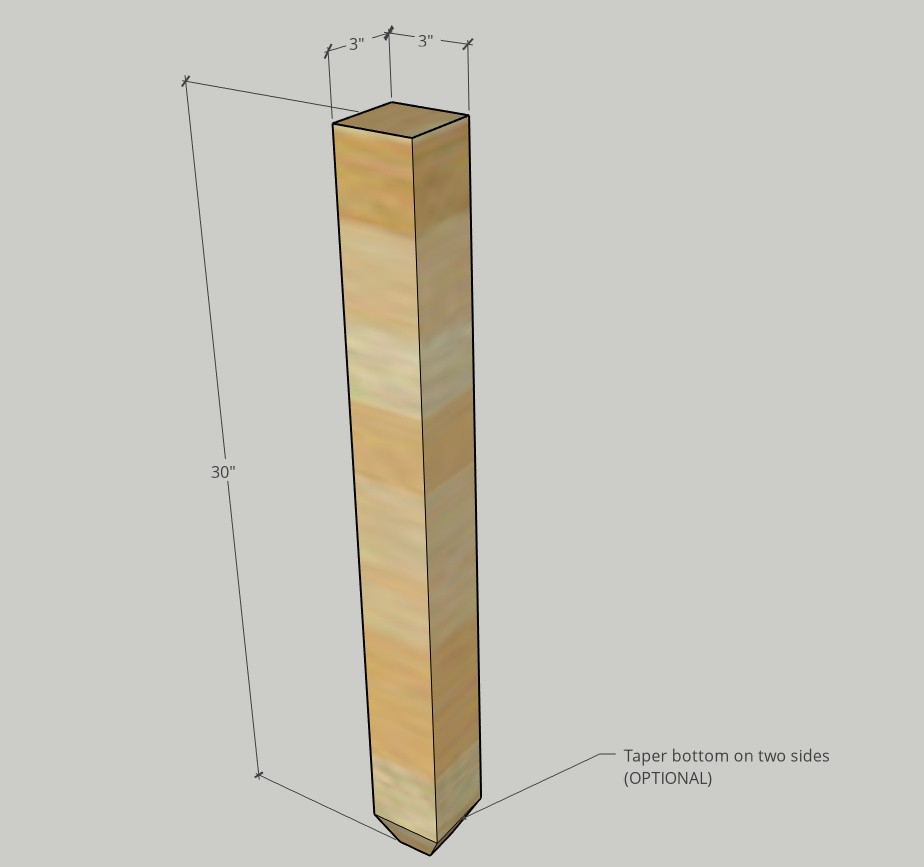
Then, I trimmed these leg posts down to 30” on the miter saw.
.
As an optional step, I added a taper to the ends of the legs. To do this, I adjusted my miter saw miter angle to 60 degrees and cut two sides so they tapered to the middle of the leg like shown here.
I did that for all four posts, then set them to the side.
Step 2: Assemble Writing Desk Frame
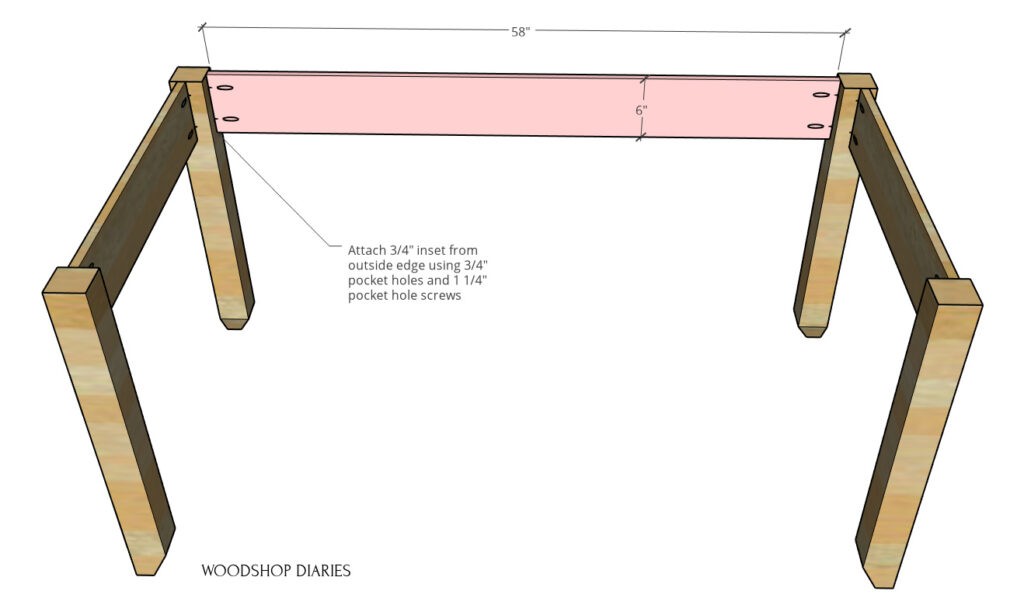
Now that the legs were ready, I needed to get the desk aprons ready to begin assembling the frame of the desk.
.
I used ¾″ plywood ripped to 6” wide for the side and back apron. (FYI–the “aprons” are basically just the panels between the legs.) For more information on cutting plywood, check out this post.
.
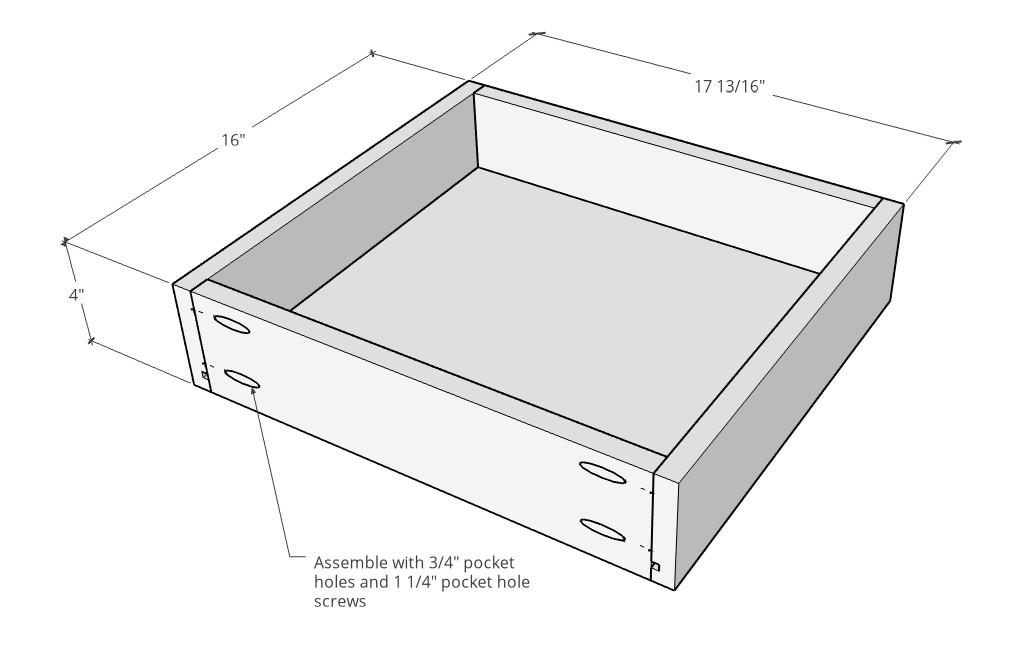
I used my pocket hole jig to drill ¾″ pocket holes into the ends of the aprons and began assembling the two sides using 1 ¼″ pocket hole screws.
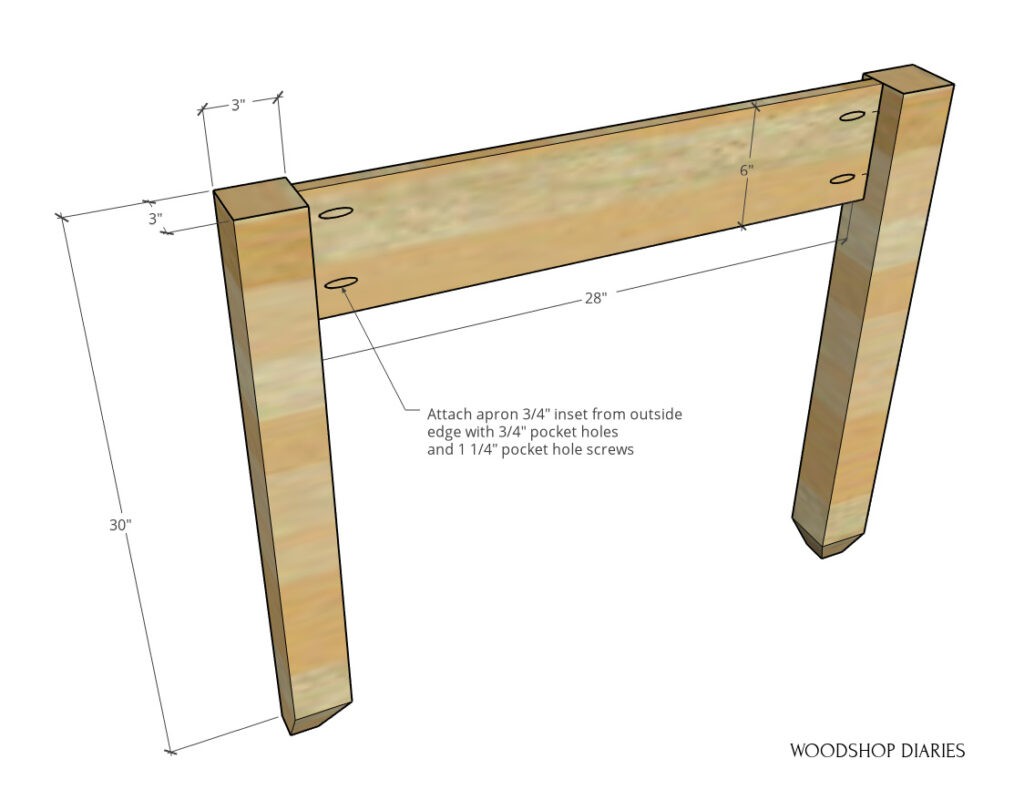
I was adding some trim to the desk in a later step, so I installed the aprons ¾” inset from the outside edge of the legs. That way, when I add the trim later, it’ll be flush to the outside.
.
If you tapered your legs here, it’s important to make sure to face the tapers towards the inside of the desk.
.
Once the two sides were together, I added the back apron the same way—¾” inset from the outside edge of the legs.
Now, since I was adding drawers to the front side, I didn’t install an apron here. Instead, I ripped two strips of ¾” plywood to 3” wide and installed with pocket holes and screws.
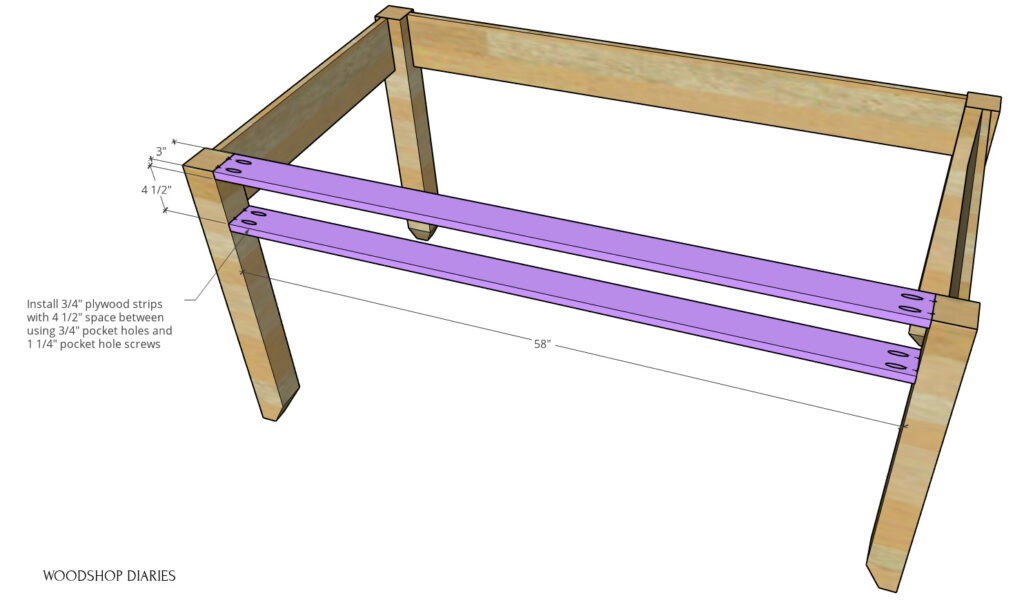
The top piece was added flush to the top of the legs, but the bottom piece should be installed so that there is 4 ½″ gap between them.
.
I edge banded the front edge of these pieces with iron on edge banding as they will be showing in the finished project.
Step 3: Install Drawer Box Bracing into Desk Frame
Once the main frame was together, I began adding the bracing for the drawer slides and drawers.
.
I used ¾″ plywood for all of these bracing pieces (but you could use 1x2s on the left and right pieces if you wanted) along the top and installed them using ¾″ pocket holes and 1 ¼″ pocket hole screws.
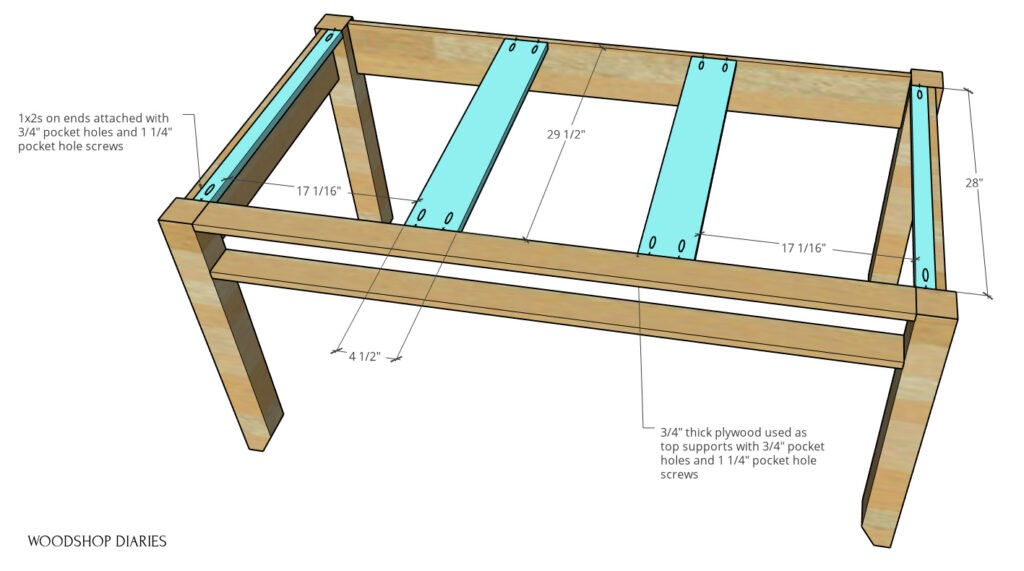
After the top bracing was attached, I added the bracing inside the desk.
.
I used scrap plywood for this part as well—the width of the pieces on the far left and far right aren’t too important here–they just need to be wide enough to mount a drawer slide onto.
.
I used pocket holes and screws to attach these two braces so they are mounted flush to the inside of the legs like shown here.
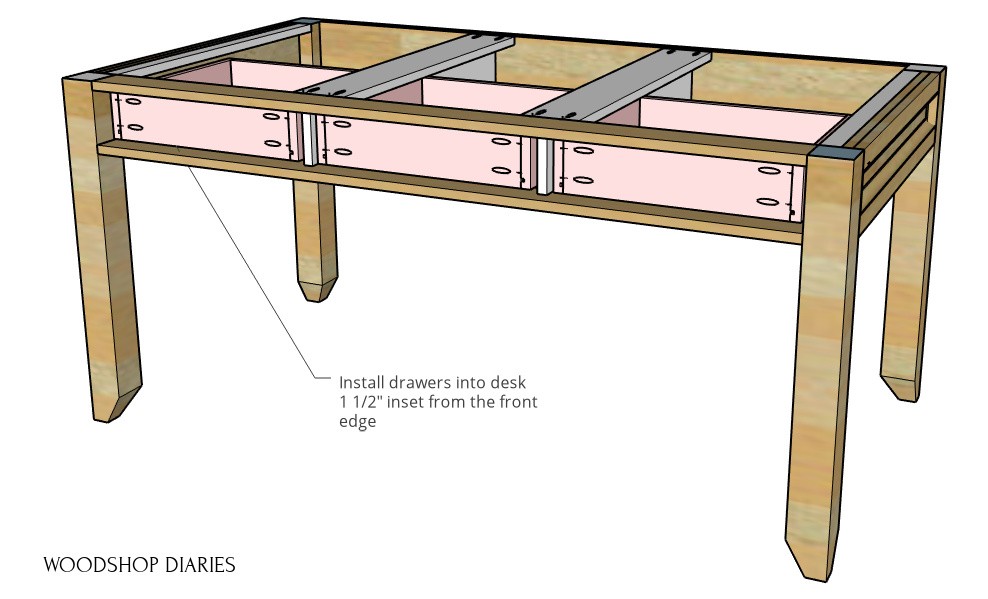
But the middle two pieces do need to be ripped to the exact width that the front pieces are apart—in this case, it’s 4 ½”.
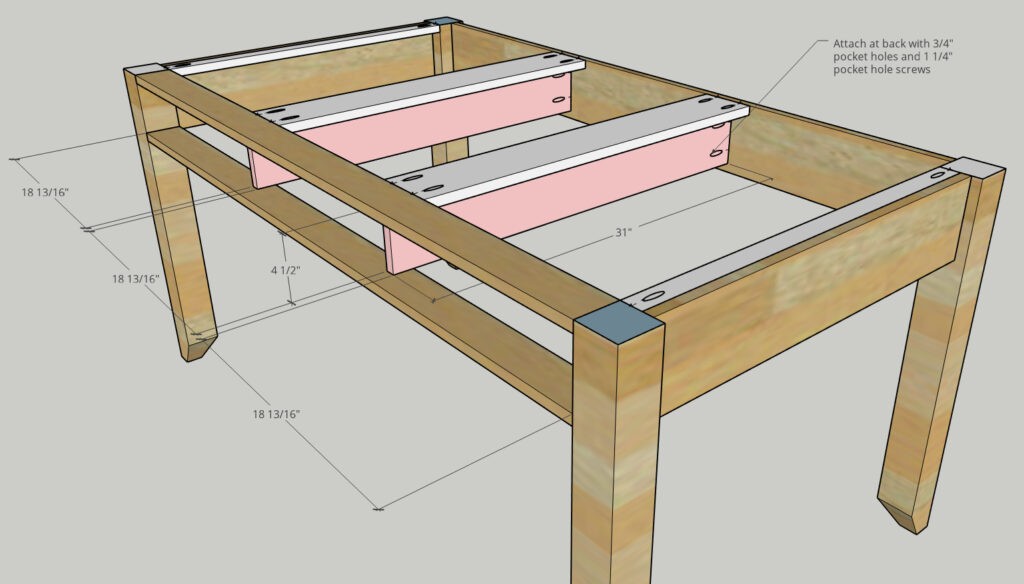
I evenly spaced the two pieces in the middle and attached the back side to the back apron. The front of these pieces should be 1 ½” inset from the front edge of the frame.
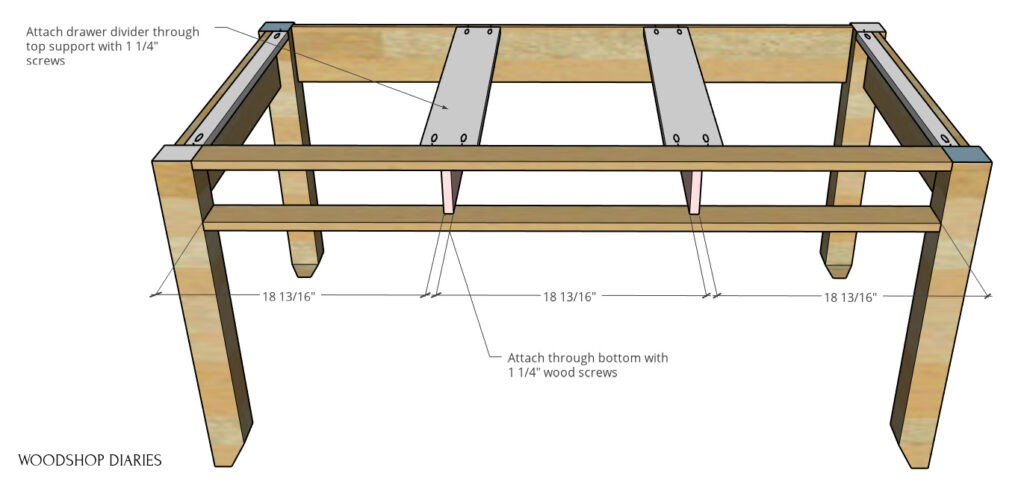
Once I ensured they were evenly spaced from the back to the front, I clamped in place and used some wood screws to secure the front to the frame pieces and added a couple along the top as well.
Step 4: Add Drawer Slides and Drawers to Desk
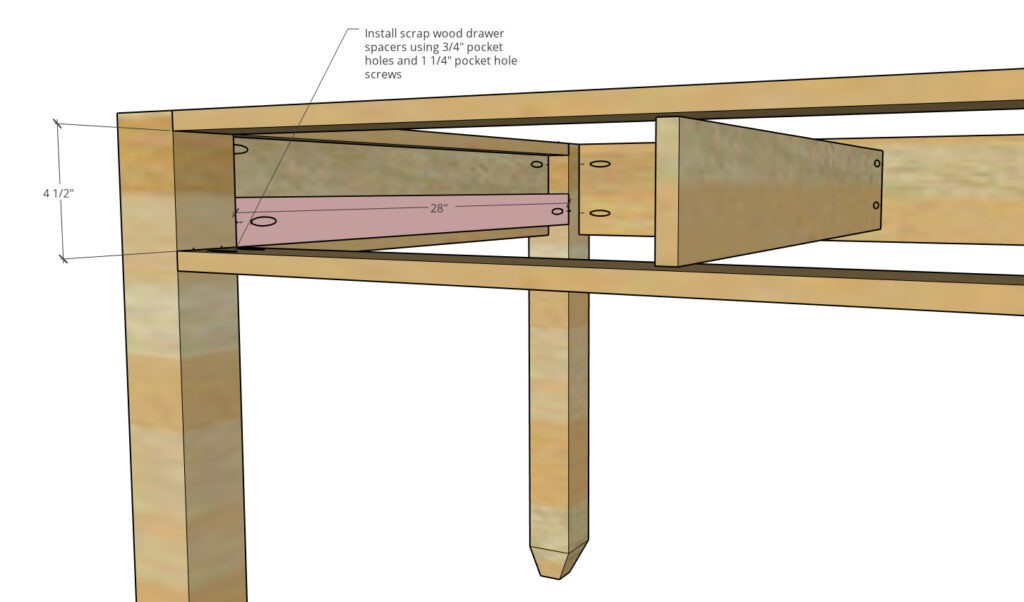
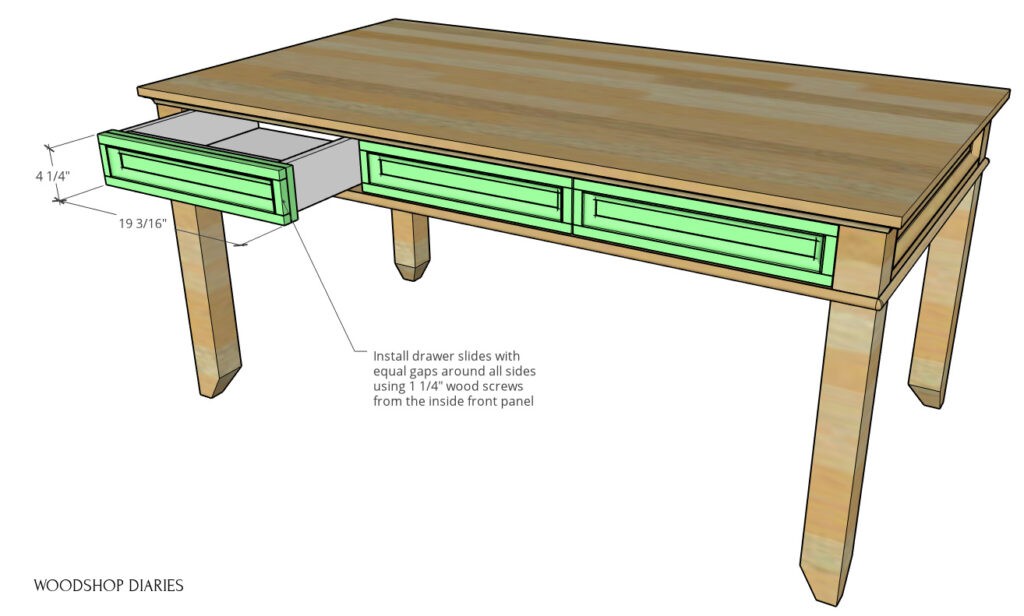
Now that the bracing is in place, it’s time to add the slides. I installed 3 pair of 16” ball bearing drawer slides onto these braces keeping them 1 ½” inset from the front edge of the desk.
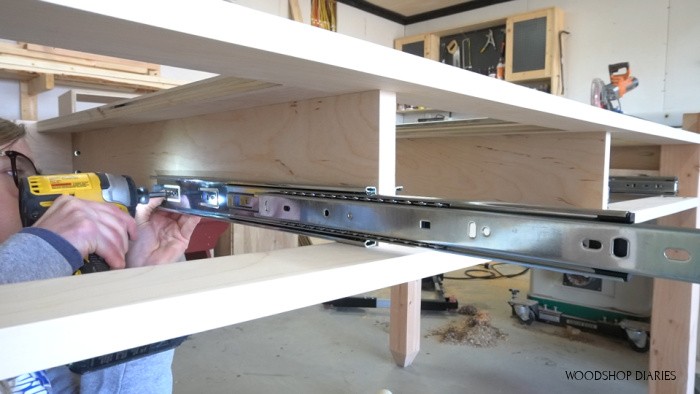
If you’re interested in learning more about building drawers and installing slides, I’ve got a super detailed guide I will link here.
.
Once the slides were in, it was time to build and install the boxes.
.
I went to my scrap plywood pile and dug out some pieces to use for the drawers. I ripped them down to about 4” wide, cut a dado along the bottom, trimmed them to length, and cut some ¼” plywood bottoms to fit inside.
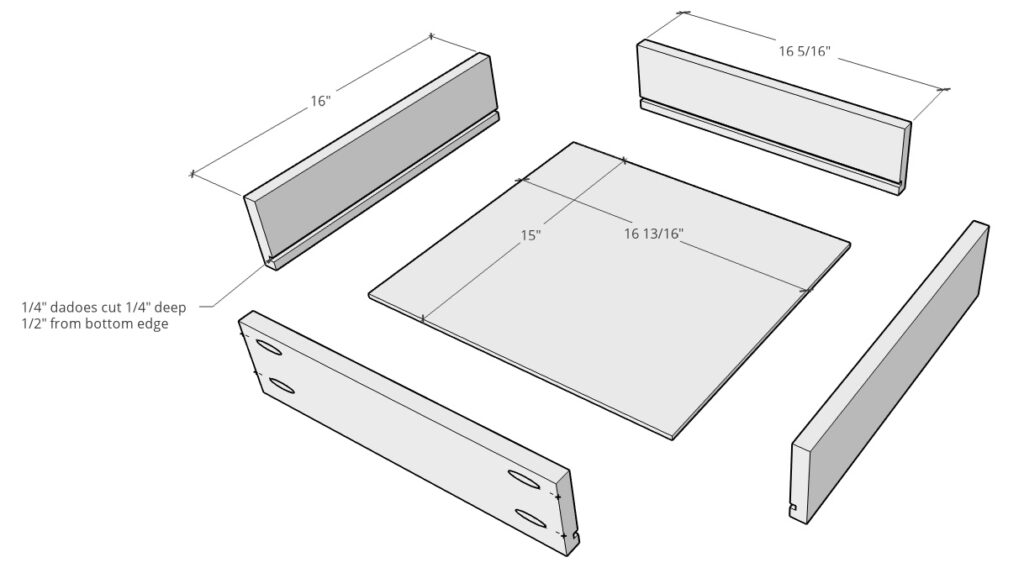
Then, I assembled the boxes using pocket holes and screws.
Then, I installed them into the desk. Again, for more details on building and installing drawers and drawer slides, check out this post.
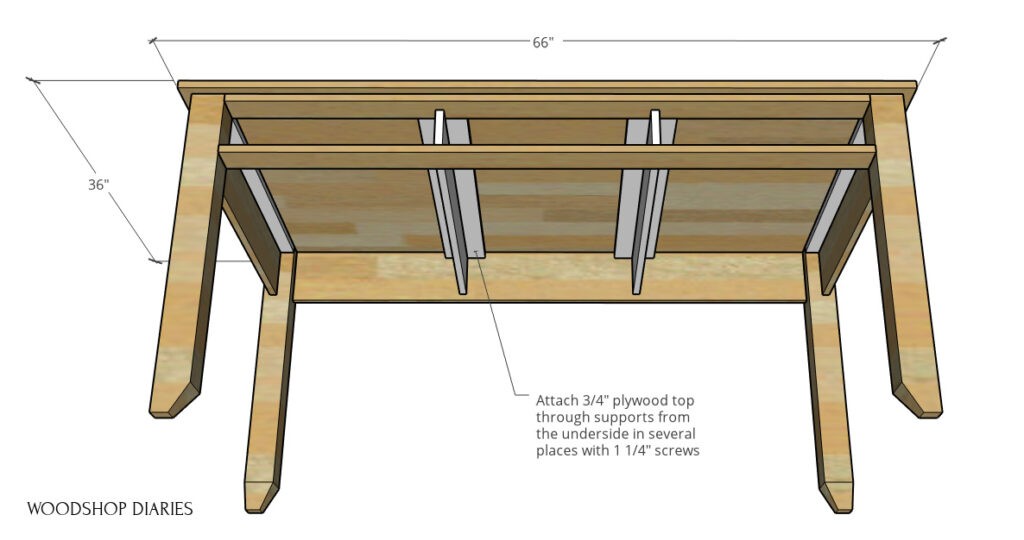
Step 5: Add DIY Writing Desk Top
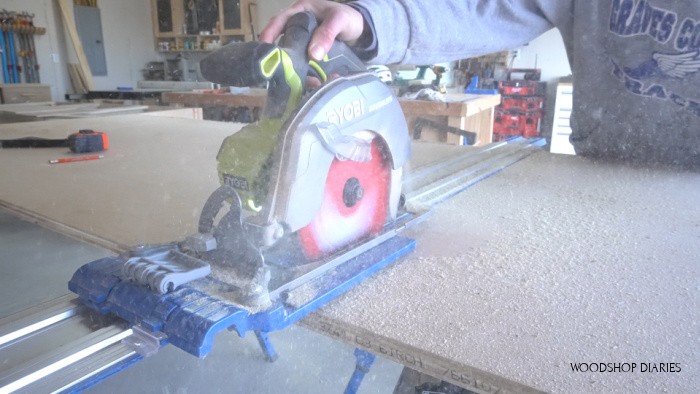
Next, I cut the top from a sheet of ¾” plywood. I used my Kreg cutting guides and circular saw for this, but you could also just clamp a straight edge if you don’t want to use the guides.
.
RELATED: How to Cut Down Plywood Sheets–The Easy Way!
Before attaching the top, I applied iron on edge banding to cover the plywood edges, and sanded it well.
.
I placed the top upside down on the ground and flipped the desk over on top of it.
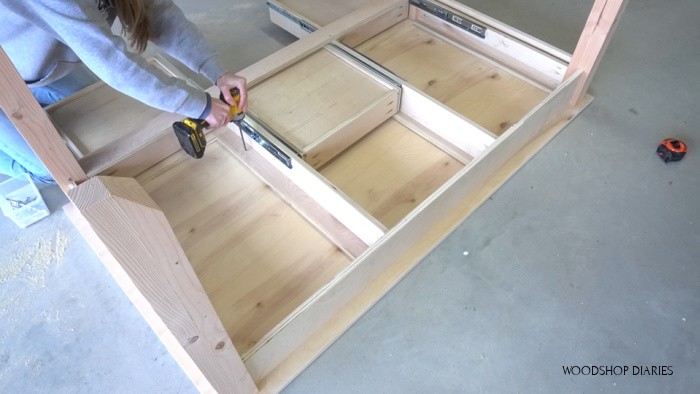
I checked all the corners to make sure I got it good and centered, then used wood screws to secure the top in several places through the top supports.
.
You will need to pull the drawers out a little to access the top support at the front to screw through.
Step 6: Add Trim Detail (OPTIONAL)
Now, all the trim I added here is optional, but I do think it adds a little extra visual interest and makes it look nice.
First, I cut to fit 1×2 boards to glue and nail along the top and bottom edges of the sides and back of the desk (shown in purple below).
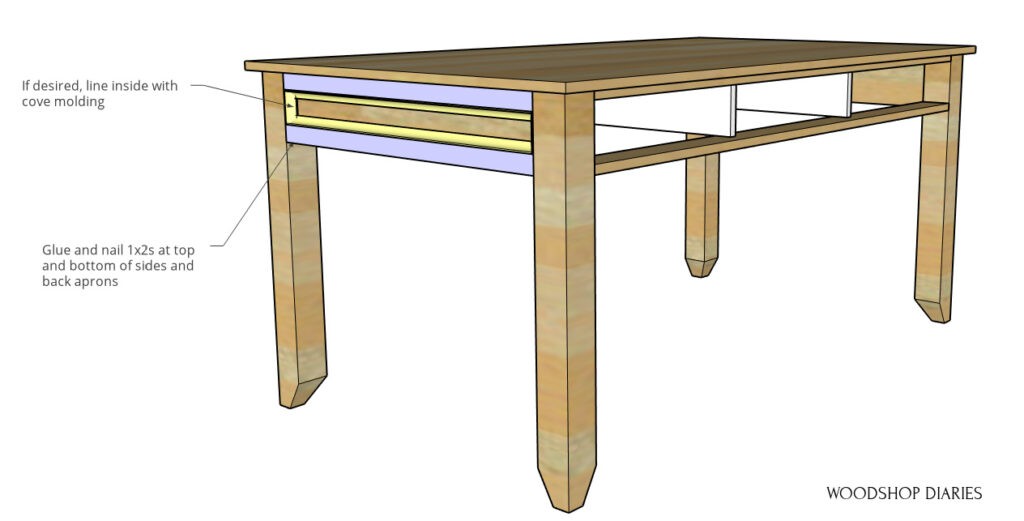
Then, I lined (glued and nailed in place) the inside of these frames with cove molding cut to fit on the sides and back (shown in yellow above).
.
And finally, I added some half round molding around the bottom edge all the way around.
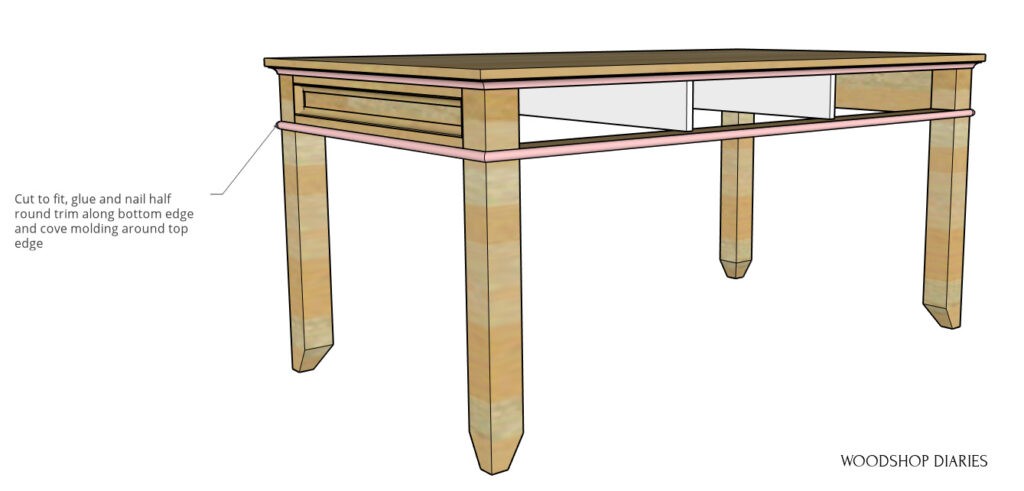
I actually intended on adding more cove molding along the top edge (shown above) where the desk meets the top, but I ran out and didn’t go into town for more haha. So if you wanted to add some this, I think it would look nice.
.
I puttied all the joints and nail holes on this trim and sanded it well.
Step 7: Install Drawer Fronts
And the last part is adding the drawer fronts. Even though the front was drawers and the sides and back were solid, I wanted them to match.
.
So for the drawer fronts, I cut ¾” plywood the size the fronts needed to be and added some trim on top.
.
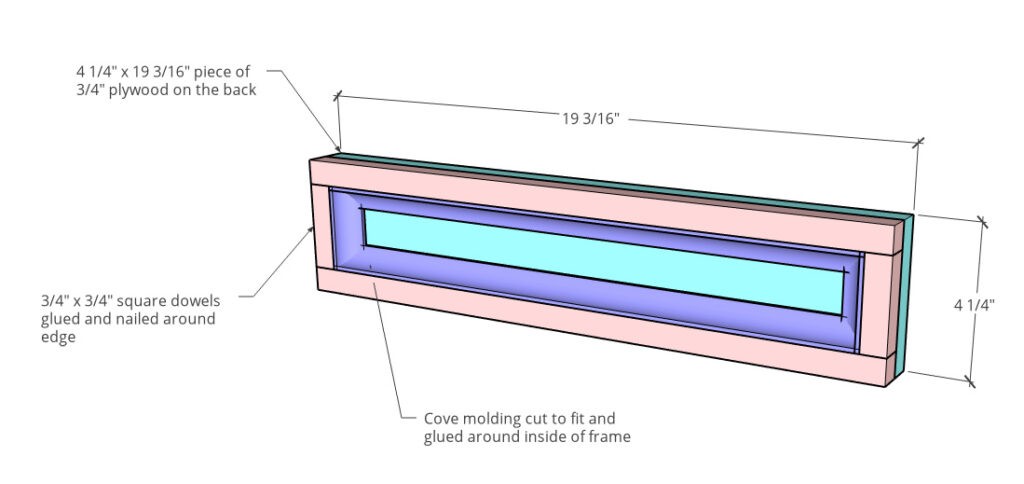
I cut square ¾” square dowels to frame the edges and glued and nailed them on top. Then, just like with the sides and back of the desk, I lined the inside with cove molding. Below you can see the blue back piece is the plywood, the pink is the ¾″ square dowels, and the purple is cove molding.
Then, I spaced them out on each drawer with ⅛” gap around the edges and screwed them in place with wood screws from the inside of each drawer.
To finish it off, I gave it a few coats of clear poly (I used Minwax Helmsman Water Based in Semi Gloss) and some simple black handles.
.
I actually had wanted to paint this DIY writing desk since the wood colors didn’t match exactly, but my mom and dad really wanted to leave it natural…and the customer is always right haha.
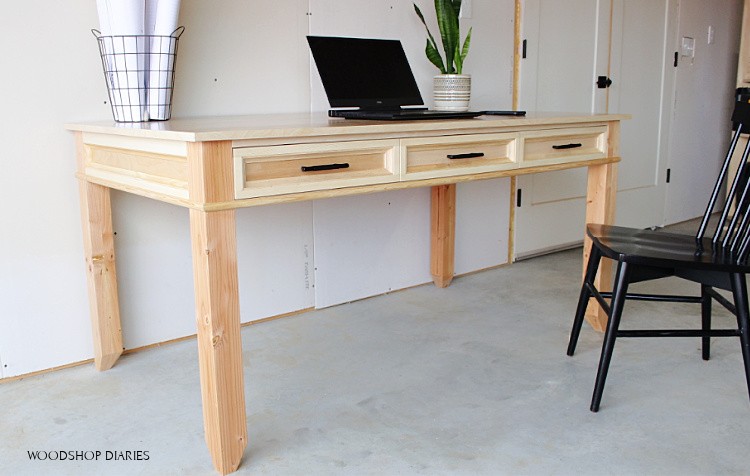
I do like the light colored wood, but I wish I had picked 2x4s that were a little less…pink. Oh well…I can always paint it later if they change their mind 🙂
.
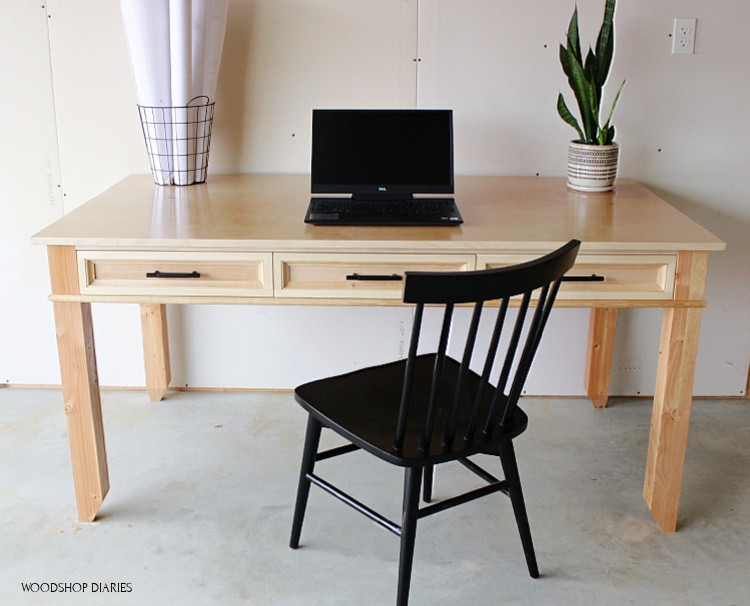
I’m really happy with how this project turned out and think it would make a nice desk, but also a nice craft table, or you could even put some casters on it and make a rolling kitchen island as well.
If you’re interested in building your own DIY writing desk, be sure to check out the YouTube Video!
.
And if you enjoyed this project, I’d love if you’d pin it for later and subscribe to my newsletter below so you don’t miss out on the projects to come.
Until next time, friends, happy building!