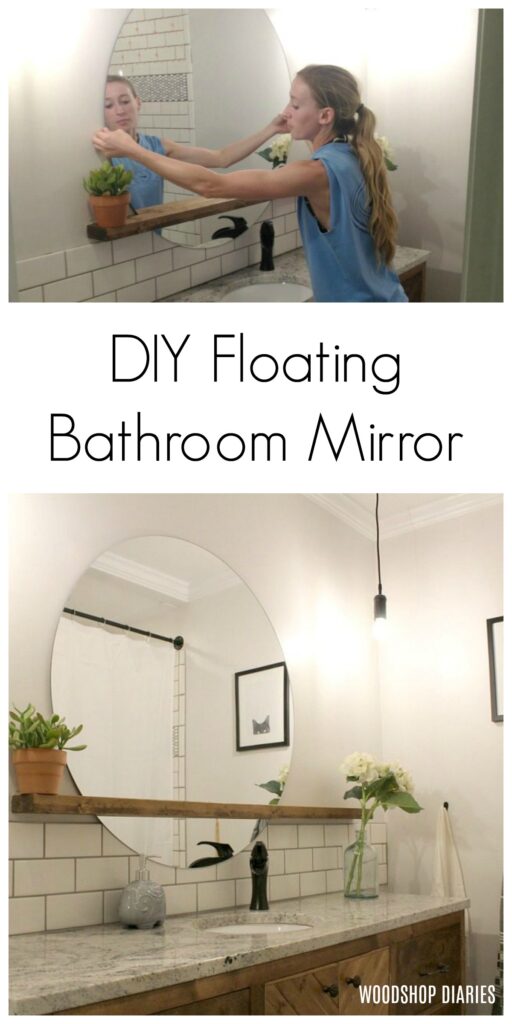
This DIY Floating Mirror is brought to you by my own personal cheapness and laziness.
 .
.
Yep, you read that correctly. I am confessing to you right now that I am cheap and lazy. Need an explanation? Read on : )
.
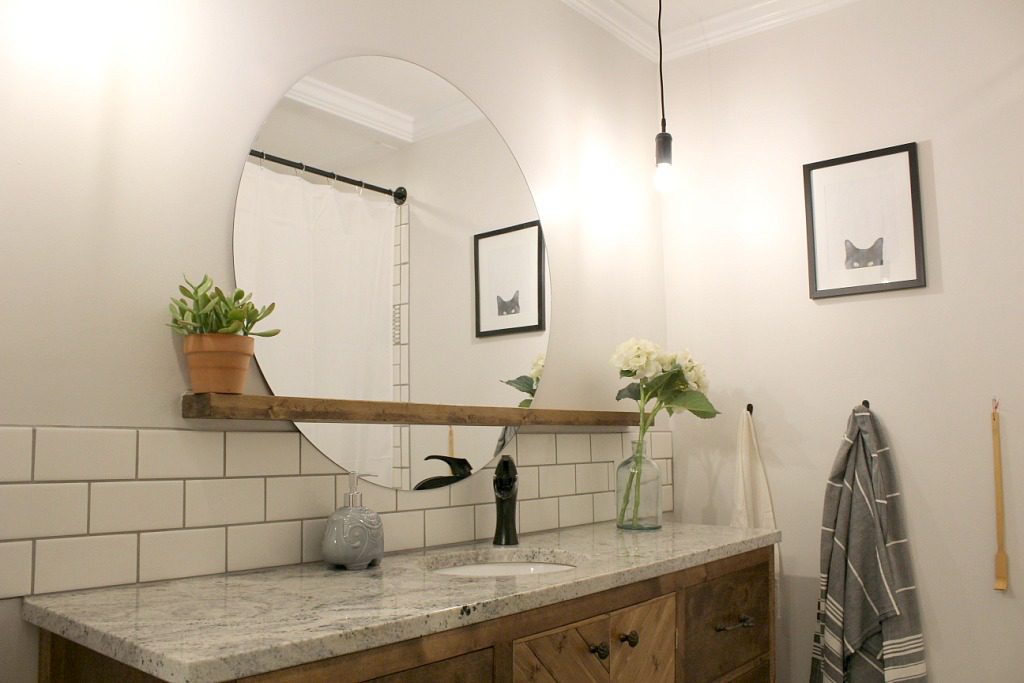
So, if you’ve been following along for a little bit, you know that we are remodeling our bathroom. Well, this bathroom needed a big new mirror because the old one was TINY. But…two things caused me some issues…Dilemma #1: It needs a frame…or not…but it needs SOMETHING…or not… Dilemma #2: I’m obviously VERY indecisive.
.
Originally, the mirror was going to be framed. I wanted a big round wood framed mirror. So I made a frame from some 1x10s that I glued together and cut out with a router.
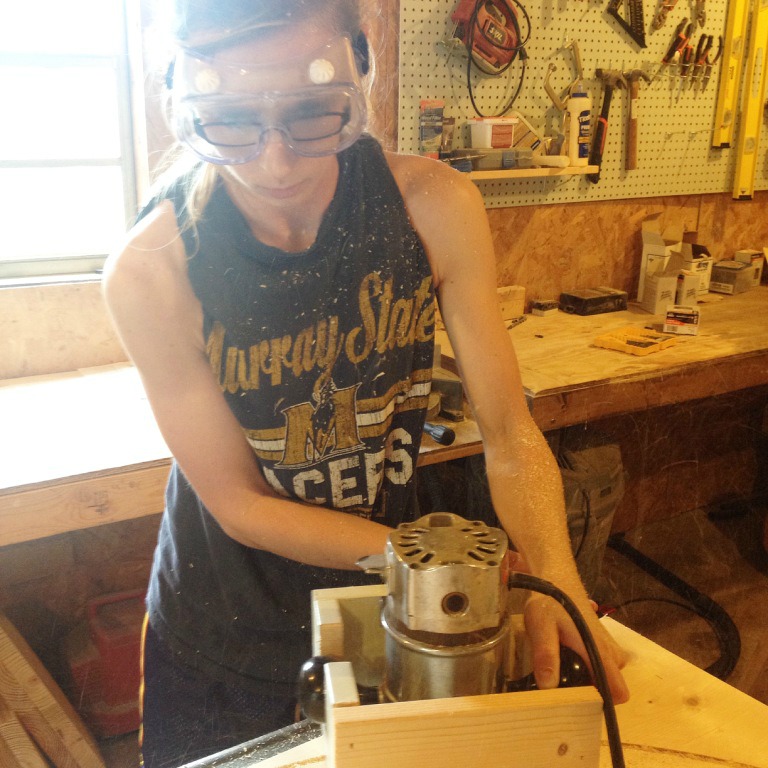
The problem was that I cut it too thin. I didn’t want a big bulky mirror frame (I was thinking minimalist style), but I made the frame only ¾″ thick. It was WAY too flimsy. PS I ended up using the center cut out to make a clock later.
.
So anyway, this thing sat (and is still sitting) in my shop for several weeks while I thought about what to do with it because I was too lazy to do the whole thing over and make it thicker. Side note: I’m really not lazy…I just hate redoing things. But I really am cheap because honestly, I just didn’t want to have to go buy more 1x10s. #truth
.
SO, I did what all normal people do when they are trying to find inspiration. I got on Pinterest. And what did I find but this. THIS. IS. IT. Not only is it amazingly out of the ordinary (which is totally my style), but it’s the easiest thing to make that I’ve ever seen in my life! And I won’t have to buy any lumber because I’ve already got a 2×4 in the shop for the shelf! So let me show you how I made it 🙂
.
This post contains affiliate links. If you purchase from these links, I may receive a small commission at no extra cost to you. Thank you for supporting this site so I can continue to provide free content. Please see disclosure policy for more details.
So here’s what I needed:
36″ diameter mirror (⅛″ thick)
2×4 board
Table Saw (or router)
.
So, I called up my local glass shop and ordered a 36″ diameter mirror ⅛″ thick. If you’re more of an online shopper, here is one on Amazon, but it’s ¼″ thick. If you go with ¼″ thick instead of ⅛″, you’ll just have to make your slit a little wider. No big deal. More details on that in a minute.
.
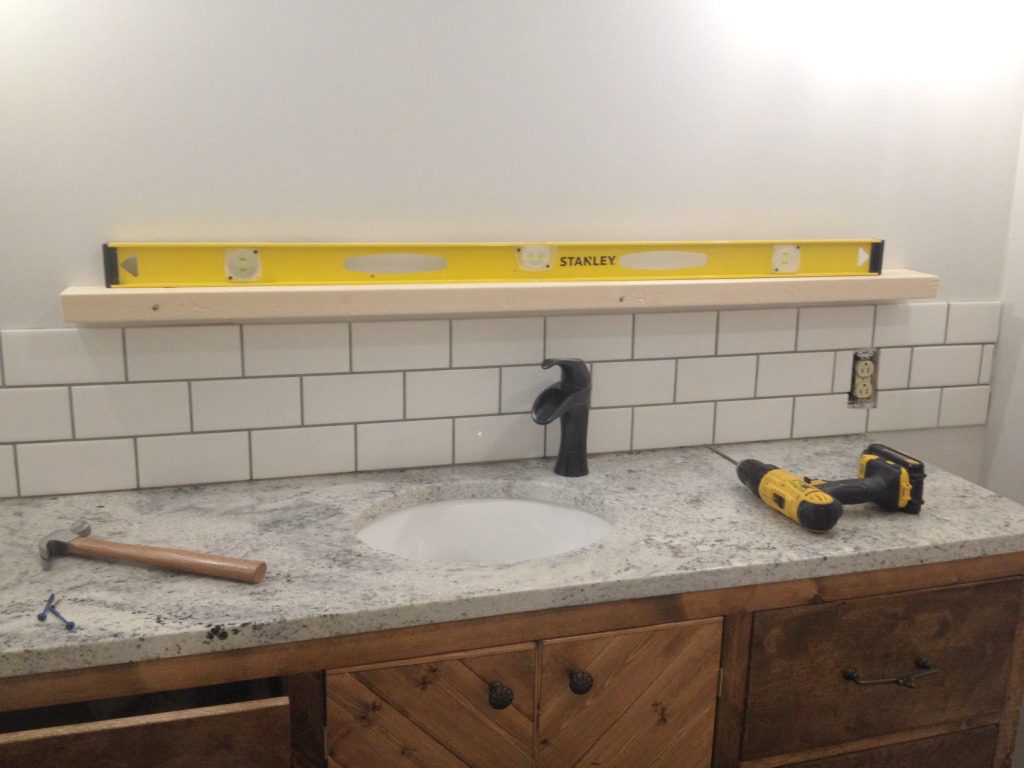
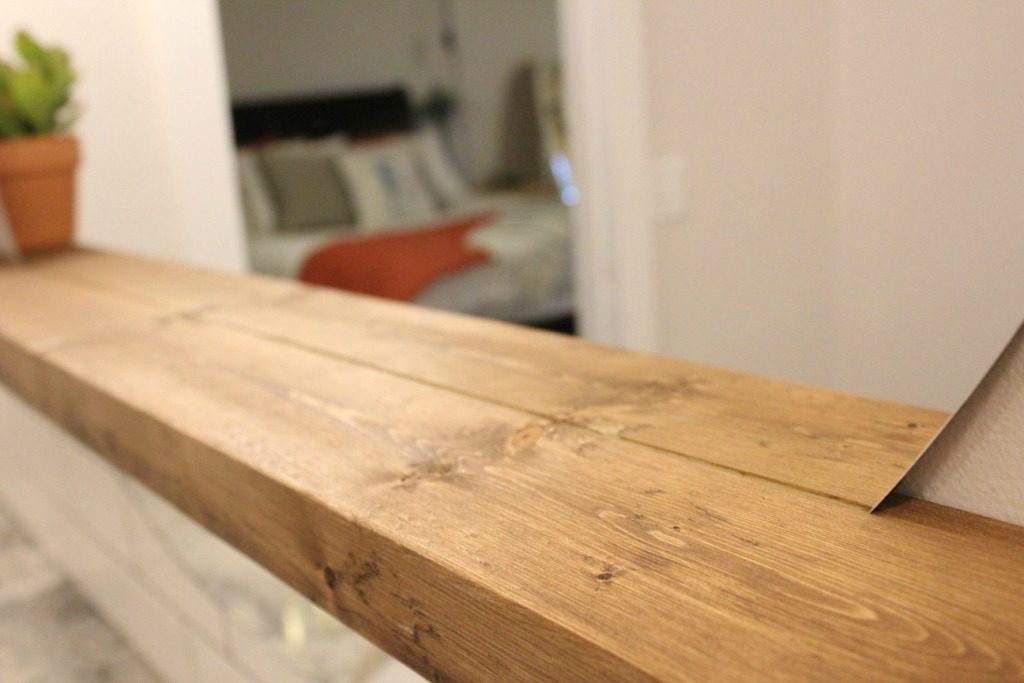
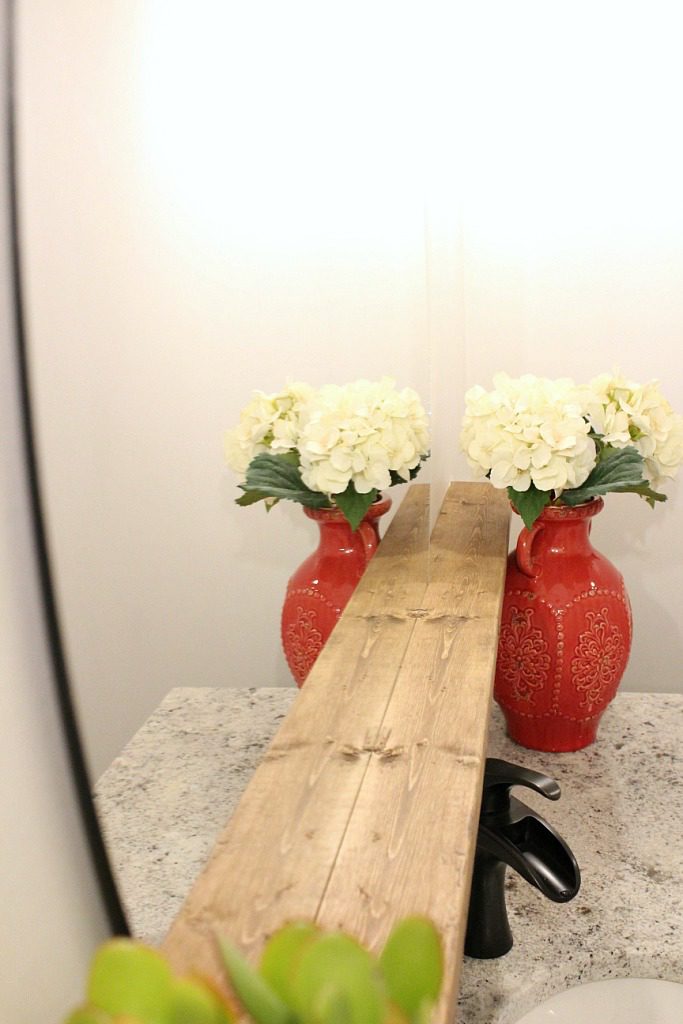
When I got the mirror, I used a tape measure to eyeball the width across the mirror at about where I wanted the shelf to hit it. The width of the mirror at the point I wanted it to hit was about 28″ wide. That left a few inches hanging below the shelf.
.
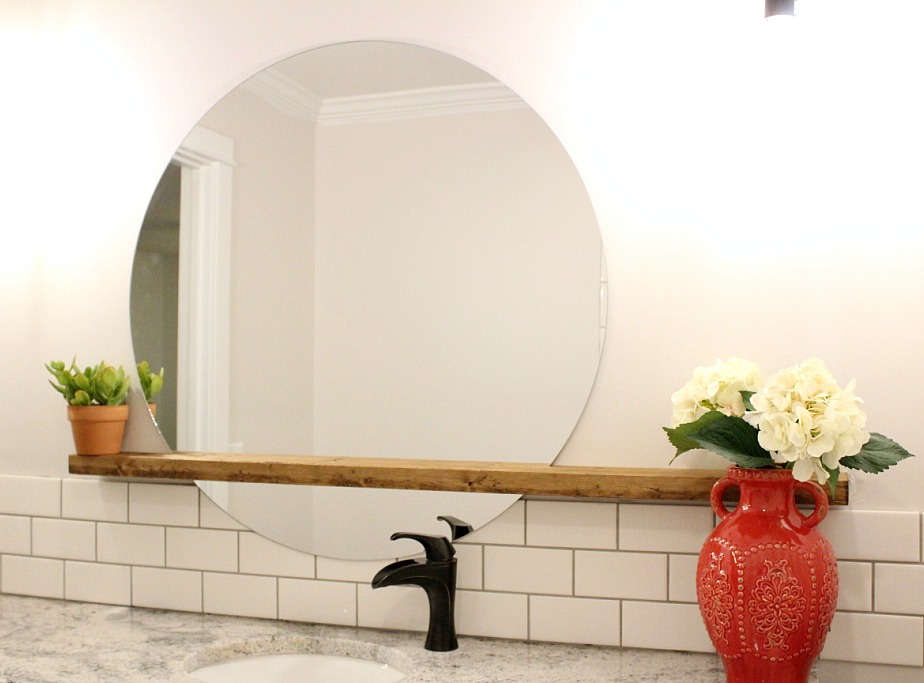
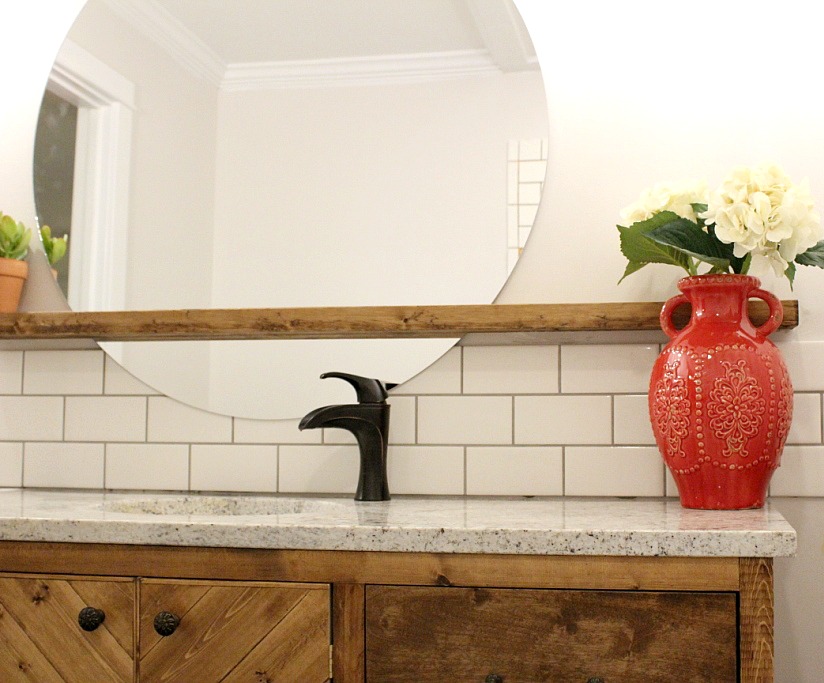
In my bathroom, I marked the studs in the wall along where I wanted the shelf to sit. Then I measured the length my shelf needed to be in order to hit at least three studs (remember you can’t count the studs right behind where the mirror will be). I used a 2×4 for my shelf. I cut it this length. Mine ended up being around 54″ long. I also offset my shelf so the mirror isn’t in the center. This is just personal preference, not necessary.
.
Once I had the shelf (also known as a 2×4) cut to 54″, I held it against the wall where I wanted to attach it. I made sure to line it up with the studs that I marked earlier.
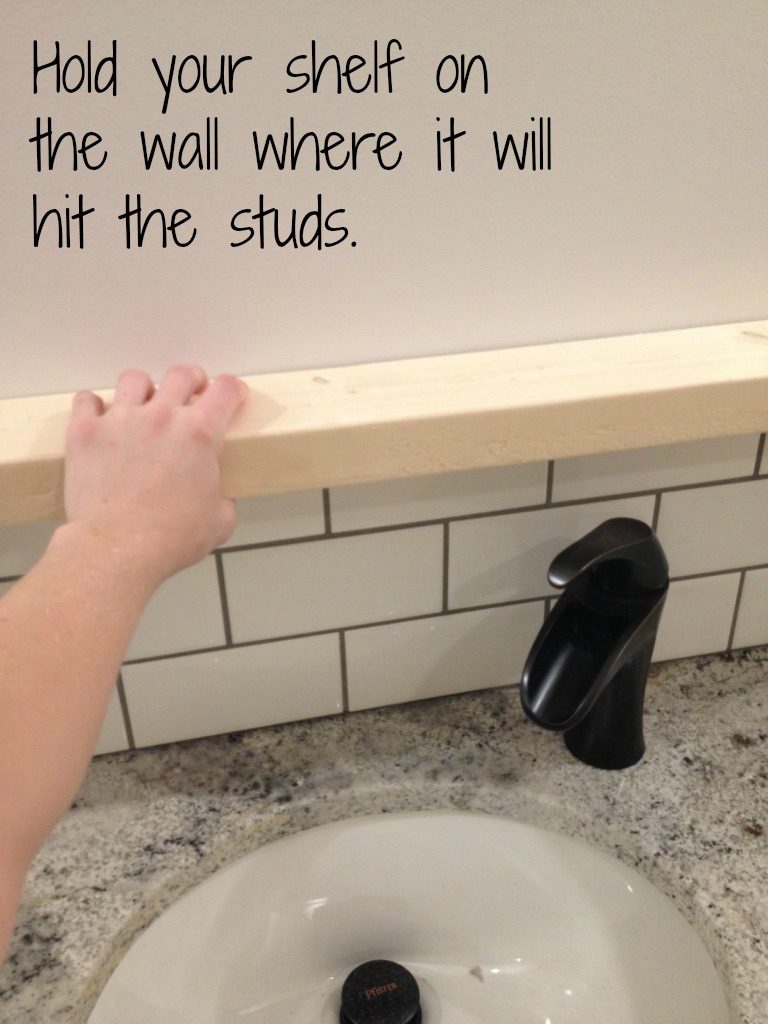
Then, I marked on the bottom of the board where the studs are and where the center of the mirror will be.

Then I took the board down and used a tape measure to mark where the mirror will sit on the board. Remember, my mirror was 28″ wide where I wanted it to sit on the shelf. So, I centered 14″ on my tape measure with the mark for the center of the mirror and drew a line at 0 and 28″.
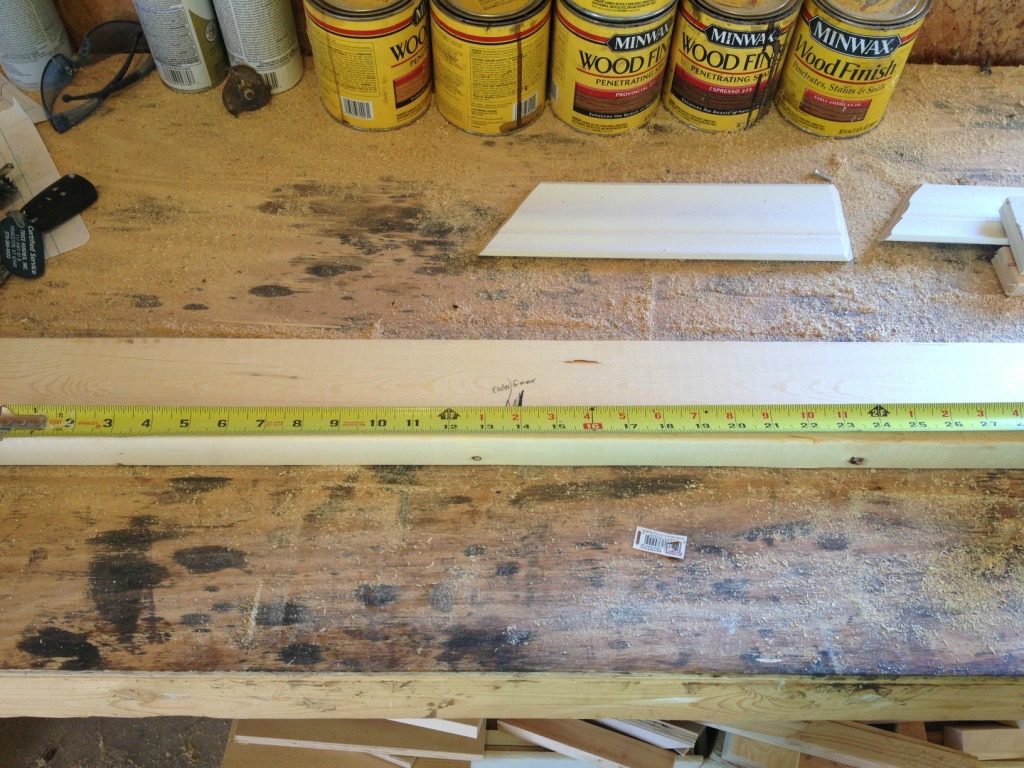
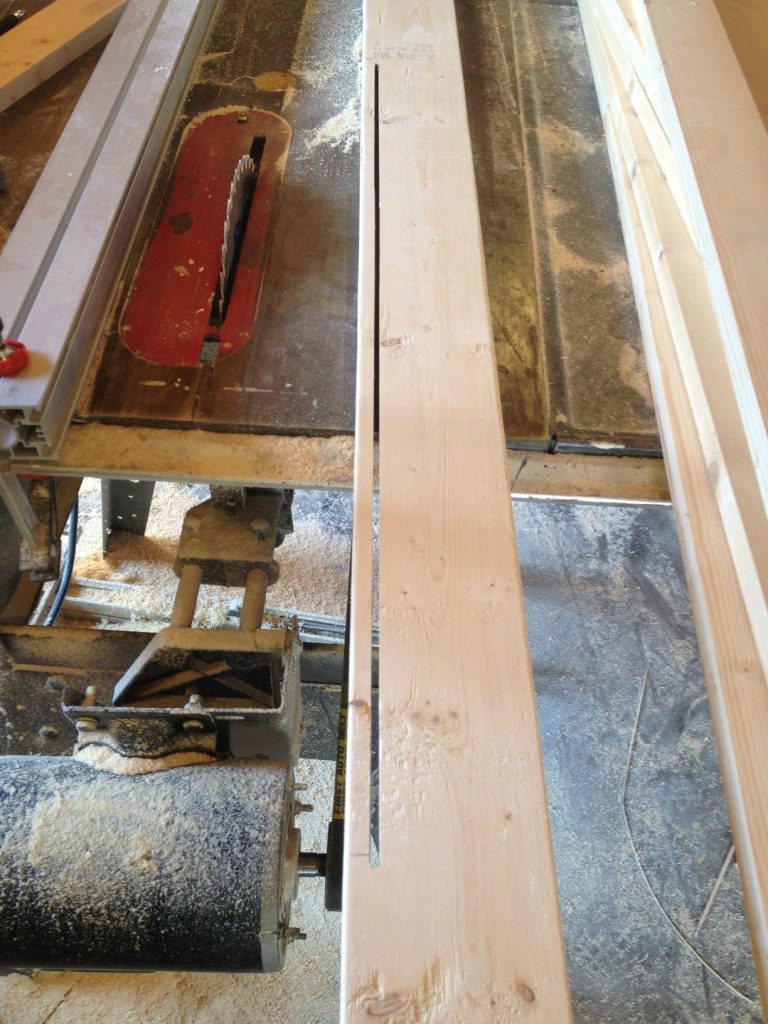
I flipped the board back over and marked the same lines on the top side. Then I cut the slit using the table saw. (You could use a router for this if you don’t have/want to use a table saw.) I first set my rip fence about 3″ from the blade.
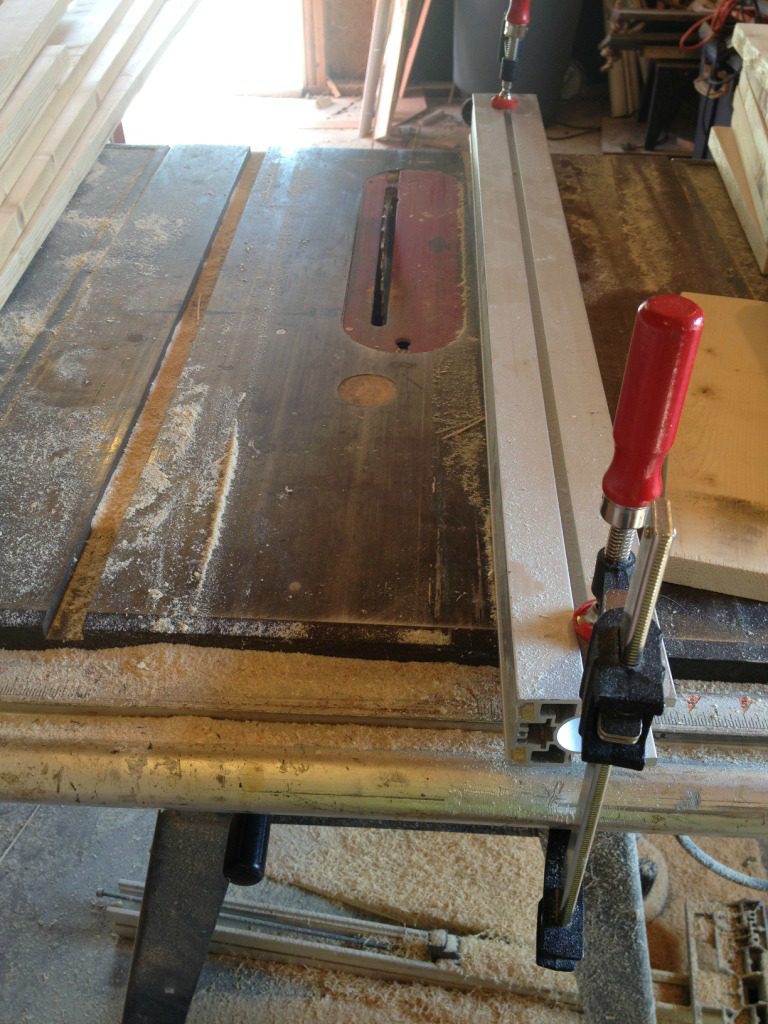
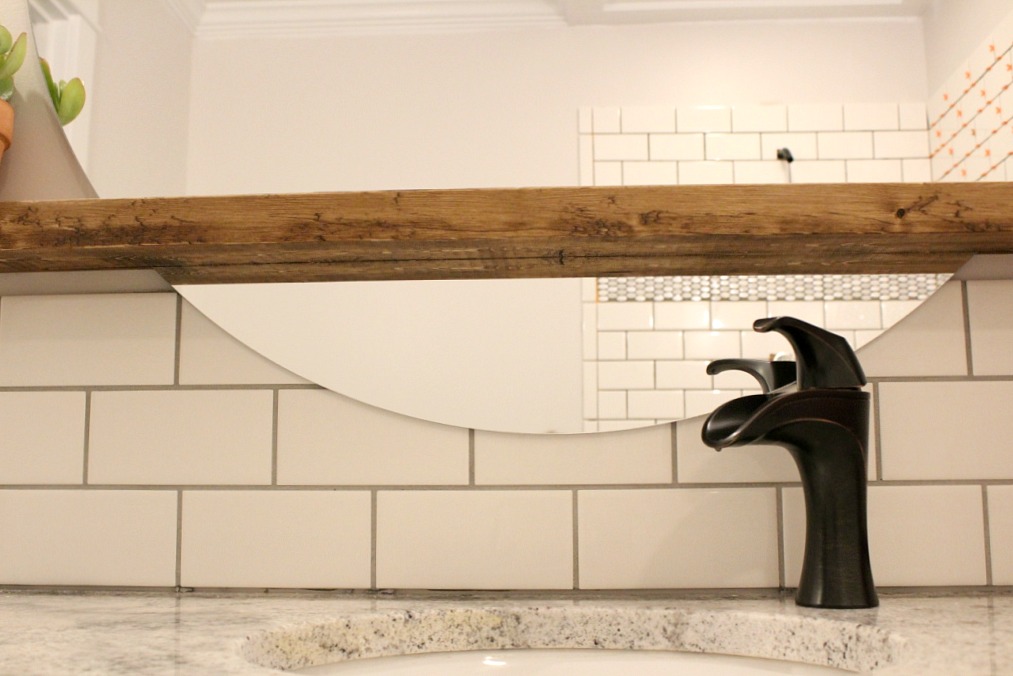
SLOWLY AND CAREFULLY, I lowered the 2×4 board onto the blade (top side up) between the two lines that I just drew. I ran the board through until the blade had cut all the way between the two lines. Then I adjusted my rip fence 1/16″ closer to the blade and did the same thing again. Then I had a slit in my 2×4 a little over ⅛″ thick all the way between the two lines. If you use a thicker mirror, just keep adjusting the fence and cutting until your slit is wide enough to accommodate your mirror.
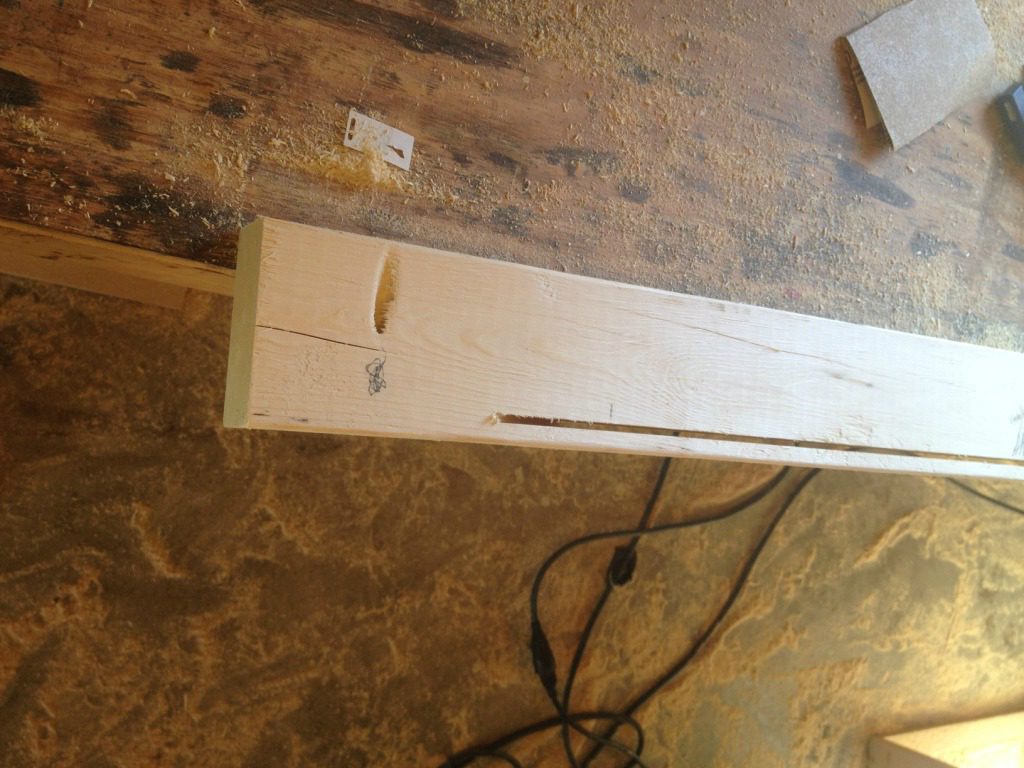
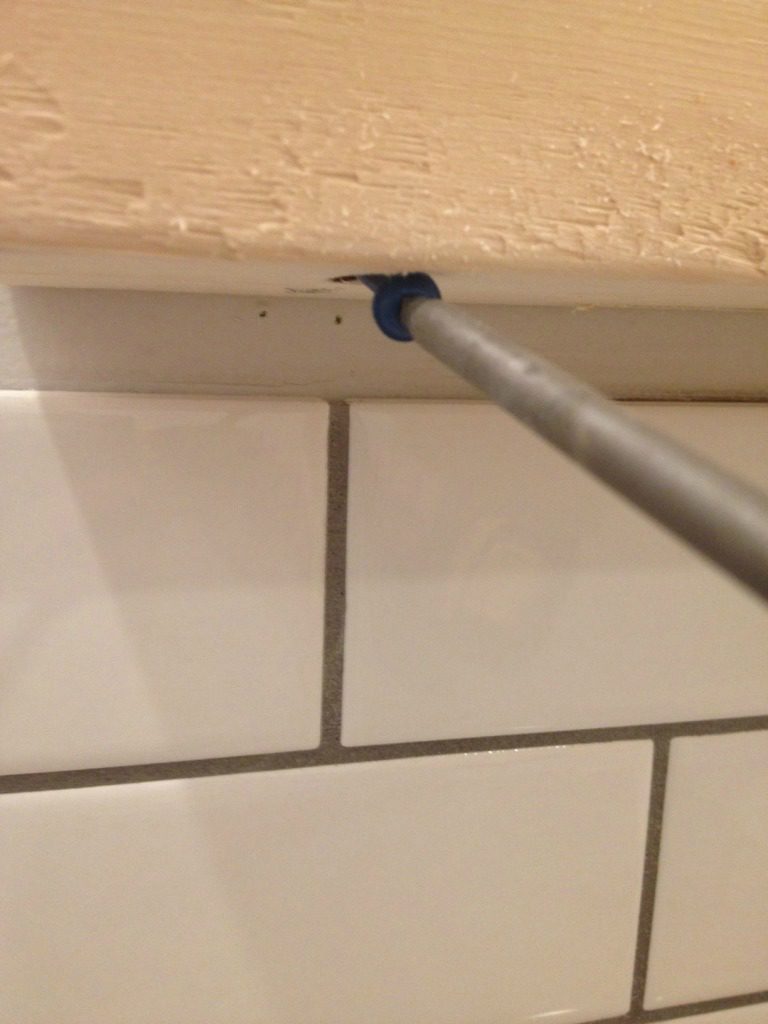
Then I drilled 1 ½″ pocket holes using my Kreg Jig on the lines that I marked where the studs were. I made sure the holes were facing the BACK side of the board so I can screw into the wall.
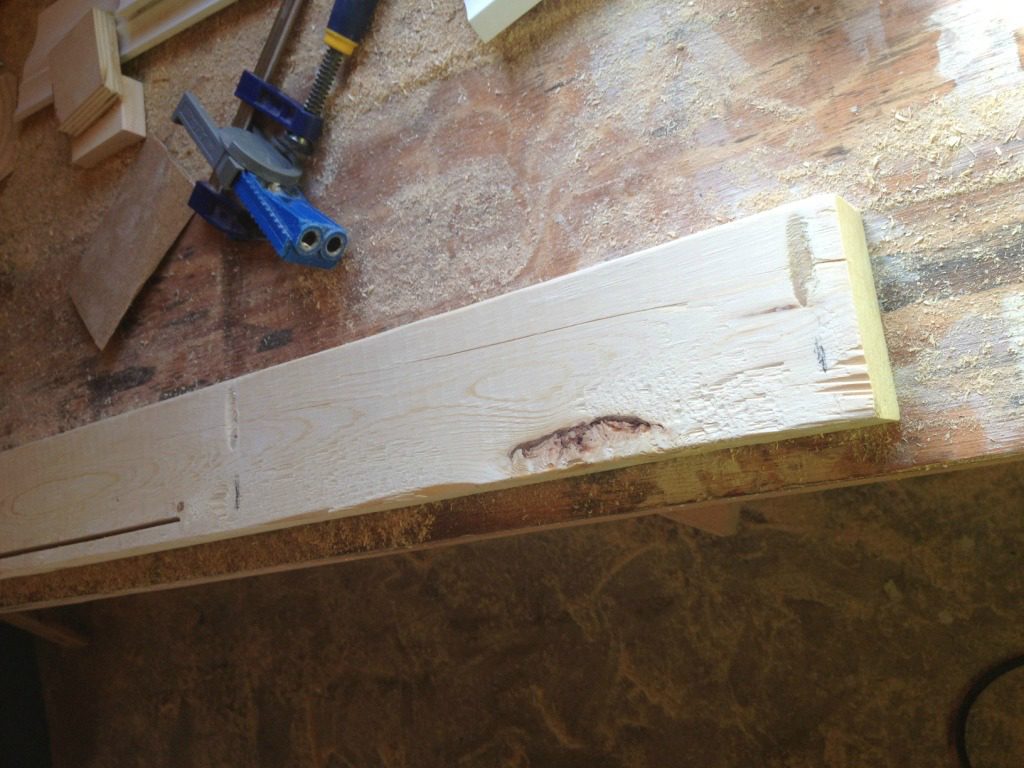
Here is where you should sand and stain/paint your board. But, of course, I am too impatient and I hung it first and stained it later. To hang the board, use 2 ½″ pocket hole screws and screw the board into the studs, making sure it is level.
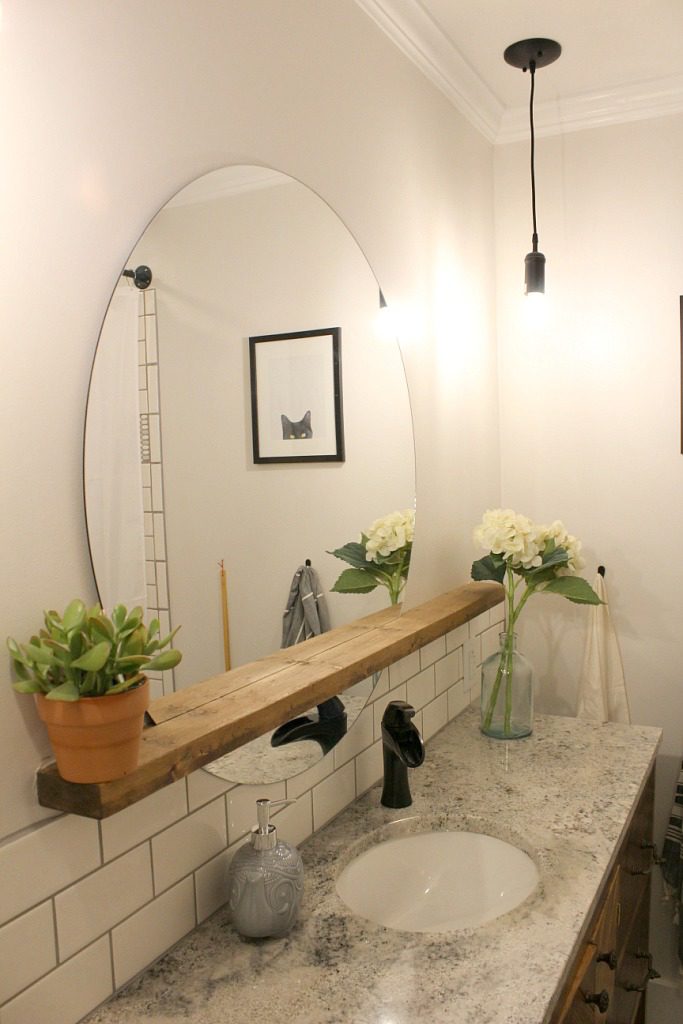
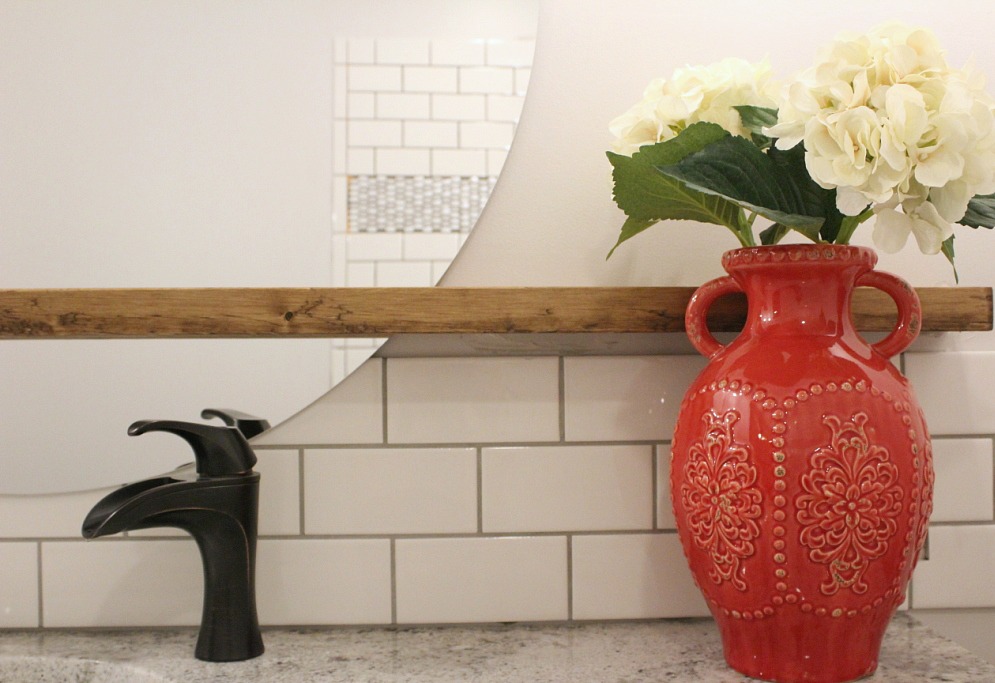
I wiggled the shelf a little to make sure it wasn’t moving any. If it is, you probably missed a stud (or two or three) and you’ll need to find them again and line your pocket holes with them. Luckily mine hit the studs and was very secure to the wall. I removed it later and stained it with Minwax Provincial, but then I simply lowered the mirror into the slot on the board (CAREFULLY).
And that’s it! If the mirror is leaning forward or backward, you may need to get a clip to hold it in place. Too much pressure on the glass (if it is leaning) can cause it to break. Mine set pretty good and was perfectly vertical, so I didn’t secure it any other way. Because I’m so indecisive, I wanted to be able to remove it and do something different in the future if I chose, so I didn’t want to glue it to the wall or anything. This floating shelf idea was genius!
.
Now, please enjoy the bazillion pictures I took of it because I love it so. Also, here is your sneak peek at our newly remodeled bathroom.
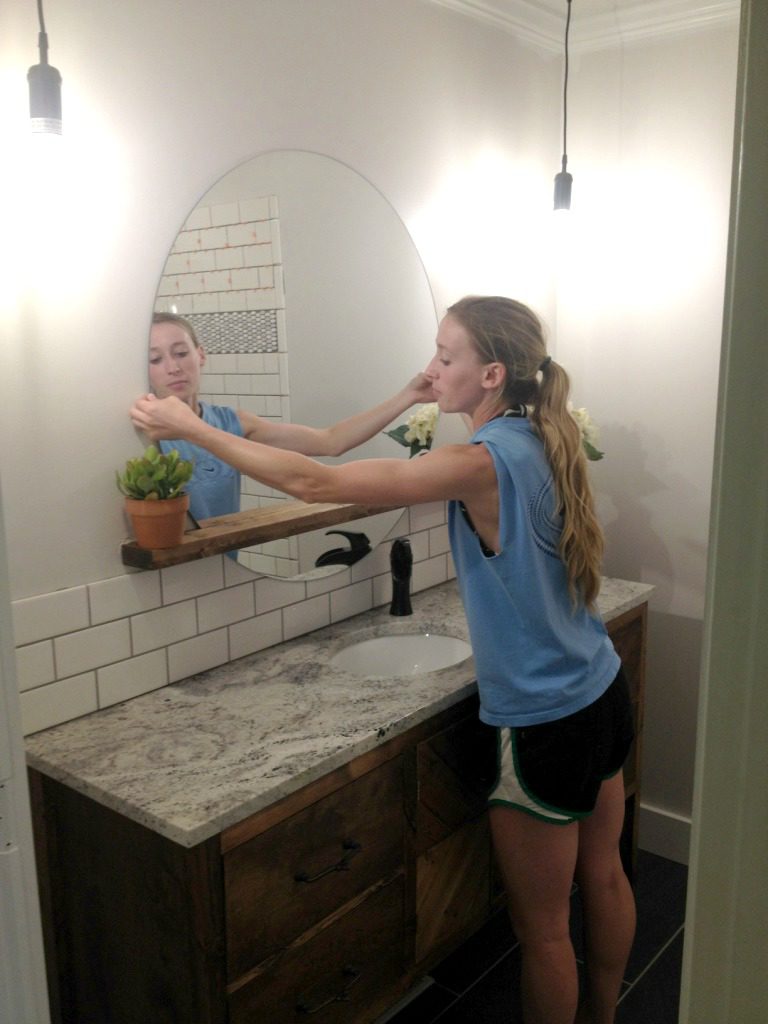
Now, you can’t just take pictures of a mirror without having an obligatory mirror selfie in there somewhere, right?

And you can’t ever just take ONE selfie…
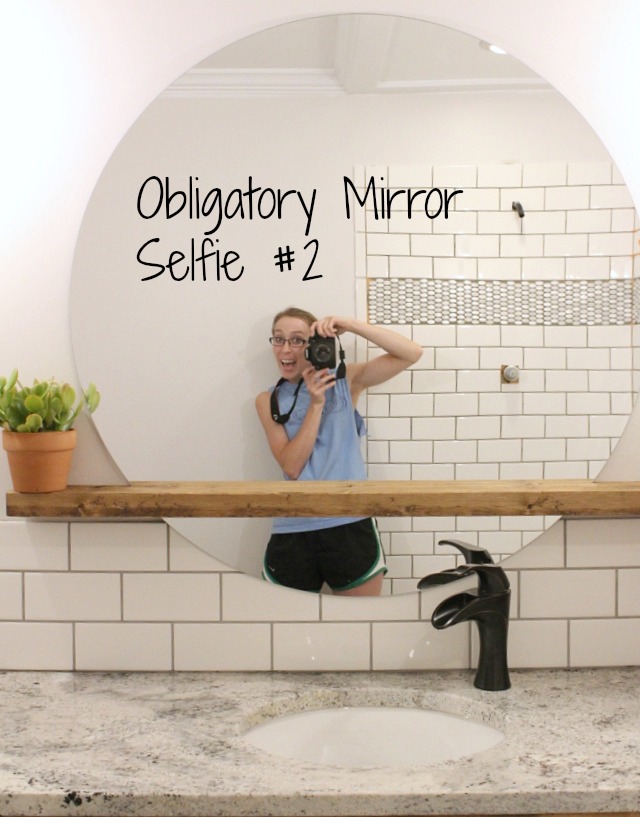
I may have gotten out of control…
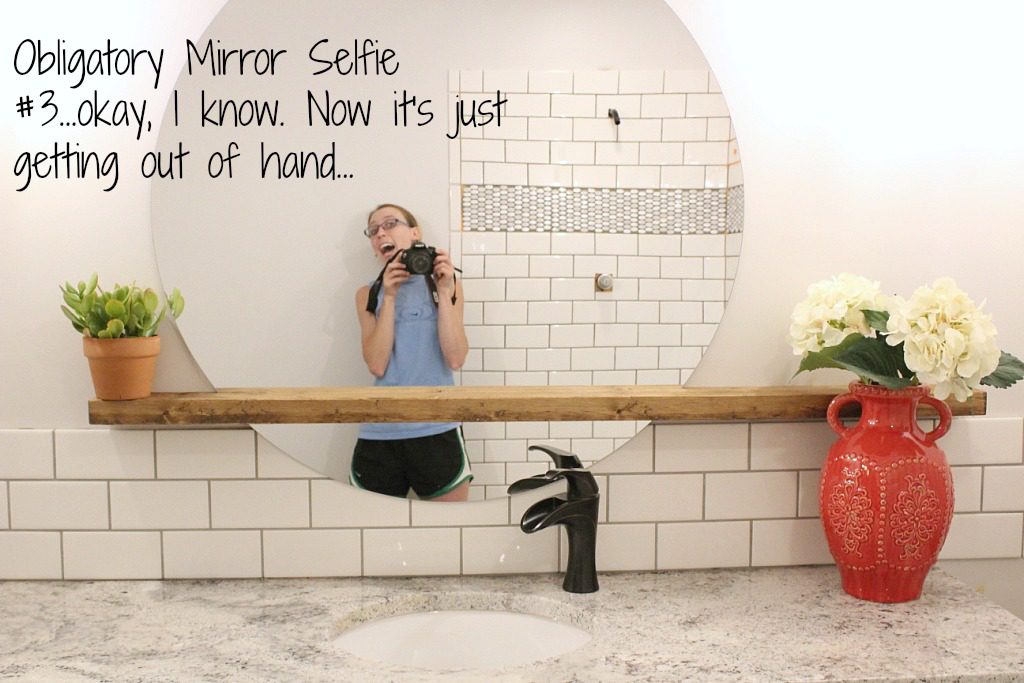
Okay, okay, back to pictures of the mirror…without me in them…
So, tell me what you think? Totally better than trying to make another frame, right? And totally easier…and cheaper. SOOO, sometimes being cheap and lazy pays off : )
.
Oh, and if you were wondering, the vanity was totally DIYed and you can check out the whole how-to here.
.
If you like this project as much as I do, don’t forget to pin for later!
Stay tuned for several more projects coming up shortly! Until then, happy building!
Planning a bathroom remodel and I LOVE this mirror. Any ideas on how to achieve the slit without a table saw?
Thank you! You could use a router to cut the slit or a circular saw as well.
I did this in my guest bath remodel (but not a DIY because I don’t have the carpentry tools you have). Love it!
This is amazingly beautiful and yet simple enough (I hope) for me 🙂 I have been struggling for quite awhile with my second/guest bathroom. I hate the medicine cabinet in there . . . and who needs that in the ‘little’ bathroom anyway??! But I didn’t want to pull it out because it had a nice mirror. Viola!! You just solved this for me – I can have a mirror, and a shelf, and get rid of that ugly, crooked cabinet with the ‘hollywood’ lights above it. THANK YOU!!!!
Thank you! So glad you liked the project!!
This is sooooo gorgeous! What a brilliant idea!! I’m paranoid, tho, as I’ve cut slits in wood before, aaaaand…….. I myself would sure put some kind of decorative (or not) band around that shelf on both sides of the mirror – maybe on the ends. I see, in future, that board splitting clean on out and that beautiful mirror crashing!
I LOVE what you did! Everything about it 🙂
Thank you!!
I love this idea!! I am currently in the process of planning my bathroom renovation and looking for some unique ways to hang a mirror. Thank you for sharing, I may copy / use this for inspiration!!
Thanks so much!
what a genius idea! Love the look and its non-permanent status 🙂
Thank you!
Shara, you are Brilliant !!! : ) You should market this or patent it or what ever you need to do to be able to call it “yours” ! Maybe make some money off it. I found you on hometalk..com and i Pinned, just love your idea. Thanks <3
Thank you so much! If I could figure out how to patent it, I sure would haha. Thanks for pinning! 🙂
Shara,. That has got to be The Best use of wood and mirror I have ever seen.
Keep up the great work, you a true inspiration.
Thank you so much! 🙂
I LOVE you mirror! I wish I had your skills (and tools! Lol!)
Thank you!
I found you through MyLove2Create’s facebook page today. This mirror project is about the best thing ever!!! I’m just about to start a makeover on our hall bathroom and this would look fantastic in it! I’m totally gonna give this a try!
Awesome! So glad you stopped by! Thank you so much! It really is a easy and fun project 🙂 Good luck with your bathroom makeover! If you give the mirror a try, I would love to see your pictures!
What?! Genius is right….Love on fifty different levels!
Thank you so much! 🙂
I’m OBSESSED with it! You did an awesome job, Shara!
Thank you so much Mary!!
Hi, I found you on my Hometalk email, today, l and hunted down your blog to find out about your sink and countertop. Is it custom? Because I’m turning a thrift store dresser into a vanity, and it has a narrow depth, which is what I wanted, but now finding a sink has become the bane of my existence, and I don’t want to just have to resort to buying a vessel sink. Your sink looks small enough to fit, though. Can you give me the details? I’m desperate to finish this! Please & thank you! Your posts are honestly so much fun to read!
Hi Amy! Yes, the countertop is custom. I bought a remnant of granite from a local shop and they cut it the size I needed for my vanity (which was only 18″ deep). The sink was included with the countertop, so I am not sure where it came from, but it is 14″ deep (front to back, not actual “depth”). Before I bought the granite top, I was searching online and found several 14″ sinks, so hopefully you can find some too! I’m sorry, that’s not much help! I wish I knew where the sinks came from, but they just include them in the countertop purchase.
This is about the neatest idea I have ever seen. Honestly, I’m a bit jealous! I can’t do this in a rental. D a m n. And how ingenious to offset it. That is one of the best features. Great work as usual.
Thank you! Sad day you can’t do this in your rental 🙁 maybe you could putty the holes when you left and they’d never notice?? 😉
I think it would be cute to add one or two more half shelves on the wider side. By cutting the same groove on wood. Not plunge cut, but cut to the end of the board. Then side it behind the mirror and mount it the same way. And maybe make the shelves uneven in size.